
7HP-CAPQLED
| ||

Introduction
7inch QLED Quantum Dot Display, Capacitive Touch, 1024 × 600, G+G Toughened Glass Panel, Various Devices & Systems Support.
| More |
Features
- 7-inch QLED quantum dot display, wider color gamut, more pure chroma, and longer lifetime.
- 1024 x 600 hardware resolution, support software resolution (up to 1920 x 1080).
- Toughened glass capacitive touch panel, up to 6H hardness.
- Use with Jetson Nano Developer Kit, Support Ubuntu system.
- Use with Raspberry Pi, supports Raspberry Pi OS, Ubuntu, Kali, and Retropie systems.
- Use with Windows PC, support Windows 11, 10, 8.1, 8, 7, five-points touch.
- Support popular Game Consoles like Xbox360, PS4, and SWITCH.
- Multi-languages OSD menu, for power management, brightness/contrast adjustment, etc.
- It has a 3.5mm audio jack and supports HDMI audio output.
EDID Sequence Parameters
If the system of the main control board can automatically identify the EDID for display, there is no need to set the relevant timing parameters additionally.
Otherwise, you can refer to the following EDID settings:
| Pixel Clock | H Addressable | H Blanking | V Addressable | V Blanking | H Front Porch | H Sync Width | V Front Porch | V Sync Width | H Image Size | V Image Size | H Border | V Border |
|---|---|---|---|---|---|---|---|---|---|---|---|---|
| 50.25 | 1024 | 320 | 600 | 25 | 44 | 88 | 3 | 6 | 154 | 86 | 0 | 0 |
What's ON Board

Anti-Piracy
Since the first-generation Raspberry Pi released, Waveshare has been working on designing, developing, and producing various fantastic touch LCDs for the Pi. Unfortunately, there are quite a few pirated/knock-off products in the market. They're usually some poor copies of our early hardware revisions, and comes with none support service.
To avoid becoming a victim of pirated products, please pay attention to the following features when purchasing:
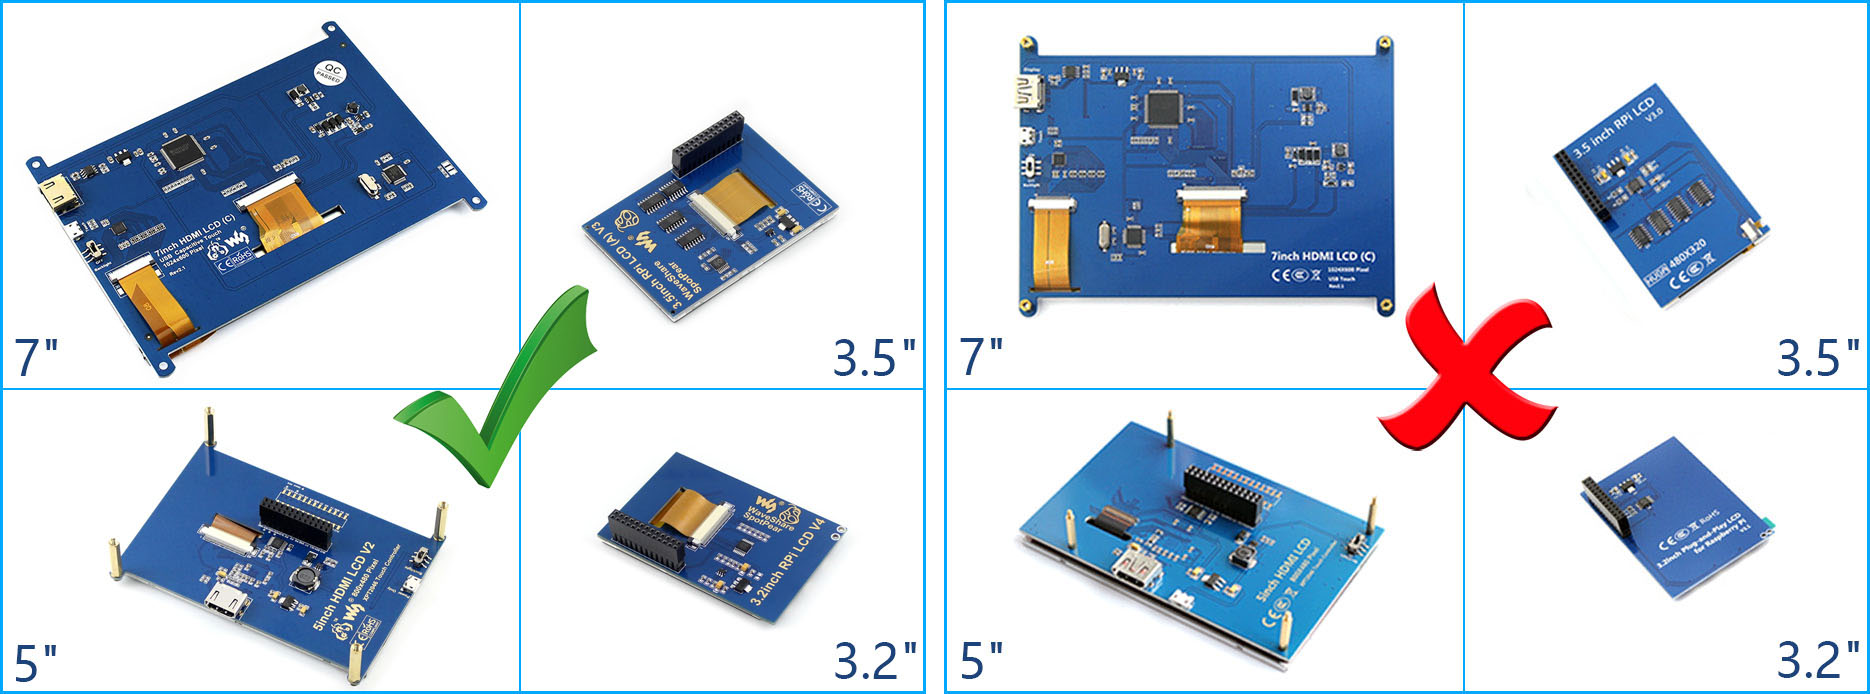
Beware of knock-offs
Please note that we've found some poor copies of this item in the market. They are usually made of inferior materials and shipped without any testing.
You might be wondering if the one you're watching or you've purchased in other non-official stores is original, feel free to contact us.
Working with PC
This product supports Windows 11/10/8.1/8/7 OS:
1. Connect the TOUCH interface of the LCD to the USB interface of the PC. Wait for a while, the windows will automatically recognize the touch function.
2. Connect the HDMI interface of the LCD to the HDMI port of the PC. About 5s later, you can see the LCD display properly. If you need the audio, you can insert 3.5mm earphones into HP ports.
Note:
1) When the computer is connected to several different displays at the same time, only this LCD can be used to control the cursor on the main display, so we recommended setting this LCD as the main display.
2) Some of PC cannot support the HDMI screen Hot Plug. In this case, restarting the PC can solve.
3) Sometimes LCD will flicker because of undersupplying from the USB cable of the PC. You need to connect an external power supply (5V/2A) to the DC port.
Working with Raspberry Pi
Supports Raspberry Pi OS/Ubuntu/Kali/Retropie Systems.
When working with Raspberry Pi, you should set the resolution of the LCD by yourself, otherwise, the LCD screen will not work. For more detailed information, please read the following section.
Please download the latest version of the image from the Raspberry Pi official website.
1. Download the compressed file to the PC, and extract the img file.
2. Connect the TF card to the PC and use SDFormatter to format the TF card.
3. Open the Win32DiskImager software, select the system image prepared in step 1, and click write to flash the system image.
4. After the programming is completed, open the config.txt file in the root directory of the TF card, add the following code at the end of config.txt and save it.
hdmi_force_hotplug=1
config_hdmi_boost=10
hdmi_group=2
hdmi_mode=87
hdmi_cvt 1024 600 60 6 0 0 0
5. Insert the TF card into the Raspberry Pi, connect the Touch port of the LCD to the USB port of the Raspberry Pi, and connect the HDMI port of the LCD to the HDMI port of the Raspberry Pi.
6. Power on the Raspberry Pi, and it will display normally after a few seconds.
Note:
- On December 2, 2021, the Raspberry Pi OS was divided into two branches, the Buster branch and the Bullseye branch. The Buster branch is a continuation of the old system and is more stable. The Bullseye branch added some new features, using open-source libraries and new interfaces. Since the current Bullseye branch has just been released shortly, it is not stable yet. If you are an industrial user, it is strongly recommended to use the Buster branch.
- If you use the Buster branch system, you can use it according to the above configuration. But if you are using the Bullseye branch system, you need to modify the default KMS driver to the FKMS driver to display the system desktop normally.
Modification method: Open the config.txt file in the root directory of the TF card, and find the following line:
dtoverlay=vc4-kms-v3d
change into
dtoverlay=vc4-fkms-v3d
- If you need to use the CSI camera under the Bullseye branch system. Since this branch uses the libcamera camera library by default, the library doesn't support FKMS drivers.
So in addition to the above modification, you also need to install the Raspicam camera library.
The installation method is as follows:
 cd ~
 sudo apt install cmake
 git clone https://github.com/raspberrypi/userland
 cd userland
 ./buildme
 sudo cp build/bin/* /bin/
Then execute the following command to shut down the system:
poweroff
Connect the Raspberry Pi camera to the CSI interface of the Raspberry Pi, power on the Raspberry Pi again, and after the system boots, execute the following command:
Take a picture:
raspistill -o image.jpg
Take a video:
raspivid -o video.h264 -t 10000
Backlight adjustment on Raspberry Pi OS
Bullseye System
wget https://files.waveshare.com/upload/0/01/Brightness-HDMI.zip
unzip Brightness-HDMI.zip
cd Brightness-HDMI
sudo chmod +x install.sh
./install.sh
Note: Only the Rev4.1 version supports the USB backlight adjustment function.
Bookworm System
wget https://files.waveshare.com/upload/0/01/Raspios-bookworm-7HP-Backlight.zip
unzip Raspios-bookworm-7HP-Backlight.zip
cd 32
#cd 64
sudo chmod +x 7H_Backlight
After running the above commands, enter the corresponding file folder and double-click the icon to run the driver.
Note: Only the Rev4.1 version supports the USB backlight adjustment function.
Working with Jetson Nano
To work with Jetson Nano Developer Kit, you don't need to make software configurations.
1) Connect the TOUCH interface of the LCD to the USB interface of Jetson Nano.
2) Connect the HDMI interface of the LCD to the HDMI interface of the Jetson Nano and then power on the Jetson Nano. After about 5 seconds, you can see the LCD display normally. If you need to output sound, you can insert 3.5mm earphones into the HP audio output interface.
Note:
1) If the LCD flickers, it may be due to the insufficient power supply of the Jetson Nano's USB interface. It can be solved normally after connecting to an external 5V/2A power supply through the DC interface of the LCD.
2) When the HP audio interface is in use, it may be necessary to set the sound output settings in the system.
Resource
Software
3D Drawing
External guides
FAQ
Add the following command to /boot/config.txt:
disable_splash=1
{{{5}}}
Replace the custom image with the image in this directory /usr/share/plymouth/themes/pix/splash.png.
{{{5}}}
Raspberry Pi Long-press Right-click Software Installation
Test environment: 2022-04-04-raspios-bullseye-armhf 32-bit system.
Models supported: Supports Waveshare DSI LCD, DPI LCD, and HDMI LCD capacitive touch screen series 32-bit systems, while 64-bit systems are not supported by default
wget https://files.waveshare.com/upload/1/18/Evdev-right-click-emulation.zip
unzip Evdev-right-click-emulation.zip
cd evdev-right-click-emulation
sudo apt install build-essential libevdev2 libevdev-dev -y
sudo cp 'out/evdev-rce' '/usr/local/bin/'
sudo chmod +x '/usr/local/bin/evdev-rce'
Enter the command:
sudo evdev-rce
After running, you can touch and long press to realize the right-click function.
Set up Pi User to Run
sudo usermod -G 'input' -a pi
echo 'uinput' | sudo tee -a /etc/modules
sudo nano  /etc/udev/rules.d/99-uinput.rules
Add following in 99-uinput.rules file.
KERNEL=="uinput", MODE="0660", GROUP="input"
Save it and run it in the terminal.
sudo udevadm control --reload-rules
sudo udevadm trigger
Then reboot:
sudo reboot
Run after reboot (no sudo needed at this point).
evdev-rce
After running, you can touch and long press to realize the right-click function.
Set Startup
Enter in the terminal.
sudo mkdir ~/.config/autostart
sudo nano ~/.config/autostart/right_click.desktop
Add the following in right_click.desktop.
[Desktop Entry]
Version=1.0
Type=Application
Name=evdev-rce
GenericName=Enable long-press-to-right-click gesture
Exec=env LONG_CLICK_INTERVAL=1000 LONG_CLICK_FUZZ=200  /usr/local/bin/evdev-rce
Terminal=true
StartupNotify=false
If you want to modify the sensitivity, you can modify the two parameters: LONG_CLICK_INTERVAL=1000, LONG_CLICK_FUZZ=200.
It depends on the system, if the system has hibernation, the screen will also be black. If it is the official system of Raspberry Pi, the default is about ten minutes without action to have hibernation.
{{{5}}}

{{{5}}}
Normally, when the screen is powered on and an HDMI signal is recognized, it will light up automatically without pressing a button.
{{{5}}}
Support
Technical Support
If you need technical support or have any feedback/review, please click the Submit Now button to submit a ticket, Our support team will check and reply to you within 1 to 2 working days. Please be patient as we make every effort to help you to resolve the issue.
Working Time: 9 AM - 6 PM GMT+8 (Monday to Friday)