VisionFive2
| ||
Overview
Onboard RV64GC ISA Quad-core 64-bit SoC, operating frequency up to 1.5GHz, VisionFive 2 supports OpenCL 3.0, OpenGL ES 3.2, and Vulkan 1.2. It is available in 4GB/8GB LPDDR4 RAM options and an optional wireless module. Also, it has multiple onboard interfaces, including M.2 / CSI / DSI / HDMI / eMMC / USB 3.0 / 40PIN GPIO / RJ45 Gigabit Ethernet port / TF card slot, etc. Supports 4K@60fps and H264/H265 multi-stream video decoding, 1080p@30fps and H265 multi-stream video encoding. Onboard 40PIN GPIO header, VisionFive2 is compatible with Raspberry Pi series boards. Provides wide software compatibility including support for Debian.
Parameters
| Processor | StarFive JH7110 |
|---|---|
| CPU | RISC-V U74 Quad-core 64-bit V64GC ISA [email protected] |
| GPU | IMG BXE-4-32 |
| Memory | 4G/8G Byte LPDDR4 |
| Storage | TF card/eMMC |
| Camera | MIPI CSI 2lane × 1 |
| Display Port | HDMI 2.0 × 1 (4K@30fps or 2K@60fps); 2-lane MIPI DSI × 1 (1080p@30fps); 4-lane MIPI DSI × 1 (2K@30fps); Only one DSI port can be used for display at the same time. |
| USB Host | USB Type-A 3.0 × 4 |
| USB Device | USB Device × 1; multiplexed with the USB Type-C port |
| Networking | 1 × Gigabit Ethernet port (main Ethernet port) (near the edge of the board); 1 × 100/10M Ethernet port |
| Others | 40PIN × 1; M.2 M-Key SSD slot; 2Pin fan header; 3.5mm Audio Jack |
| Power Supply | Supports Quick Charge input 5V DC (minimum 3A) (up to 30 W) Supports 5~20V fixed voltage input Supports USB Type-C PD 2.0, 9V/2A, 12V/2A, 15V/2A, 20V/2A Supports QC 3.0/2.0 adapter, 9V/2A, 12V/1.5A |
| Dimensions | 100 × 74 × 21 mm |
| Recommended Operating Ambient Temperature | 0~50℃ (If the operating temperature of the chip exceeds 85°C, the frequency and voltage of the CPU will be automatically reduced for cooling.) |
User Guide
As the Debian image is large, it is recommended to use a TF card of 32GB or above.
Install Debian System
Download, open SDFormatter, and format the corresponding TF card.

Download, open Win32DiskImager.zip, choose the corresponding image and disk, and click "write".

Booting
After 202302, systems can be booted by the SD card.
Turn the two DIP switches on the board to the right (ON) position.

Directly boot it with the SD card, just toggle the switch to the left side.
Insert the TF card that burned the image, connect the USB to TTL module according to the figure, connect it to the PC, and check the port.

Open MobaXterm and operate as shown below:


Wait a few seconds and it will automatically enter the system (if you have selected it before, you must select it before entering the system).

Enter the corresponding account and password:
Username: root/user (for general users, only available in systems on 202303 and later)
Password: starfive

Extended file system ensures that all storage on the memory card is available
To modify the 4 partitions into 3 partitions, where user data and other information are stored in the third partition, for systems before 202302.
Query memory space: df -h.

Enter the commands: fdisk /dev/mmcblk1.
Input according to the content shown in the picture, and press Enter directly at positions 5 and 6.

Enter the command: resize2fs /dev/mmcblk1p4.

Then use "df -h" to view the size of the space.

Check IP
The net-tools toolbox is not installed on the Debian system, so it needs to be installed manually.
Use the following command:
apt-get install net-tools
After the installation is complete, you can use the command ifconfig to view the IP of the corresponding network port.

Connect To SSH
The system from 202302 does not come with SSH installed. You'll need to use the following command to install it.
apt-get install ssh
The Debian system on VisionFive2 doesn't support SSH connections using the root user. Therefore, you'll need to configure it as follows:
Edit the SSH configuration file.
nano /etc/ssh/sshd_config
Add the following two sentences at the end of the file:
PasswordAuthentication yes
PermitRootLogin yes
Save, exit, and restart the ssh service.
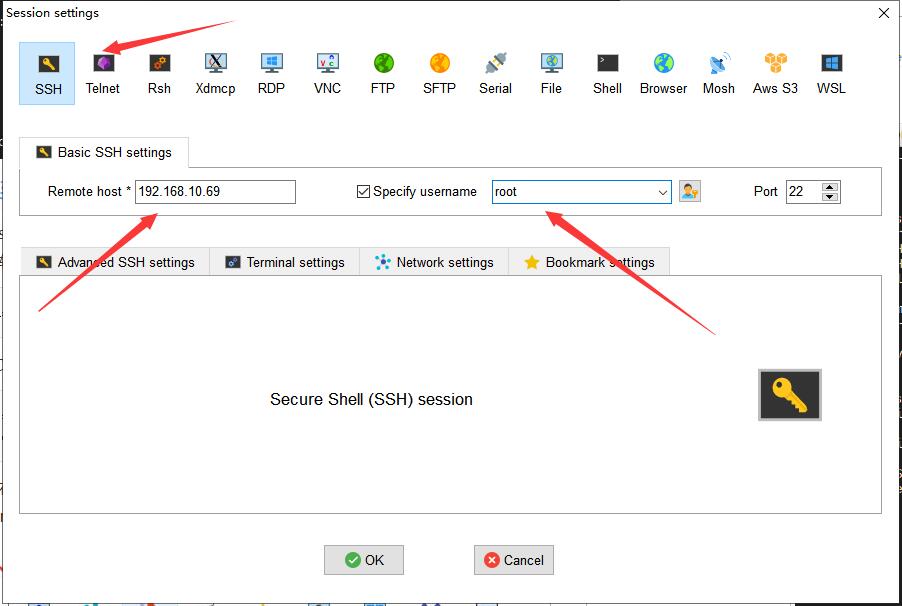
Utilize 'service sshd restart' or 'systemctl restart sshd.service' commands to restart the SSH service on VisionFive2. Use MobaXterm software to establish an SSH connection. If unable to connect, restarting VisionFive2 should resolve the issue.


Working with ECR660U-WiFi Module
This module is only compatible with Debian systems from 202302 onwards.
Preparation
Connect to the WiFi module, ignore the contents printed by the serial port .
Use "ifconfig -a" command, and two devices starting with "wl" show up indicating a successful connection.

Normally, wl is followed by the fixed MAC address of the WiFi, e.g:
wlx2c0547a116fa address: 2c:05:47:a1:16:fa
wlx2c0547a116fb address: 2c:05:47:a1:16:fb
However, before connecting to WiFi, visionfive2 will randomly give a virtual MAC address to the device from time to time, at which point we can use the following actions to determine the real address of the module.
Install iw:
apt-get install iw
View the device information:
ip link

As shown in the picture, the above two are the real addresses of the modules.
If you don't like the name, you can change it as follows:
nano /etc/udev/rules.d/70-persistent-net.rules
# Add the following "2c:05:47:a1:16:fa" and "2c:05:47:a1:16:fb" as the real addresses you just got
SUBSYSTEM=="net", ACTION=="add", DRIVERS=="? *", ATTR{address}=="2c:05:47:a1:16:fa", ATTR{dev_id}=="0x0", ATTR{type}=="1", NAME="wlan0"
SUBSYSTEM=="net", ACTION=="add", DRIVERS=="? *", ATTR{address}=="2c:05:47:a1:16:fb", ATTR{dev_id}=="0x0", ATTR{type}=="1", NAME="p2p1"
# Update udev rules
udevadm control --reload-rules
Reinstall the WiFi module.
After using the ifconfig -a command, you will see that the name of wlxxxxxxx has been changed.

Connect to WiFi
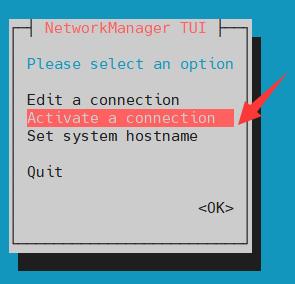
Enter nmtui to access the graphical interface for network configuration:

Select the second option

Select the WiFi you want to connect to, the * sign at the end of the WiFi indicates the signal strength:

Enter the password and press Enter.

An * sign appears in front of the corresponding WiFi to indicate a successful connection.

Press Esc to go back to the main screen and select the first option.

The name of the WiFi you just connected to appears as shown in the picture, which means that the system has remembered this WiFi and will try to connect to it automatically the next time you turn on your computer.

Go back to the terminal and enter the ifconfig command, you can see that the WiFi is getting the IP and displaying the real MAC address.

Connect to CSI Camera
Currently, it only supports cameras with the IMX219 sensor.
Preparation
Connect to HDMI/DSI and CSI.
Login to Debian 202306 or later versions using a regular user account.
Please note: CSI won't function properly with the root user, so it's crucial to use a regular user account.
user account: user
password: starfive
Enter the command terminal:


The following command is for checking your system version and whether it supports CSI.
cat /sys/bus/media/devices/media0/model

The prompt indicates that either the CSI connection isn't established correctly, the CSI isn't an IMX219 photosensitive chip, or the system doesn't support CSI functionality.
![]()
Install StarFive Packages (you can modify "shall" if the installation time is too long.)
wget https://github.com/starfive-tech/Debian/releases/download/v0.8.0-engineering-release-wayland/install_package_and_dependencies.sh
chmod +x install_package_and_dependencies.sh
./install_package_and_dependencies.sh
Use the following command to view the devices that can be used:
v4l2-ctl --list-devices
Get Started to Use
Input the following command:
/opt/media-ctl-pipeline.sh -d /dev/media0 -i csiphy0 -s ISP0 -a start
After ensuring the CSI connection is correct and the library is installed properly, the display shows the following:

Input the following commands:
/opt/ISP/stf_isp_ctrl -m imx219mipi -j 0 -a 1
Displays as follows:
![]()
Enter the second terminal and input the following commands:
ffplay -f v4l2 -framerate 30 -video_size 640*480 -i /dev/video1
Adapted Products
Audio
Sensor
LCD
- 0.96inch LCD Module
- 1.14inch LCD Module
- 1.28inch LCD Module
- 1.3inch LCD Module
- 1.54inch LCD Module
- 1.8inch LCD Module
- 2inch LCD Module
- 2.4inch LCD Module
Motor
Relay
Learning Module
Resources
Schematic
Official Resource/Forum Address
SDK
Debian Image
Development Software
VisionFive2 Flash
FAQ
1. Check the network connection by using the 'ip a' command to verify if an IP address is obtained. Also, use the 'ping' command to test network connectivity.
2. Check for memory expansion; refer to the details on Memory expansion.
{{{5}}}
Requires using the script located at /opt/disable_monitor_color.sh and restarting. It needs to be rerun when using a different monitor as it's associated with the display device ID.
{{{5}}}
Only Debian systems from 202303 onwards support touch functionality. Debian systems before 202303 can only power the DSI without touch capability.
{{{5}}}
Official website introduction: https://rvspace.org/en/project/VisionFive2_Debian_Wiki_202302_Release.
Brief summary:
1. Can use SD, eMMc boot mode to boot.
2. Use Flash mode to boot, need to update Flash firmware.
3. The image is greatly reduced to 2GB, if you need the full function, please use the following command after logging into the system.
wget https://github.com/starfive-tech/Debian/releases/download/v0.7.0-engineering-release/install_package_and_dependencies.sh
chmod +x install_package_and_dependencies.sh
./install_package_and_dependencies.sh
{{{5}}}
It is because the Flash firmware is not compatible.
click this link to download the corresponding firmware.
{{{5}}}
The debian system version is too old, Flash firmware version is too old.
Solution:
Download the latest Debian image.
Just follow #VisionFive2 Flash.

{{{5}}}
I'm sorry that it cannot support the Yocto.
{{{5}}}
Support
Technical Support
If you need technical support or have any feedback/review, please click the Submit Now button to submit a ticket, Our support team will check and reply to you within 1 to 2 working days. Please be patient as we make every effort to help you to resolve the issue.
Working Time: 9 AM - 6 PM GMT+8 (Monday to Friday)


