USB TO AUDIO
| ||
Introduction
This is a USB sound card that supports recording and playback, a stereo codec, a built-in microphone, and a speaker. It is suitable for Raspberry Pi/Jetson Nano, driver-free, plug-and-play.
Features
- Onboard PWR indicators for operating status.
- Onboard microphone and speaker, support audio input/output.
- Driver-free, plug-and-play. Compatible with Windows, Mac OS, Linux, and Android.
- Standard USB 2.0 port, portable size.
Specification
- Power supply: 5V
- Audo encoder/decoder: SSS1629A5
- Control port: USB
- Audio port: PH2.0
- Speaker driver: 2.6W per channel (4Ω BTL)
Working with Raspberry Pi
Hardware Configuratoin
- Raspberry Pi x1
- Speaker
- USB TO AUDIO
Play and Record
- Right-click the Audio logo of Raspberry Pi ->Choose USB PnP Audio Device->Play or recording.
Configure Volume
- Right-click USB Device Settings -> The left spider is the volume of the speaker and the right one is a microphone.
Working with Jetson Nano
Hardware Configuration
Configure Play & Recording Volume
- Right-click on the top right speaker icon -> the speaker volume bar and microphone volume bar appear -> you can drag the volume bar to adjust the volume and microphone volume.
Working with PC
- Connect the USB TO AUDIO to the PC and it will be auto-recognized as a USB audio device.
- Open the Control panel. choose Hardware and Sound-> Sound -> Recording and a USB microphone is listed.
- Connect the speaker to the USB TO AUDIO, please keep the speaker away from the USB TO AUDIO module.
Right-Click Microphone -> Properties -> Listen and set it as below:

- Try to say to the microphone and check if the speaker works normally. Please keep the speaker away from the USB TO AUDIO Module, or it causes an echo problem.
Working with Horizon Sunrise X3 PI
- Open the command terminal, connect USB TO AUDIO, and enter the following commands:
lsusb
- Seeing the content as shown means that the USB device has been detected:
- Enter the commands, and list the sound card and the digital audio device:
aplay -l
See the content as shown in the figure indicates that the corresponding audio output is detected, remember the two positions shown in the label, later to carry out the use of the device needs:

Enter the command to list sound cards and recording devices:
arecord -l
See the content as shown in the figure indicates that the corresponding audio input is detected, remember the two positions shown in the label, the latter for the use of the device needs:

Enter the commands, and adjust the volume in the interface:
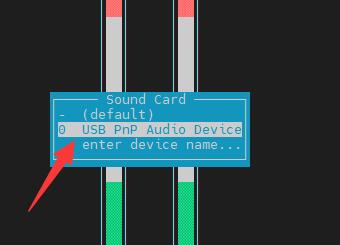
sudo alsamixer
Press F6, choose the corresponding device and adjust the volume:


Start recording 10 seconds of audio:
arecord -Dhw:0,0 -f S16_LE -r16000 -c2 -d 10 -t wav sound_16b_16k.wav
Note the markings of the location shown, here to be consistent with the previously detected.

Start playing the audio you just recorded:
aplay -Dhw:0,0 -f S16_LE -r16000 -t wav sound_16b_16k.wav
Note the markings of the location shown, here to be consistent with the previously detected:

Working With VisionFive2
Install usbutils library:
apt install usbutils
Enter lsusb to view the corresponding USB device, and the device shown in the figure indicates that the device is connected.

Install alsa-utils:
apt install alsa-utils
Enter the commands, list the sound card and the digital audio device:
aplay -l

Enter the commands, list the sound card and the recording device:
arecord -l

Enter the command to adjust the volume on the terminal screen:
sudo alsamixer


Enter the command to adjust the volume on the terminal screen:
sudo alsamixer
Resources
FAQ
sudo alsamixer
- If the USB PnP Audio sound card is not set as the default sound card, you need to press F6 to select the sound card device.
- Switch speaker or microphone volume settings with left and right buttons; switch microphone volume settings with up and down buttons.
{{{5}}}
arecord -d 10 test.wav
- Broadcast
aplay test.wav
{{{5}}}
{{{5}}}
Support
Technical Support
If you need technical support or have any feedback/review, please click the Submit Now button to submit a ticket, Our support team will check and reply to you within 1 to 2 working days. Please be patient as we make every effort to help you to resolve the issue.
Working Time: 9 AM - 6 PM GMT+8 (Monday to Friday)


