ROS Intelligent Voice
JetBot ROS AI Kit Advanced Tutorial Directory
- How to Analysis the Radar Data?
- SLAM Lidar Mapping
- Autonomous Navigation
- ROS OpenCV
- ROS Intelligent Voice
- Install ROS System on Jetson Nano & Environment Cofiguration
- Install ROS System in Ubuntu Virtual Machine & Environment Configuration
- ROS Voice Environment Configuration
- JetBot ROS AI Kit Main Page
Introduction
- Before running the audio program, please check whether the USB sound cards of the virtual machine and Jetson Nano work normally, and set the USB sound card as the default audio output device.
Detect sound card
- Check playback: aplay -l.
aplay -l
- Select playback sound card USB PnP Audio Device.
- Check the recording: arecord -l.
arecord -l
- Select the recording sound card as USB PnP Audio Device.
Recording playback test
- Recording:
jetson@linux:~$ arecord -D plughw:2,0 -f S16_LE -r 48000 -c 2 test.wav
Recording WAVE 'test.wav' : Signed 16 bit Little Endian, Rate 48000 Hz, Stereo
- -D "plughw:1,0" means card 1.
- "device 0" IS the USB sound card we use.
- "-f S16_LE" means signed 16-bit little endian.
- "-c 2" means dual channel.
- "test.wav" is generated by recording the file name.
- Press Ctl+C to end recording.
- Play:
jetson@linux:~$ aplay -D hw:2,0 test.wav
Playing WAVE 'test.wav' : Signed 16 bit Little Endian, Rate 48000 Hz, Stereo
- Play the audio you just recorded.
Volume Adjustment
sudo alsamixer
- If the USB sound card is not set as the default sound card, you need to press F6 to select the sound card device.

Speaker is the speaker output volume, Mic is the microphone recording volume.
- The volume adjustment knob on the expansion board can also adjust the speaker volume. Note that if the volume is adjusted too high, it will cause a lack of power supply and stucking.
Set up the sound card
- Enter the system graphical interface, click the audio icon in the upper right corner to enter the sound setting interface. Both Output/Input devices select USB PnP Audio Device.
- The system we configured has VNC enabled by default. If there is no screen, it can be set through the remote login interface of the VNC Viewer software. Enter the corresponding IP address in the address bar to open the connection, and enter the jetbot password to log in to the interface.
- Before running the voice program, the audio output and input settings must be the audio sound card, otherwise the program will make an error or not respond.
Precaution:
1. Voice services all need to be connected to the Internet, and English voice services also need to be connected to the Internet to work properly. If the network is not good, the response may be slow or there is no response.
2. The iFLYTEK service is used in Chinese, and Google Assistant is used in English. There is a service limit of 500 times a day, and it will not respond if it exceeds it. Users can apply for an account by themselves, and modify the program to replace it with their own account.
3. The English Google Assistant needs to install the Google Assistant Service in the virtual environment first, otherwise the program will run incorrectly; the configuration system has been installed by default
4. If the sound is stuck in the voice playback, it may be that the current of the power amplifier is not enough, please reduce the volume appropriately.
5. Both speech recognition and human-computer dialogue detect speech through webrtcvad, there is a certain probability of missed detection and false detection, and the success rate in a noisy environment will be lower.
Step 1: Voice Streaming Transmission
- Voice streaming is the real-time voice transmission between the computer and the robot to realize the remote intercom.
- The virtual machine needs an external output and input volume device, and the audio output and input settings correspond to the audio device. It is recommended to use a USB audio device, otherwise the corresponding sound card cannot be found or cannot transmit audio normally.
- The picture below shows if you set up a USB audio input and output device in the virtual machine, select Virtual Machine -> Removable Device to select the corresponding USB audio device and connect to the virtual machine.
- Select the sound setting in the system settings, and select the corresponding USB device for the Output/Input device.
- In the Output settings, click Test Speakersk to test whether the device can play normally.
- In the Input setting, if the microphone detects the sound, the Input level will jump, and the test microphone is normal.
- The audio transmission uses the ROS audio function package, which needs to be installed on both the robot and the virtual machine. Please enter the following command to install. The system we configured is already installed by default.
sudo apt-get install ros-melodic-audio-common
- Start Voice Streaming Node in Ubuntu Virtual Machine.
roslaunch jetbot_pro audio_stream.launch
- Start the voice streaming node on the robot side.
roslaunch jetbot_pro audio_stream.launch
- After startup, you can communicate with the robot through an external microphone; if there is no sound, please check whether the sound card is normal and whether the volume switch of the expansion board is turned on as shown in the figure below.
- Ctrl+C, exit the voice streaming node.
Step 2: TTS (Text to Speech)
- Receive/speak text data topic, convert the text data to speech and play it.
- Note: Internet is required when using this function.
- Enter the following command on the robot to enable the TTS node.
roslaunch jetbot_pro tts.launch
- Enter the following command on the virtual machine to publish the "/speak" topic.
rostopic pub -1 /speak std_msgs/String "data: 'hello,who are you'"
- -1 means it only sends once.
- The node receives the "/speak" topic and converts it to speech output.
- The program defaults to English with gtts.
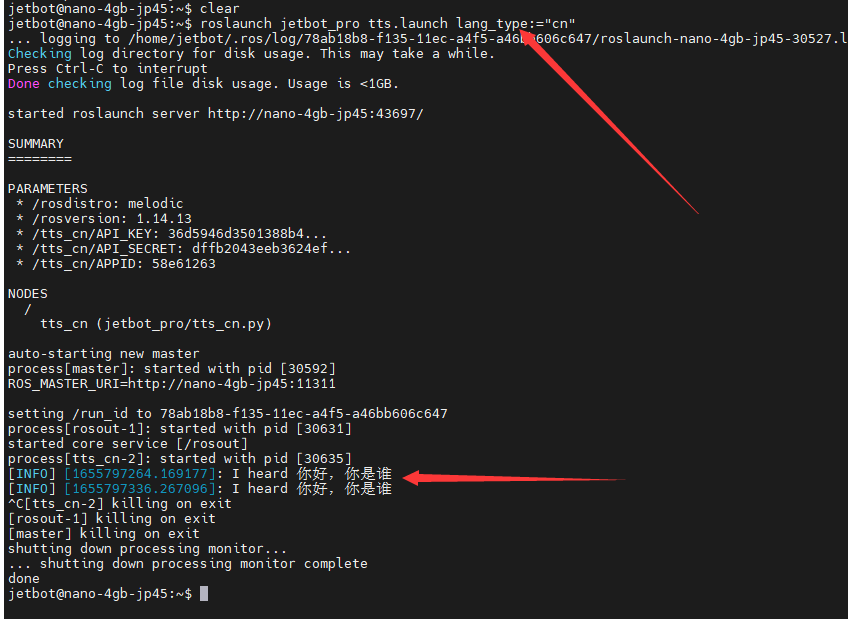
roslaunch jetbot_pro tts.launch lang_type:="cn"
- The virtual machine publishes Chinese to the /speak topic.
rostopic pub -1 /speak std_msgs/String "data: 'Hello, who are you'"
- Ctrl+C to exit.
【If there is no sound output, please check whether the communication is normal and whether the IP address is right.】
Step 3: Voice Activity Detection
- Detect speech when the microphone is muted. Record and play sound if the sound is detected.
- Enter the following command on the robot to enable the voice detection node.
rosrun jetbot_pro vad.py
- As shown in the figure, recording: indicates that the sound is detected. When the sound is detected, Open is displayed to start recording the sound, and when the sound is stopped, it is displayed Close to stop the sound recording.
- done recording: indicates the sound processing, and the sound just recorded will be played at this time.
- Ctrl+C to exit.
Step 4: ASR(Automatic Speech Recognition)
- This function is speech recognition, which converts the recognized speech into text data and sends a string topic.
- Enter the following command on the robot to start the ASR node.
roslaunch jetbot_pro asr.launch
- Run rostopic echo /chatter to see posted topics. But Chinese cannot be displayed normally.
rostopic echo /chatter
- Run rostopic echo /chatter to see posted topics. But Chinese cannot be displayed normally.
rostopic echo /chatter
- You can run the following command to display the received topics.
rosrun rospy_tutorials listener
- Ctrl + C to exit.
Step 4: Human-Machine Dialogue
- The robot can recognize the person speaking and reply by voice, which realizes the dialogue and chat between the person and the robot, and sends the conversation content topic. This function also requires the Internet.
- Enter the following command on the robot to start the human-machine dialogue node.
roslaunch jetbot_pro talk.launch
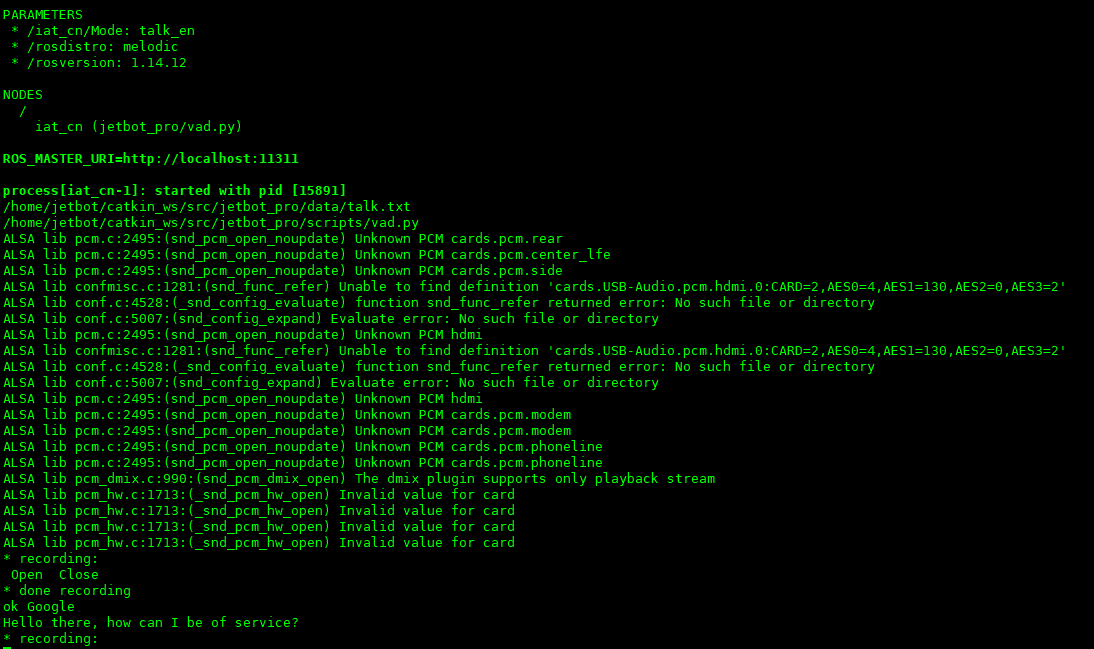
- As shown in the figure, recording: Indicates that the sound is detected. When the sound is detected, *Open is displayed to start recording the sound, and when the sound is stopped, it is displayed Close to stop the sound recording.
- done recording: Indicates the sound processing. Transmit the voice data to the server for recognition. If the voice is recognized, the dialogue content will be played and the voice replied by the robot will be played through the voice. Otherwise, it will enter the recording state and continue to detect the voice.
- Reopen a terminal and enter the following command to view the posted topic.
rostopic echo /chatter


