Template: AS7341 Spectral Color Sensor-RaspberryPi-Guides
This example uses Raspberry Pi 3 Model B, provides BCM2835, WiringPi, file IO, RPI (Python) library demos.
Raspberry Pi
Hardware connection
| AS7341 Spectral Color Sensor | Raspberry Pi (BCM) |
| VCC | 3.3V/5V Power input |
| GND | Ground |
| SDA | SDA(2) |
| SCL | SCL(3) |
| INT | 4 |
| GPIO | / |
Enable I2C interface
- Open the terminal, and use the command to enter the configuration page.
sudo raspi-config
Choose Interfacing Options -> I2C -> Yes to enable I2C interface.
And then reboot the system:
sudo reboot
Libraries Installation
- Install BCM2835 libraries:
wget http://www.airspayce.com/mikem/bcm2835/bcm2835-1.60.tar.gz
tar zxvf bcm2835-1.60.tar.gz
cd bcm2835-1.60/
sudo ./configure
sudo make
sudo make check
sudo make install
- Install wiringPi libraries:
sudo apt-get install wiringpi
#For Pi4B, you need to upgrade it:
cd /tmp
wget https://project-downloads.drogon.net/wiringpi-latest.deb
sudo dpkg -i wiringpi-latest.deb
gpio -v
Download the demo
Open the terminal of the Raspberry Pi, execute command to download demo codes:
sudo apt-get install p7zip-full
wget https://files.waveshare.com/upload/b/b3/AS7341_Spectral_Color_Sensor_code.7z
7z x AS7341_Spectral_Color_Sensor_code.7z -r -o./AS7341_Spectral_Color_Sensor_code
sudo chmod 777 -R  AS7341_Spectral_Color_Sensor_code
C
cd AS7341_Spectral_Color_Sensor_code/AS7341_Spectral_Color_Sensor_code/RaspberryPi/c
make clean
make
Enter the following command to execute the demo:
sudo ./main data
- 【Note】The 'data' here can be changed to flicker, syns, int, pinint, clear to verify different test demos, and its meaning is explained in the code.
data corresponds to the Arduino's AS7341_Getdata demo
flicker corresponds to Arduino's AS7341_Getflicker demo
syns corresponds to Arduino's AS7341_Syns demo
int corresponds to Arduino's AS7341_INT demo
pinint corresponds to Arduino's AS7341_pinINT demo
clear corresponds to the AS7341_Clear demo of Arduino
- Take the execution of sudo ./main data as an example, the test result is:
python
cd
cd AS7341_Spectral_Color_Sensor_code/AS7341_Spectral_Color_Sensor_code/RaspberryPi/python/examples
Enter the following command to execute the demo:
sudo python data.py
- 【Note】The "data" here can be changed to flicker, syns, int, pinint, clear to verify different test demos and its meaning is explained in the code.
data corresponds to the Arduino's AS7341_Getdata demo
flicker corresponds to Arduino's AS7341_Getflicker demo
syns corresponds to Arduino's AS7341_Syns demo
int corresponds to Arduino's AS7341_INT demo
pinint corresponds to Arduino's AS7341_pinINT demo
clear corresponds to the AS7341_Clear demo of Arduino
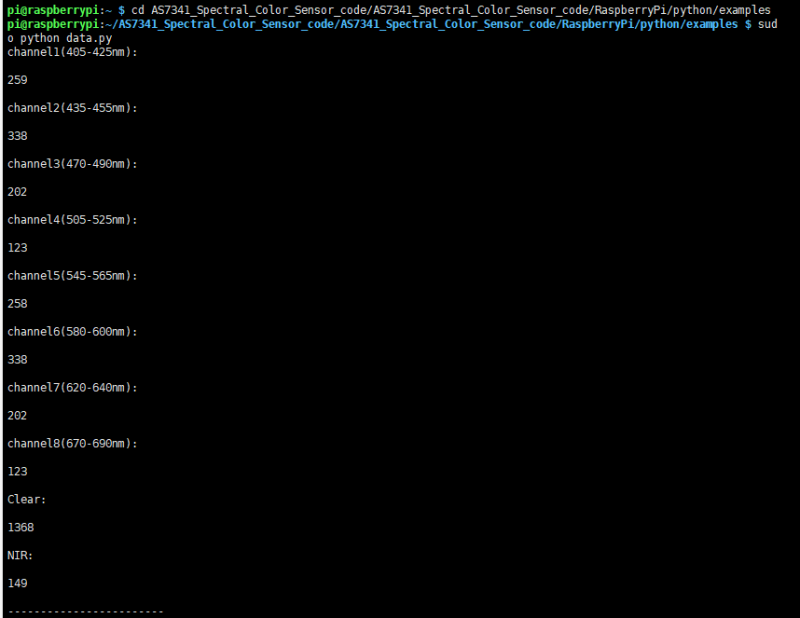
- Take the execution of data.py as an example, the test result is:
Demo description
The functions of all test demos and the points that need attention have been introduced in the Arduino tutorial. When executing sudo ./main syns or python syns.py, you need to pull up the GPIO port and then pull it down to generate a falling edge signal. You can connect the GPIO pin to the high-level pin for a short time and then released to generate a falling edge signal.


