RGB-Matrix-P2.5-96x48-F
| ||
Overview
Introduction
This product is a 96 × 48 full-color LED matrix display, with 4608 RGB LEDs on board, 2.5mm pitch, supports Raspberry Pi, Arduino, ESP32, etc., provides supporting open source demos and tutorials, suitable for makers or electronics enthusiasts getting started Learning, or DIY secondary development into other desktop or wall-mounted display applications.
Features
- 4608 individual RGB LEDs, full-color display, adjustable brightness.
- 96 × 48 pixels, 2.5mm pitch, allows displaying text, colorful images, or animation.
- 160 × 160mm dimensions, moderate size, suitable for DIY desktop display or wall mount display.
- Onboard two HUB75 headers, one for controller data input, one for output, and chain support.
- Comes with online open-source development resources (examples for Raspberry Pi / ESP32 / Arduino).
Parameters
| Dimensions | 240mm × 120mm |
|---|---|
| Pixel | 96 × 48=4608 DOTS |
| Pitch | 2.5mm |
| Pixel Form | 1R1G1B |
| Viewing Angle | ≥140° |
| Control Type | Synchronization |
| Driving | 1/24 scan |
| Header | HUB75 |
| Power Supply | 5V / 2.5A (VH4 header input) |
| Power | ≤20W |
Pinout Difinition

The picture on the back is for reference only. Different batches of PCB board silk screen and layout may have minor adjustments, and the software is compatible. The actual arrival shall prevail.
| PIN | Description | PIN | Description | |
|---|---|---|---|---|
| +5V | 5V power input | GND | Ground | |
| R1 | R higher bit data | R2 | R lower bit data | |
| G1 | G higher bit data | G2 | G lower bit data | |
| B1 | B higher bit data | B2 | B lower bit data | |
| A | A line selection | B | B line selection | |
| C | C line selection | D | D line selection | |
| E | E line selection | CLK | Clock input | |
| LAT/STB | Latch pin | OE | Output enable |
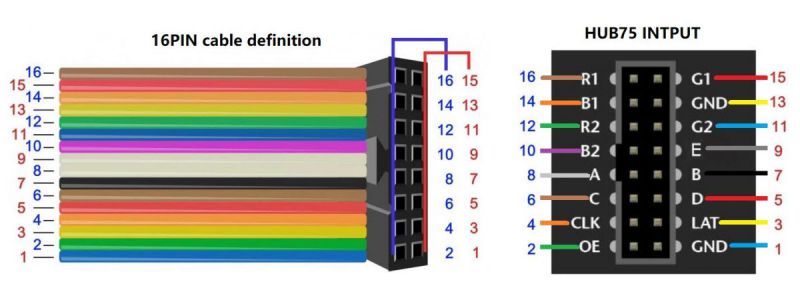
16P Cable Interface Definition
Development Board Compatibility Notes
| Development Board Model | Support Status | Description |
|---|---|---|
| Arduino Meage2560 | √ | Arduino IDE |
| NodeMCU-32s | √ | Arduino IDE |
| Raspberry Pi | √ | Raspbian |
Working With Raspberry Pi
Hardware Connection
Prepare Materials
- RGB-Matrix-P2.5-96 x 48-F (this product)
- Raspberry Pi (not included)
Hardware Connnection
The Raspberry Pi can share and connect up to three LED dot matrix screen panels. If there is only one panel, just connect the pins corresponding to the 😄 mark in the table below. [2]💥 and [3]💧 need to share the connection of the second and third panels at the same time.
The following table adds some icons for better visual distinction: [1]=😄, [2]=💥 and [3]=💧.
| Connection | Pin | Pin | Connection |
|---|---|---|---|
| - | 1 | 2 | - |
| 💧 [3] G1 | 3 | 4 | - |
| 💧 [3] B1 | 5 | 6 | GND 😄💥💧 |
| 😄💥💧 LAT/STB | 7 | 8 | [3] R1 💧 |
| - | 9 | 10 | E 😄💥💧 |
| 😄💥💧 CLK | 11 | 12 | OE- 😄💥💧 |
| 😄 [1] G1 | 13 | 14 | - |
| 😄💥💧 A | 15 | 16 | B 😄💥💧 |
| - | 17 | 18 | C 😄💥💧 |
| 😄 [1] B2 | 19 | 20 | - |
| 😄 [1] G2 | 21 | 22 | D 😄💥💧 |
| 😄 [1] R1 | 23 | 24 | [1] R2 😄 |
| - | 25 | 26 | [1] B1 😄 |
| - | 27 | 28 | - |
| 💥 [2] G1 | 29 | 30 | - |
| 💥 [2] B1 | 31 | 32 | [2] R1 💥 |
| 💥 [2] G2 | 33 | 34 | - |
| 💥 [2] R2 | 35 | 36 | [3] G2 💧 |
| 💧[3] R2 | 37 | 38 | [2] B2 💥 |
| - | 39 | 40 | [3] B2 💧 |
Software Download & Run
- Download the open source project on GitHub to the Raspberry Pi.
git clone https://github.com/hzeller/rpi-rgb-led-matrix/
- After the download is complete, it can be found in the
examples-api-use/directory:
make -C examples-api-use
- Download and compile process refer to the figure below:
Example Running Effect
Demo
1. Execute the following command to run the demo:
cd examples-api-use
sudo ./demo -D0 --led-no-hardware-pulse --led-cols=96 --led-rows=48 --led-pwm-lsb-nanoseconds 130 --led-pwm-bits=11 --led-brightness=100 --led-slowdown-gpio=4
2. The effect is shown in the figure below (the figure below is the demonstration effect of RGB-Matrix-64x32, for reference only.)
C-example
1. Execute the following command to run the demo:
sudo ./c-example -D0 --led-no-hardware-pulse --led-cols=96 --led-rows=48 --led-pwm-lsb-nanoseconds 130 --led-pwm-bits=11 --led-brightness=100 --led-slowdown-gpio=4
2. The effect is shown in the figure below (the figure below is the demonstration effect of RGB-Matrix-64x32, for reference only.)
Minimal-example
1. Execute the following command to run the demo:
sudo ./minimal-example -D0 --led-no-hardware-pulse --led-cols=96 --led-rows=48 --led-pwm-lsb-nanoseconds 130 --led-pwm-bits=11 --led-brightness=100 --led-slowdown-gpio=4
2. The effect is shown in the figure below (the figure below is the demonstration effect of RGB-Matrix-64x32, for reference only.)
Text-example
1. Execute the following command to run the demo:
sudo ./text-example -f ../fonts/8x13.bdf --led-no-hardware-pulse --led-cols=96 --led-rows=48 --led-pwm-lsb-nanoseconds 130 --led-pwm-bits=11 --led-brightness=100 --led-slowdown-gpio=4
2. After running the demo, input the characters you want to display one by one, press Enter, and the corresponding output will be displayed on the display:
pi@raspberrypi:~/rpi-rgb-led-matrix/examples-api-use $ sudo ./text-example -f ../fonts/8x13.bdf --led-no-hardware-pulse --led-cols=96 --led-rows=48 --led-pwm-lsb-nanoseconds 130 --led-pwm-bits=11 --led-brightness=100 --led-slowdown-gpio=4
Suggestion: to slightly improve display update, add
	isolcpus=3
at the end of /boot/cmdline.txt and reboot (see README.md)
Enter lines. Full screen or empty line clears screen.
Supports UTF-8. CTRL-D for exit.
Hello
Wvshare
Welcome
3. The effect is shown in the figure below (the figure below is the demonstration effect of RGB-Matrix-64x64, for reference only):

Pixel-mover
1. Execute the following command to run the demo:
sudo ./pixel-mover --led-no-hardware-pulse --led-cols=96 --led-rows=48 --led-pwm-lsb-nanoseconds 130 --led-pwm-bits=11 --led-brightness=100 --led-slowdown-gpio=4
2. The effect is as shown in the figure below: You can move the light spot on the display screen by pressing W, A, S, and D on the keyboard. (The picture below is the demonstration effect of RGB-Matrix-64x64, for reference only.)
![]()
Clock
1. Execute the following command to run the demo:
sudo ./clock -f ../fonts/7x13.bdf --led-cols=96 --led-rows=48 -d "%A" -d "%H:%M:%S" --led-no-hardware-pulse --led-pwm-lsb-nanoseconds 130 --led-pwm-bits=11 --led-brightness=100 --led-slowdown-gpio=4
2. The effect is shown in the figure below (the figure below is the demonstration effect of RGB-Matrix-64x32, for reference only):
Working With ESP32
Hardware Connection
Prepare Materials
- RGB-Matrix-P2.5-96 x 48-F (this product)
- NodeMCU-32S (not included)
Hardware Connection Diagram
- Install the Arduino IDE (version 1.8.15 is available, or you can download the new version from the Arduino official website).
Install the ESP32 PLug-in in the Arduino IDE
1. Open the Arduino IDE, click on the file in the upper left corner, and select Preferences.

2. Add the following link in the additional development board manager URL, then click OK.
https://dl.espressif.com/dl/package_esp32_index.json

Note: If you already have the ESP8266 board URL, you can separate the URLs with commas like this:
https://dl.espressif.com/dl/package_esp32_index.json, http://arduino.esp8266.com/stable/package_esp8266com_index.json
3. Download the packages, unzip it and copy the files to the following path:
C:\Users\xutong\AppData\Local\Arduino15

Note: Replace the username: xutong with your own username.
Software Download And Run
- Download the sample demo.
- Copy the files under
..\ESP32\librariesto the libraries under the Arduino IDE installation directory
(Arduino IDE 2.0 or above, the libraries path is general C:\Users\"your_user_name"\AppData\Local\Arduino15\libraries) - After connecting the wires according to the hardware connection diagram, the software settings are as follows:

- Open the demo through File, see the relative path:
RGB-Matrix-P2-64x64-Demo\ESP32
Example Running Effect
SimpleTestShapes: Displays basic shapes
BouncingSquares: Displays bouncing squares
AuroraDemo: A simple example showing various animation effects
Working With Arduino Mega2560
Hardware Connection
Prepare Materials
- RGB-Matrix-P2.5-96 x 48-F (this product)
- Arduino Mega2560 (not included)
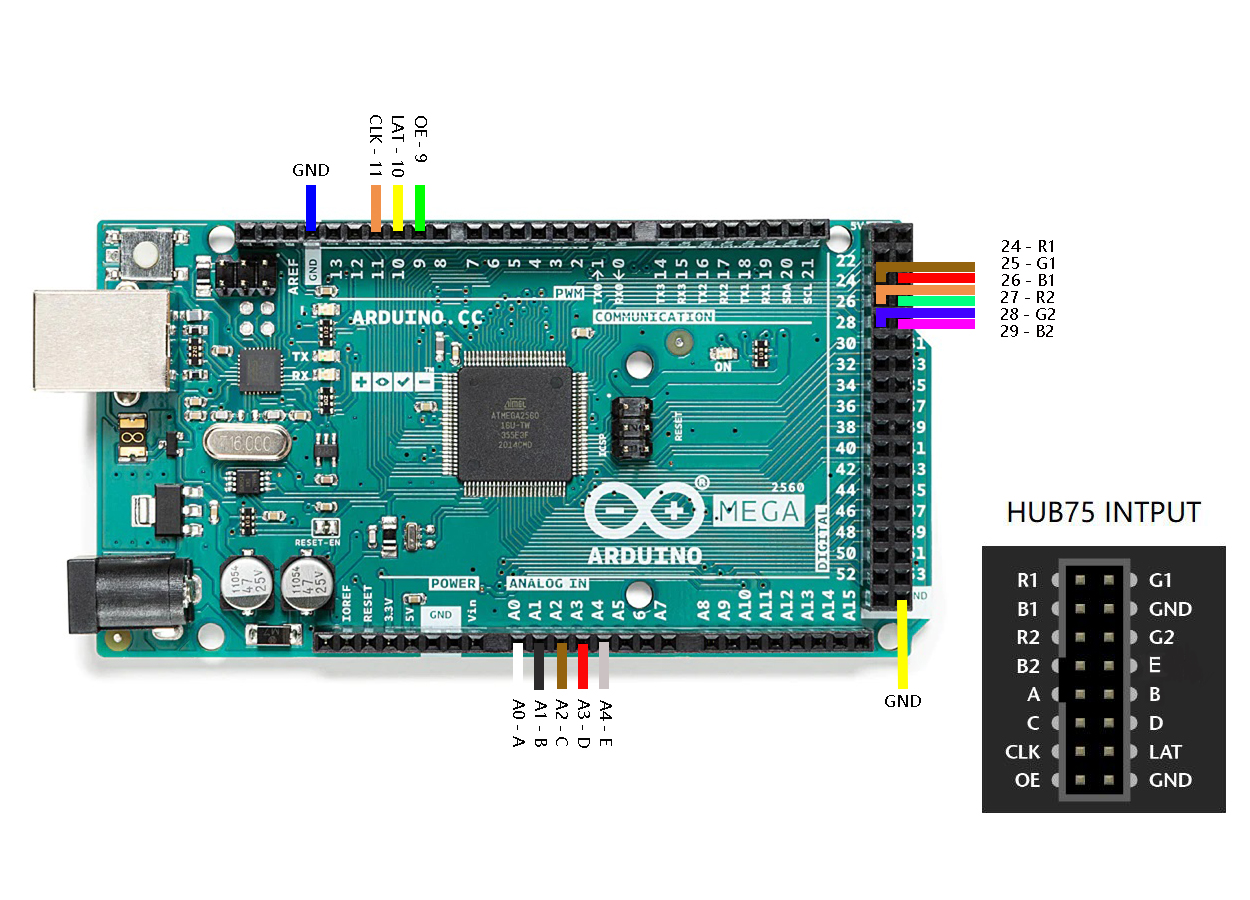
Hardware Connection Diagram
Software Setting
- Install Arduino IDE (Available version 1.8.15, you can also download a new version through Arduino official website).
- Download the sample demo
- Software selection:
Tools->Board->Arduino Mega or Mega 2560, as shown below:
- Open the demo through File, see the relative path:
RGB-Matrix-P2-64x64-Demo\Arduino MEGA\RGB_Matrix_64x64_P2
Example Running Effect
As shown below:
【Function Description】
- UI:
- Draw lines, shapes, and patterns
- Icon can be displayed
- Text content such as text and numbers can be displayed
- Can display Chinese characters and pictures
- Users can customize the displayed text, drawings or animation pictures, etc.
Resource
Document
- Note: Currently only supports font sizes of 16*16, 32*32, and 64*64.
- English Character Display Principle.pdf
Drawing
Demo
Software
FAQ
About 29 degrees.
{{{5}}}
Support
Technical Support
If you need technical support or have any feedback/review, please click the Submit Now button to submit a ticket, Our support team will check and reply to you within 1 to 2 working days. Please be patient as we make every effort to help you to resolve the issue.
Working Time: 9 AM - 6 PM GMT+8 (Monday to Friday)


