
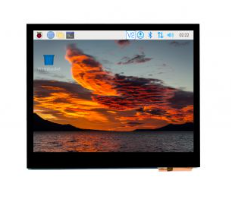
3.5inch HDMI LCD (E)
| ||
Overview
Feature
- 3.5inch IPS screen, hardware resolution is 640 × 480.
- 5-point capacitive touch, toughened glass panel, hardness up to 6H.
- When used with Raspberry Pi, supports Raspberry Pi OS / Ubuntu / Kali and Retropie.
- When used with Tinker Board 2, it supports Android / Debian.
- Ubuntu is supported when used with Jetson Nano.
- When used as a computer monitor, supports Windows 11/10/8.1/8/7.
- Onboard dual touch circuit, optional USB Type-C or I2C touch, more application scenarios.
- With 3.5mm audio and speaker interface, support HDMI audio output.
Featured Design

Use with Raspberry Pi
Hardware connection
1. Set the touch interface selector switch on the back of the screen to "I2C".
2. Fix the Raspberry Pi to the screen through the copper posts, and pay attention to aligning the position of the pogo pins.
3. Connect the HDMI port. Connect the HDMI connector to the screen and the HDMI port of the Raspberry Pi.
Note: Raspberry Pi Zero/Zero 2 W needs an additional HDMI cable for connection.
The hardware connection is as follows:

Software settings
To use the display with the Raspberry Pi, this LCD can support Raspberry Pi OS / Ubuntu / Kali and Retropie systems, you need to configure the resolution manually. Otherwise, it will cause a display exception. When the LCD works on the PC version of the Windows system, there is no such problem.
- Download the newest image from Raspberry Pi website.
- Unzip the image archive and get the .img file.
- Format the SD card with the SDFormatter software.
- User the Win32DiskImager software, and write the .img file to the SD card.
- After writing, modify the config.txt file:
hdmi_group=2
hdmi_mode=87
hdmi_cvt 640 480 75 6 0 0 0
hdmi_drive=2
dtparam=i2c_arm=on
dtoverlay=waveshare-35dpi-3b
dtoverlay=waveshare-35dpi-4b
dtoverlay=waveshare-35dpi-5b
- Download the 3.5inch HDMI LCD (E) file and extract 3 dtbo files. Copy these three files to the overlays directory (/boot/overlays/).
- Save and quit the TF card safely, and insert the TF card into the Raspberry Pi.
- Power on the Raspberry Pi and wait for more than ten seconds to display normally.
Use with PC
The LCD can work on PC version Windows 11/10/8.1/8/7 system.
Instructions:
1) Switch the touch interface selector switch to "USB".
2) Connect the Power&Touch interface of the LCD to the USB interface of the PC.
3) Connect the Display port of the LCD to the HDMI port of the PC.
Hardware connection as shown:

Use with Jetson Nano
1) Switch the touch interface selector switch to "USB".
2) Connect the Power & Touch interface of the LCD to the USB interface of the Jetson Nano.
3) Connect the Display port of the LCD to the HDMI port of the Jetson Nano.
Hardware connection as shown:

Use with Tinker Board 2
Hardware connection
1) Switch the touch interface selector switch to "USB".
2) Connect the Power & Touch interface of the LCD to the USB interface of the Tinker Board 2.
3) Connect the Display port of the LCD to the HDMI port of the Tinker Board 2.
Hardware connection as shown:

Software setting
Android and Debian systems for Tinker Board 2.
- Download the newest image from Tinker Board website.
- Unzip the image archive and get the .img file.
- Format the SD card with the SDFormatter software.
- Use the Win32DiskImager software, and write the .img file to the SD card.
- Save and quit the TF card safely, and insert the TF card into the Tinker Board 2.
- Power on the Tinker Board 2 and wait for more than ten seconds to display normally.
Resources
3D Drawing
Software
Project Resources
This section features third - party project resources. We merely provide links and bear no responsibility for content updates or maintenance. Thank you for your understanding.
Ex-IT guy- I made a working screen made out of LEGO bricks!
- Youtube: https://www.youtube.com/watch?v=8-d7zujJNcc
- Github: https://github.com/exitguy/bits/tree/main/LEGO_CRT
FAQ
Add the following command to /boot/config.txt:
disable_splash=1
{{{5}}}
Replace the custom image with the image in this directory /usr/share/plymouth/themes/pix/splash.png.
{{{5}}}
Raspberry Pi Long-press Right-click Software Installation
Test environment: 2022-04-04-raspios-bullseye-armhf 32-bit system.
Models supported: Supports Waveshare DSI LCD, DPI LCD, and HDMI LCD capacitive touch screen series 32-bit systems, while 64-bit systems are not supported by default
wget https://files.waveshare.com/upload/1/18/Evdev-right-click-emulation.zip
unzip Evdev-right-click-emulation.zip
cd evdev-right-click-emulation
sudo apt install build-essential libevdev2 libevdev-dev -y
sudo cp 'out/evdev-rce' '/usr/local/bin/'
sudo chmod +x '/usr/local/bin/evdev-rce'
Enter the command:
sudo evdev-rce
After running, you can touch and long press to realize the right-click function.
Set up Pi User to Run
sudo usermod -G 'input' -a pi
echo 'uinput' | sudo tee -a /etc/modules
sudo nano  /etc/udev/rules.d/99-uinput.rules
Add following in 99-uinput.rules file.
KERNEL=="uinput", MODE="0660", GROUP="input"
Save it and run it in the terminal.
sudo udevadm control --reload-rules
sudo udevadm trigger
Then reboot:
sudo reboot
Run after reboot (no sudo needed at this point).
evdev-rce
After running, you can touch and long press to realize the right-click function.
Set Startup
Enter in the terminal.
sudo mkdir ~/.config/autostart
sudo nano ~/.config/autostart/right_click.desktop
Add the following in right_click.desktop.
[Desktop Entry]
Version=1.0
Type=Application
Name=evdev-rce
GenericName=Enable long-press-to-right-click gesture
Exec=env LONG_CLICK_INTERVAL=1000 LONG_CLICK_FUZZ=200  /usr/local/bin/evdev-rce
Terminal=true
StartupNotify=false
If you want to modify the sensitivity, you can modify the two parameters: LONG_CLICK_INTERVAL=1000, LONG_CLICK_FUZZ=200.
It depends on the system, if the system has hibernation, the screen will also be black. If it is the official system of Raspberry Pi, the default is about ten minutes without action to have hibernation.
Enter the following command in the terminal of the Raspberry Pi system:
sudo -E rpi-eeprom-config --editAs shown below, change the existing "DISABLE_HDMI" from 0 to 1. If this line does not exist, add it directly. After saving the file, restart the system to disable this screen.

Note: This method currently only supports the Raspberry Pi OS system. If other systems have display issues, you need to disable DISABLE_HDMI on the Raspberry Pi 4B using Raspberry Pi OS first, and then use other systems for display.
Note: After modifying the new version, the backlight brightness will be controlled by the external PWM signal, and the brightness adjustment in the OSD menu will no longer control the backlight.
New version:
First, move the 10K resistor shown in the figure below to the empty resistor pad under the PWM solder pad. After the modification, connect the external PWM signal to the PWM solder pad for backlight control.
The backlight control pin of the new version is active low.
_PWM_new.png)
Old version:
Early versions do not have reserved PWM solder pads. To achieve external PWM backlight adjustment, you need to rotate the 10K resistor shown in the figure below by 180°, and then connect the PWM input signal to the floating end of the rotated 10K resistor (indicated by the yellow arrow).
_pwm.png)
{{{5}}}
60Hz.
{{{5}}}
It depends on the system, if the system has hibernation, the screen will also be black. If it is the official system of Raspberry Pi, the default is about ten minutes without action to have hibernation.
{{{5}}}
Support
Technical Support
If you need technical support or have any feedback/review, please click the Submit Now button to submit a ticket, Our support team will check and reply to you within 1 to 2 working days. Please be patient as we make every effort to help you to resolve the issue.
Working Time: 9 AM - 6 PM GMT+8 (Monday to Friday)