Template: UV Sensor C Raspberry Pi Guide
From Waveshare Wiki
Revision as of 08:16, 6 September 2022 by Eng52 (talk | contribs) (→Download and run the test demo)
Working with Raspberry Pi
This demo uses a Raspberry Pi 4 Model B, which provides RPI (Python) library demos.
Hardware connection
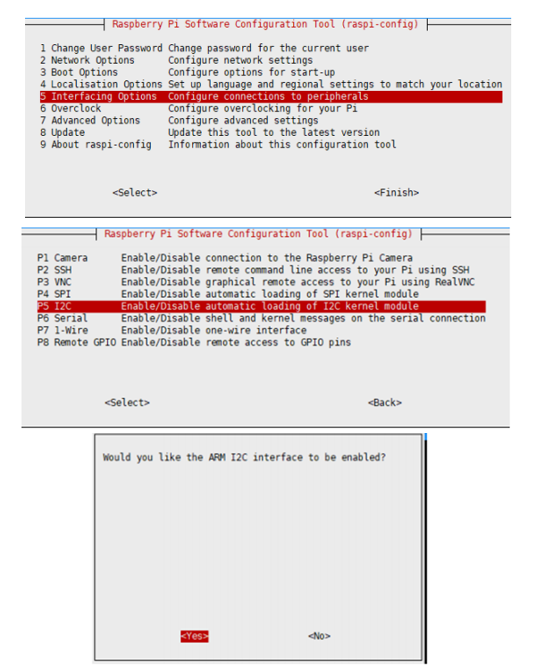
Enable I2C interface
- Execute in terminal:
sudo raspi-config
#Select Interfacing Options -> I2C ->yes to start the i2C kernel driver
- then restart the raspberry pi
sudo reboot
Installing Libraries
- Install BCM2835, open the Raspberry Pi terminal, and run the following command
wget http://www.airspayce.com/mikem/bcm2835/bcm2835-1.60.tar.gz
tar zxvf bcm2835-1.60.tar.gz
cd bcm2835-1.60/
sudo ./configure
sudo make
sudo make check
sudo make install
- install wiringpi
sudo apt-get install wiringpi
#For Raspberry Pi 4B may need to be upgraded:
cd /tmp
wget https://project-downloads.drogon.net/wiringpi-latest.deb
sudo dpkg -i wiringpi-latest.deb
gpio -v
Download and run the test demo
sudo apt-get install p7zip-full
wget https://www.waveshare.com/w/upload/a/ab/UV_Sensor_C_Code.7z
7z x UV_Sensor_C_Code.7z -r -o./UV_Sensor_C_Code
sudo chmod 777 -R  UV_Sensor_C_Code
python program
Execute in the UV_Sensor_C_Code directory:
cd UV_Sensor_C_Code/RPI
sudo python LTR390.py
- Note: The sensor has 2 working modes, measuring light intensity and UV light respectively.
- Note: The upper and lower thresholds of the interrupt are set by the program. If it is higher than or lower, it will trigger, and the INT pin will output a high pulse.

