Difference between revisions of "Template:Raspberry Pi Pico Spec"
From Waveshare Wiki
m (Text replacement - "https://www.waveshare.com/w/upload/" to "https://files.waveshare.com/upload/") |
|||
| Line 25: | Line 25: | ||
==Software Environment Debugging== | ==Software Environment Debugging== | ||
*In order to facilitate the development of Pico boards using MicroPython on the computer, it is recommended to download Thonny IDE. | *In order to facilitate the development of Pico boards using MicroPython on the computer, it is recommended to download Thonny IDE. | ||
| − | *Download [https:// | + | *Download [https://files.waveshare.com/upload/a/ab/Thonny-3.3.3_%281%29.zip Thonny IDE] and install it in steps. |
| − | **[https:// | + | **[https://files.waveshare.com/upload/d/d2/Thonny_IDE.zip Thonny IDE download link (Windows)] |
**[https://thonny.org/ Thonny website] | **[https://thonny.org/ Thonny website] | ||
*After installing, please configure the language and the environment for the first time. Note that we should choose the Raspberry Pi option in the board environment. | *After installing, please configure the language and the environment for the first time. Note that we should choose the Raspberry Pi option in the board environment. | ||
| Line 35: | Line 35: | ||
[[File:Raspberry Pi Pico002.png]]<br/> | [[File:Raspberry Pi Pico002.png]]<br/> | ||
[[File:Raspberry-Pi-Pico-Basic-Kit-M-3.png]]<br/> | [[File:Raspberry-Pi-Pico-Basic-Kit-M-3.png]]<br/> | ||
| − | *Click OK to return to the main interface of Thonny, download the [https:// | + | *Click OK to return to the main interface of Thonny, download the [https://files.waveshare.com/upload/1/1c/Rp2-pico-20210418-v1.15_%281%29.7z firmware library] to Pico, and then click the stop button to display the currently used environment in the Shell window. |
*Pico download firmware library method in Windows: Press and hold the BOOT button and connect to the computer, release the BOOT button, a removable disk will appear on the computer, and copy the firmware library into it. | *Pico download firmware library method in Windows: Press and hold the BOOT button and connect to the computer, release the BOOT button, a removable disk will appear on the computer, and copy the firmware library into it. | ||
*How to download the firmware library for RP2040 in Windows: After connecting to the computer, press the BOOT key and the RESET key at the same time, release the RESET key and then release the BOOT key, a removable disk will appear on the computer. | *How to download the firmware library for RP2040 in Windows: After connecting to the computer, press the BOOT key and the RESET key at the same time, release the RESET key and then release the BOOT key, a removable disk will appear on the computer. | ||
*Copy the firmware library into it (you can also use Pico). | *Copy the firmware library into it (you can also use Pico). | ||
[[File:Raspberry Pi Pico003.png]]<br/> | [[File:Raspberry Pi Pico003.png]]<br/> | ||
Latest revision as of 06:52, 2 September 2023
Overview
Raspberry Pi Pico is a low-cost, high-performance microcontroller board with flexible digital interfaces. It incorporates Raspberry Pi's own RP2040 microcontroller chip, with a dual-core Arm Cortex M0+ processor running up to 133 MHz, embedded 264KB of SRAM, and 2MB of onboard Flash memory, as well as 26 x multi-function GPIO pins.
For software development, either Raspberry Pi's C/C++ SDK or the MicroPython is available. There are also complete development resources and tutorials to help you get started easily, and integrate it into end products quickly.
Features
- RP2040 microcontroller chip designed by Raspberry Pi in the United Kingdom.
- Dual-core Arm Cortex M0+ processor, the flexible clock running up to 133 MHz.
- 264KB of SRAM, and 2MB of onboard Flash memory.
- Castellated module allows soldering direct to carrier boards.
- USB 1.1 with device and host support.
- Low-power sleep and dormant modes.
- Drag-and-drop programming using mass storage over USB.
- 26 × multi-function GPIO pins.
- 2 × SPI, 2 × I2C, 2 × UART, 3 × 12-bit ADC, 16 × controllable PWM channels.
- Accurate clock and timer on-chip.
- Temperature sensor.
- Accelerated floating-point libraries on-chip.
- 8 × Programmable I/O (PIO) state machines for custom peripheral support.
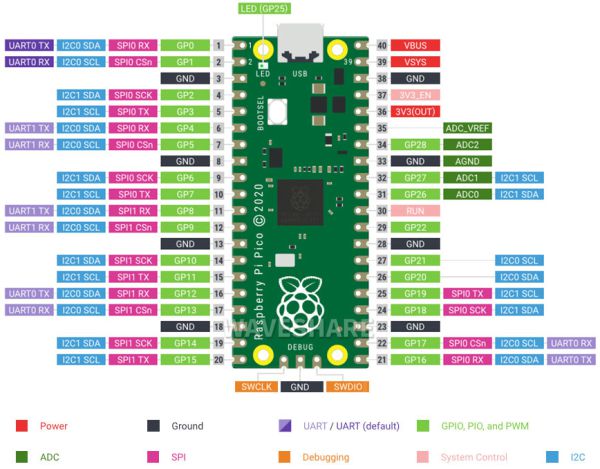
Pinout
Dimension
Software Environment Debugging
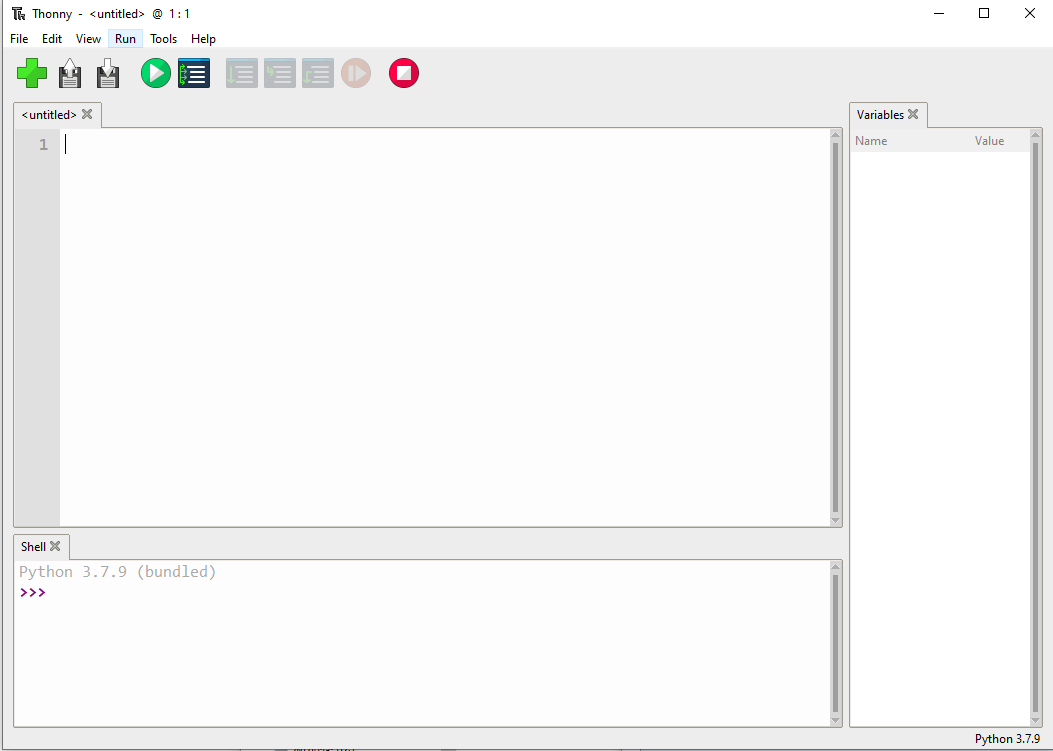
- In order to facilitate the development of Pico boards using MicroPython on the computer, it is recommended to download Thonny IDE.
- Download Thonny IDE and install it in steps.
- After installing, please configure the language and the environment for the first time. Note that we should choose the Raspberry Pi option in the board environment.
- Configure the Micrpython environment and select the Pico port.
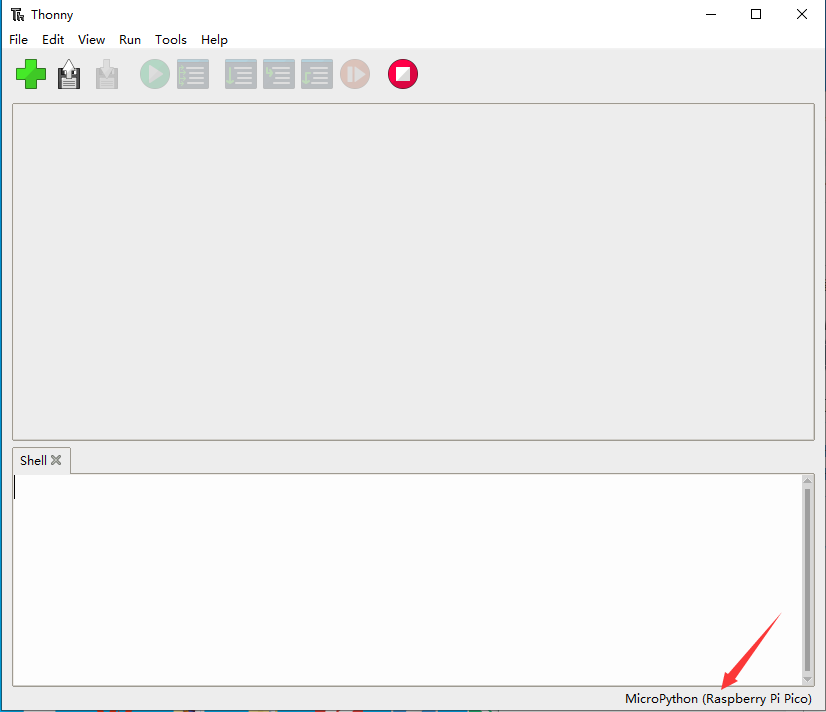
- First connect the Raspberry Pi Pico to the computer, left-click on the configuration environment option in the lower right corner of Thonny--> select configure an interpreter.
- In the pop-up window bar, select MicroPython (Raspberry Pi Pico), and select the corresponding port.
- Click OK to return to the main interface of Thonny, download the firmware library to Pico, and then click the stop button to display the currently used environment in the Shell window.
- Pico download firmware library method in Windows: Press and hold the BOOT button and connect to the computer, release the BOOT button, a removable disk will appear on the computer, and copy the firmware library into it.
- How to download the firmware library for RP2040 in Windows: After connecting to the computer, press the BOOT key and the RESET key at the same time, release the RESET key and then release the BOOT key, a removable disk will appear on the computer.
- Copy the firmware library into it (you can also use Pico).


