Template: Raspberry Pi Pico Quick Start
User Guides for MicroPython
Refresh Firmware
- Download Testing Firmware to your computer and extract it.
- There are two uf2 files, the pico_micropython_20210121.uf2 file is MicroPython firmware
- Press the button on the Pico board, connect the pico to the USB port of the computer via the Micro USB cable, and then release the button.
- After connecting, the computer will automatically recognize a removable disk (RPI-RP2)
- After connecting, the computer will automatically recognize a removable disk (RPI-RP2)
- Copy and drag the firmware file downloaded earlier to the RPi-RP2 mobile disk
- After the copy is completed, Pico will automatically restart, and after the automatic restart, pico will be recognized as a virtual serial port

【Note】 1. If the mobile disk is not automatically recognized after connecting to pico?
▶ Check that the BOOTSEL button is not pressed or released in the middle.
▶ The Micro USB cable used must be a data cable, and the USB cable that can only be used for power supply cannot be used.
2. You can also operate on the Raspberry Pi, the operation steps are the same, also connect the pico to the Raspberry Pi, and then drag the firmware to the mobile disk.
Software Environment Debugging
Windows
In order to facilitate the development of Pico boards using MicroPython on the computer, it is recommended to download Thonny IDE.
- Download Thonny IDE and follow the steps to install
- After the installation is completed, the first time you need to configure the language and motherboard environment, because we are using Pico, so pay attention to select the Raspberry Pi option.
Raspberry
If you want to control Pico on Raspberry Pi, please refer to this con figuration step
Current Raspberry Pi systems come with Thonny IDE.
But if Thonny is not updated to the latest version, there is no Pico support package, and you need to update Thonny to the latest v3.3.3 version.
- Enable a terminal and enter the following command to update thonny
sudo apt upgrade thonny
- Open Thonny IDE (click Raspberry logo -> Programming -> Thonny Python IDE )
- Select Tools -> Options... -> Interpreter
- Select MicroPython (Raspberry Pi Pico and ttyACM0 port
LED Control Demo
- Connect the Pico to the computer (without pressing any keys), if you have not flashed MicroPython before, please follow the #Flash firmware operation
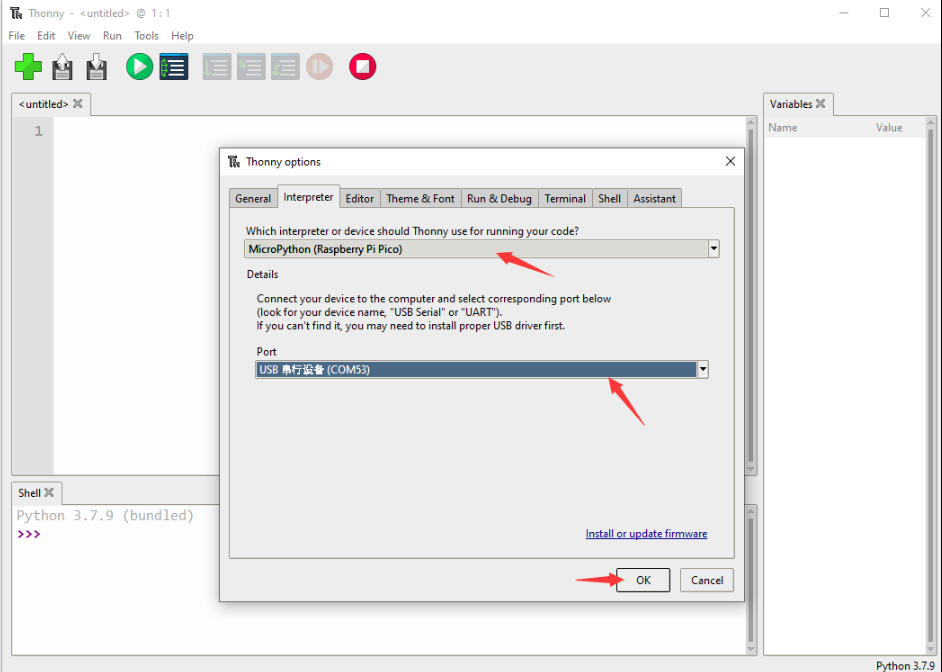
- Select Tools -> Options... -> Interpreter
- Select Raspberry Pi Pico in the interpreter options (be careful to download the latest version of Thonny, otherwise there is no option)
- port selection
- On the computer, the port is selected as, after connecting to Pico, the COM port recognized by the computer
- On the Raspberry Pi, the port is identified as /dev/ttyACM0.
- then confirm
- After confirmation, you can see that there will be multiple Pico information in the command line interface, and now you can enter the MicroPython program here to control the pico
- Looking at the pin diagram of Pico, we know that the control pin of Pico's on-board LED is GPIO25, here we try to control the on-board LED
- Run the following code in sequence in Thonny
>>> from machine import Pin
>>> led = Pin(25, Pin.OUT)
>>> led.value(1)
>>> led.value(0)

After running the code in sequence, you can see that the Pico onboard LED lights are turned on and then off
【Note】
If you want to know more about the functions of Pico Micropython, you can refer to Pico Python SDK Manual


