Template: Pico-SIMXXX-Manual
HTTP
在本实例中,Raspberry Pico通过NB-IoT连接上互联网,通过HTTP GET获取到 获取到天气网站的天气信息,同时把 Pico 上的温度信息 通过HTTP POST 推送到服务器上。
用户可以通过网页访问,查看实时上传的数据。大致的软件示意图如下所示:

硬件准备
按下图所示,把Pico-SIM7020X-NB-IoT模块焊接上排座或排针,然后接入Pico主板、电池、天线和NB-IoT卡:

服务器网页部署
以 http://pico.wiki/esp-chart.php 为例。其软件框图大致如下图所示:

1、服务器搭建php,mysql等环境,创建数据库文件,比如:
- 数据库:example_esp_data
- 密码:your_password
- 用户名:your_username
- 创建数据库表:
CREATE TABLE Sensor (
   id INT(6) UNSIGNED AUTO_INCREMENT PRIMARY KEY,
   value1 VARCHAR(10),
   value2 VARCHAR(10),
   value3 VARCHAR(10),
   reading_time TIMESTAMP DEFAULT CURRENT_TIMESTAMP ON UPDATE CURRENT_TIMESTAMP)
2、服务器端的php示例文件,有post-data.php 和 esp-chart.php
- post-data.php:HTTP POST的API接口,SIM7020X模块可以通过调用此API接口,往服务器POST数据。
- esp-chart.php:用户端访问的网页,可通过此页面获取到SIM7020X上传的最新数据,并通过图表展示出来。
Pico端软件设置
1、参考教程:Template:Raspberry Pi Pico Quick Start 选择在 Windows 或 树莓派 系统下运行MicroPython开发环境
(推荐选用Windows 开发环境,下文以Windows开发环境为例)。
2、下载Python例程:Pico-SIM7020X-NB-loT-HTTP.py ,代码部分预览如下:
- HTTP GET部分:
def httpGetTest():
   sendCMD_waitResp("AT+CHTTPCREATE=\"http://api.seniverse.com\"")    #Create HTTP host instance
   sendCMD_waitResp("AT+CHTTPCON=0")           #Connect server
   sendCMD_waitRespLine("AT+CHTTPSEND=0,0,\"/v3/weather/now.json?key=SwwwfskBjB6fHVRon&location=shenzhen&language=en&unit=c\"")  #send HTTP request
   waitResp()
   sendCMD_waitResp("AT+CHTTPDISCON=0")      #Disconnected from server
   sendCMD_waitResp("AT+CHTTPDESTROY=0")      #Destroy HTTP instance
- HTTP POST部分:
def httpPostTest():
   global i
   i=i+1
   sendCMD_waitResp("AT+CHTTPCREATE=\"http://pico.wiki/post-data.php\"")    #Create HTTP host instance
   sendCMD_waitResp("AT+CHTTPCON=0")           #Connect server
   sendCMD_waitRespLine("AT+CHTTPSEND=0,1,\"/post-data.php\",4163636570743a202a2f2a0d0a436f6e6e656374696f6e3a204b6565702d416c6976650d0a557365722d4167656e743a2053494d434f4d5f4d4f44554c450d0a,\"application/x-www-form-urlencoded\","+str_to_hexStr("api_key=tPmAT5Ab3j888&value1="+str(temperature)+"&value2="+str(ADC0_reading)+"&value3="+str(i)))  #send HTTP request
   waitResp()
   sendCMD_waitResp("AT+CHTTPDISCON=0")      #Disconnected from server
   sendCMD_waitResp("AT+CHTTPDESTROY=0")      #Destroy HTTP instance
更多关于SIM7020X模组HTTP应用文档内容,请见:SIM7020_Series_HTTP_Application_Note_V1.02.pdf
3、把连接好 Pico-SIM7020X-NB-IoT 模块的Pico主板,通过USB连接到电脑上。
- 运行Thonny软件,选择MicroPython(Raspberry Pi Pico),打开示例程序的路径。
- 先点击Stop(序号1),最后点击Run(序号2)按钮,开始运行程序,可通过Shell窗口(序号3)查看运行结果,如下图所示:

4、你可以通过Thonny软件查看、修改、或者运行调试代码。
运行现象
运行Pico-SIM7020X-NB-loT-HTTP.py,则Pico可以开始通过HTTP GET 天气网站的天气信息,同时可以将Pico主板上的温度通过HTTP POST到pico.wiki上。
此时,我们通过网页访问http://pico.wiki/esp-chart.php,网页可以以图表的形式直接展示出实时上传的数据。如下图所示:

TCP
实例说明
该例程展示了Raspberry Pico如何通过NB-IoT网络创建TCP客户端连接远端的服务器,向服务器发送请求。本示例采用的是测试的TCP服务器,该服务器会返回您发送过去的信息。
SIM7020 TCPIP 支持多路 client 和一路 TCP server 架构,共支持 6 路 sockets,包括 TCP 或者 UDP。

代码简析
- 定义TCP服务器IP及端口
ServerIP = '118.190.93.84'
Port = '2317'
- Pico-SIM7020C-NB-IoT模块联网测试
#AT commands test
def atCommandTest():
   sendCMD_waitRespLine("AT")                     #Test connection
   sendCMD_waitRespLine("ATE1")                #Set command echo mode
   sendCMD_waitRespLine("AT+CGMM")
   sendCMD_waitRespLine("AT+CPIN?")        #whether some password is required or not
   sendCMD_waitRespLine("AT+CSQ")          #received signal strength
   sendCMD_waitRespLine("AT+CGREG?")        #the registration of the ME.
   sendCMD_waitRespLine("AT+CGATT?")       #GPRS Service’s status
   sendCMD_waitRespLine("AT+CGACT?")       #PDN active status
   sendCMD_waitRespLine("AT+COPS?")       #Query Network information
   sendCMD_waitRespLine("AT+CGCONTRDP")       #Attached PS domain and got IP address automatically
- 向TCP服务器发送请求
def tcpclientTest():
   sendCMD_waitRespLine("AT+CSOC=1,1,1")    #create TCP socket
   sendCMD_waitRespLine("AT+CSOCON=0,"+Port+",\""+ServerIP+"\"")    #socket_id = 0,connect TCP server
   sendCMD_waitRespLine("AT+CSOSEND=0,0,\"Hello,World\"")    #send TCP data
   sendCMD_waitRespLine("AT+CSOCL=0")    #close TCP socket
- 当接收到服务器返回的数据需要对十六进制的字符串进行转换
if send_data in uart.readline().decode():
   print((uart.readline()).decode())
   print((uart.readline()).decode())
   word = (uart.readline()).decode().split(',') #hexStr_to_str
   get_word = word[2].split('\r')
   word[2] = hexStr_to_str(get_word[0])
   print(word[0]+','+word[1]+','+word[2])
运行现象
运行Pico-SIM7020X-NB-loT-TCP.py,向TCP服务器发送"Hello,World"字符串,同时服务器也会向您发送同样的字符串。
MQTT
实例说明
该示例展示了Raspberry Pico如何通过NB-IoT网络发送MQTT请求,连接到阿里云MQTT服务器,订阅一个话题并向这个话题发布一则消息。
代码简析
- 定义MQTT服务器设备信息
ProductKey = "a1IBIPnZU9G"
Broker_Address = ProductKey + ".iot-as-mqtt.cn-shanghai.aliyuncs.com"
DeviceName = "7020"
DeviceSecret = "8e870f4e611d3e4c2b8f9f017e6a88ab"
- 测试MQTT通信功能
 # MQTT Test
def mqttconnectTest():
   sendCMD_waitRespLine("AT+CMQNEW="+"\""+Broker_Address+"\""+",\"1883\",12000,1024")  #create tcp connection
   sendCMD_waitRespLine("AT+CMQALICFG=0,\""+ProductKey+"\",\""+DeviceName+"\",\""+DeviceSecret+"\"")     #set device parameters
   sendCMD_waitRespLine("AT+CMQALICON=0,600,1")     # send MQTT request
   time.sleep(3)
   sendCMD_waitRespLine("AT+CMQSUB=0,\"/"+ProductKey+"/"+DeviceName+"/"+"user/TEST1\",1")               # subscribe to topics
   time.sleep(3)
   sendCMD_waitRespLine("AT+CMQPUB=0,\"/"+ProductKey+"/"+DeviceName+"/user/TEST1\",1,0,0,16,\"3132333435363738\"")  # release the news
   time.sleep(3)
   sendCMD_waitRespLine("AT+CMQUNSUB=0,\"/"+ProductKey+"/"+DeviceName+"/user/TEST1\"")  # unsubscribe topic
   time.sleep(3)
   sendCMD_waitRespLine("AT+CMQDISCON=0")   # disconnect MQTT connection
搭建阿里云MQTT服务器
1. 进入阿里云物联网平台,如果还没有购买的需要购买一下产品,企业版首月免费。
2.创建产品


点击ok,选择Add Device
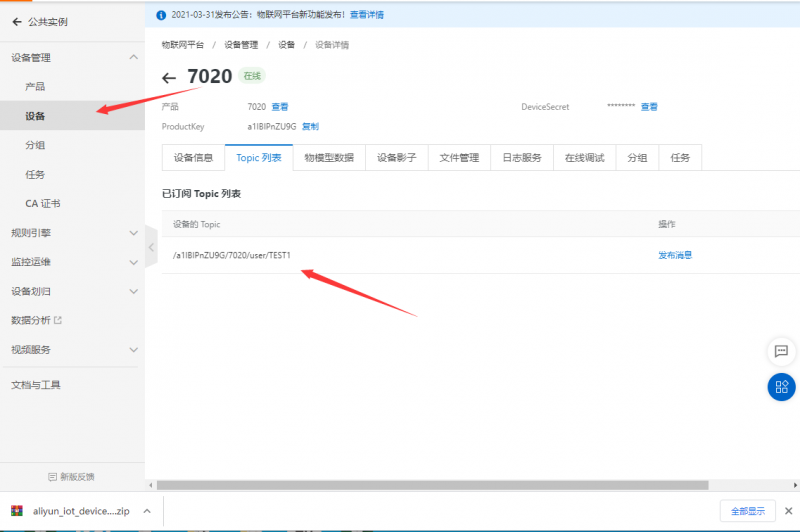
3.设置DeviceName,完成之后查看设备,查看设备的DeivceSecret,将这些值更改到MQTT代码对于的值中


4.注册话题,点击Products-->查看7020_test-->Topic Categories-->Edit Topic Category-->选择Publish and Subscribe

运行现象
运行Pico-SIM7020X-NB-loT-MQTT.py,可以看到您订阅了一个话题,然后向该话题发布一则消息时,服务器会向您推送这一则消息。

同时您可以在设备列表中看到订阅到的话题


