Template: Jetson nano dev kit login
Overview
Note
If you purchased the Nano kit with the module provided by Waveshare, we have programmed the JetPack4.6 image on the emmc before leaving the factory, and have set the SD card recognition. If you need to modify the SD card startup, please refer to the manual to modify the startup path.
If you have special requirements for the factory image version, please contact the customer service of the Waveshare shop to communicate and confirm.
Introduction
Based on AI computers Jetson Nano and Jetson Xavier NX, providing almost the same peripheral interfaces, size and thickness as the Jetson Nano Developer Kit (B01), more convenient for upgrading the core module. By utilizing the power of core module, it is qualified for fields like image classification, object detection, segmentation, speech processing etc. and can be used in sorts of AI projects.
- The header switch of the DC power supply has been canceled, which means that we can directly insert the DC power supply to the circular interface and do not need to use a jumper cap to short the J48 interface first.
- Waceshare JETSON-NANO-DEV-KIT not only supports U-disk booting but also supports TF card booting as it has integrated a TF card slot on the expansion board. The reading and writing are stable, and it is almost the same as the B01 official core board with a TF card slot.
System Installation
System Environment Construction
- The programming system needs to use the Ubuntu 18.04 host or virtual machine, and use the SDK Manager tool to program.
- The system environment in this manual uses VMware 16 virtual machine to install Ubuntu 18.04 system, only for learning.
- Download SDK Manager: open the browser and enter the URL, click to download SDK Manager.
https://developer.nvidia.com/zh-cn/embedded/jetpack

You need to register an account. After logging in, we can download it successfully. If you don't know how to register, you can refer to NVIDIA-acess
2. After the download is complete, we enter the download path Downloads to install, and input the following content in the terminal:
sudo dpkg -i sdkmanager_1.6.1-8175_amd64.deb (enter according to your own version).

3. After the installation is complete, the system may report an error that the dependency files cannot be found. Enter the following command to solve this problem.
sudo apt --fix-broken install
4. Open the Ubuntu computer terminal and run the SDK Manager to open the software.
5. Click LOGIN, log in to the NVIDIA account, and a link will pop up in the browser, enter the previous registered email and password to log in.
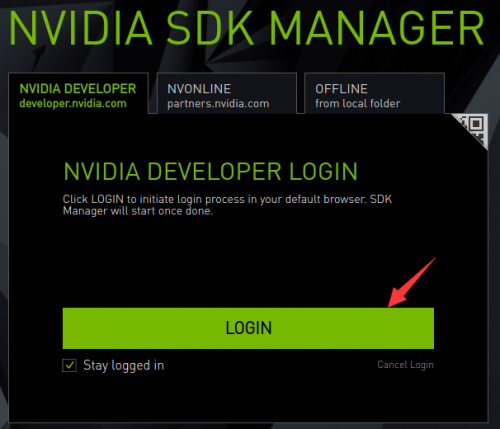
6. At this point we have successfully logged in to the SDK Manager.
Install image on EMMC
Equipment Preparation
- Jetson Nano board
- 5V/4A power adapter
- Jumper caps (or Dupont wire)
- USB data cable (Micro USB interface, can transfer data)
Hardware configuration (enter recovery mode)
- Use jumper caps or Dupont wires to short-circuit the FC REC and GND pins, as shown in the figure below, at the bottom of the core board.
- Connect the DC power supply to the circular power port and wait a moment.
- Connect the Micro USB port of the Jetson Nano to the Ubuntu host with a USB cable (note that it is a data cable).
System Programming
- Open the Ubuntu computer terminal and run the SDK Manager to open the software.
- Using a virtual machine requires setting up the device to connect to the virtual machine.

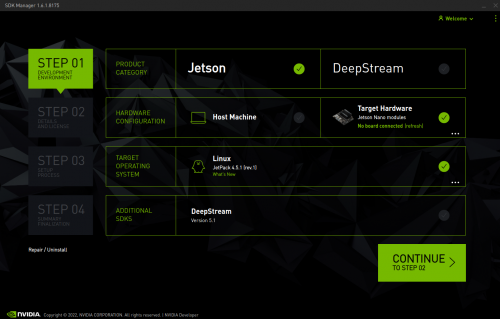
3. Log in to your account, if the Jetson Nano is recognized normally, SDK Manager will detect and prompt options.

4. In the JetPack option, take the JetPack4.6 system as an example, uncheck Host Machine and click CONTINUE.

5. Select Jetson OS, and remove the option of Jetson SDK Components. Check the protocol and click CONTINUE.
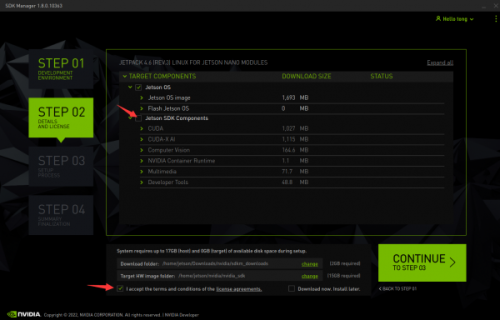
6. The path saved by HW Imager is good by default. Select Create and the path will be created automatically.

7. Enter the virtual machine password, wait for the download, and the programming is complete.

- Starting from JetPack 4.6.1, the preconfig window will pop up when using SDK Manager to program the system.
- Here, the development board type is selected by default. Be careful not to make a mistake when selecting the type of development board earlier.
- Here, we select Manual Setup-Jetson Nano.
8. After the programming is completed, remove the jumper cap of the baseboard, connect to the monitor, power on again, and follow the prompts to configure the boot (if it is pre-config set, it will directly enter the system after power on).
U disk and TF card booting principle
- U disk or TF card startup is to start the system on the EMMC in the core board first, and then the system of the core board is guided to the U disk to start or the TF card to start.
- The system in the core board can use the SDK Manager in the virtual machine to program the system; the TF card system can use Win32DiskImager to program the system; the system in the U disk uses the virtual machine to program the system.
- When preparing for U disk startup or TF card startup, first ensure that the EMMC system is successfully programmed.
Install image in the U disk
Preparation
- Jetson Nano board
- Ubuntu18.04 virtual machine (or computer host)
- U disk or mobile hard disk with USB interface (USB3.0 is recommended)
- One USB cable (Micro USB interface, which can transmit data)
- 5V/4A power adapter
System Installation
- To avoid errors in the process of programming the image, you need to use the Panasonic_SDFormatter-SD card formatting software to format the U disk before programming the image.
- Pay special attention when formatting, if your computer has another removable hard disk inserted, do not format the wrong drive.
1. Connect the U disk to the Jetson Nano, check the device number of the U disk, such as sda, open the Jetson Nano terminal, and enter.
ls /dev/sd*
2. Connect the U disk to the computer and choose to connect to the virtual machine.

3. View the device number of the U disk on the computer, such as sdb.
sudo lsblk -p -d | grep sd
- At this point, we get two device numbers: the U disk is connected to the Jetson nano device number sda, and the U disk is connected to the virtual machine device number sdb.
4. Use a virtual machine to install the system on the U disk, first format the U disk to ext4 format.
sudo mkfs.ext4 /dev/sdb
Note: Please refer to your actual situation for the specific device number. Some devices may be sda or others.
5. Mount the U disk.
sudo mount /dev/sdb /mnt
6. Enter the HW Imager address and copy the rootfs root file system (the HW Imager address is the path automatically generated when EMMC flashes the system).
cd <path>/Linux_for_Tegra/rootfs/
7. Note: Please refer to your actual address. For example, and my path command is:
cd /home/jetson/nvidia/nvidia_sdk/JetPack_4.6_Linux_JETSON_NANO_TARGETS/Linux_for_Tegra/rootfs
8. After the copy is complete, unmount the U disk (don't plug it out):
sudo umount /mnt
9. Set the nano to recovery mode (refer to the flashing tutorial), then connect to the virtual machine and program the bootloader from the U disk.
cd ../
sudo ./flash.sh jetson-nano-emmc sda
Note: The sda here should be filled in as the actual device number of the U disk identified in the Jetson Nano in the first step.
After flashing is complete. Disconnect the Jetson Nano and the USB flash drive, connect the USB flash drive to the Jetson Nano, power on it, and follow the prompts to complete the configuration process.
Install Image on TF Card
Preparation
- Jetson Nano board
- Ubuntu18.04 virtual machine (or computer host)
- 64G TF card and TF card reader
- One USB cable (Micro USB interface, which can transmit data)
- 5V/4A power adapter
System Installation
- To avoid errors in the process of programming the image, you need to use the Panasonic_SDFormatter-SD card formatting software to format the TF card before programming the image.
- Pay special attention when formatting, if your computer has another removable hard disk inserted, do not format the wrong drive.
- First download the TF card image, the image must be initialized, otherwise it will fail to boot, you can download the image provided by Waveshare.
- Open Win32DiskImager image software, insert the TF card into the card reader and insert the card reader into the computer.
- Select the downloaded image file, click "Write" and wait for the writing to complete.
Program Boot Loader
1. Install dtc software in the virtual machine.
sudo apt-get install device-tree-compiler
2. Enter the HW Imager kernel path, decompile the dts source file (for different jetpacks, modify the corresponding path).
cd ~/nvidia/nvidia_sdk/JetPack_4.6_Linux_JETSON_NANO_TARGETS/Linux_for_Tegra/kernel/dtb
dtc -I dtb -O dts -o tegra210-p3448-0002-p3449-0000-b00.dts tegra210-p3448-0002-p3449-0000-b00.dtb
3. Modify the device tree
sudo vim tegra210-p3448-0002-p3449-0000-b00.dts
4. Find the following part, change status = "disable" to okay, and add TF information below:
cd-gpios = <0x5b 0xc2 0x0>;
sd-uhs-sdr104;
sd-uhs-sdr50;
sd-uhs-sdr25;
sd-uhs-sdr12;

no-mmc;
uhs-mask = <0xc>;
dtc -I dts -O dtb -o tegra210-p3448-0002-p3449-0000-b00.dtb tegra210-p3448-0002-p3449-0000-b00.dts
6. To program the system, the Jetson Nano needs to enter the recovery mode and connect to the Ubuntu computer.
cd ~/nvidia/nvidia_sdk/JetPack_4.6_Linux_JETSON_NANO_TARGETS/Linux_for_Tegra
sudo ./flash.sh jetson-nano-emmc mmcblk1p1
How to Expand U disk or TF card system
- GParted is a very powerful partitioning tool under Linux. GParted can easily create and delete partitions, as well as resize and move partitions.
1. When we use a U disk or TF card larger than the image memory to program the image, there will be a part of the free memory that cannot be used.
df -h
2. Download GParted Disk Partitioning Tool.
sudo apt-get update
sudo apt-get install gparted -y
3. Click "Open" in the search bar or enter the following command in the terminal to open.
gparted

After opening, you will be prompted to enter the login password.

4. First look at the upper right corner, click and two partitions will appear:"mmcblk0" and "mmcblk1".
Among them, mmcblk0 is the EMMC storage device that comes with Jetson Nano, and mmcblk1 is the TF card storage device.
If you are using a U disk, the sda partition is usually displayed.

5. We select mmcblk1 (if it is a U disk boot, select sda) and find that 14.4g is not allocated.
Click on the allocated part, and the yellow arrow above changes from gray to yellow.
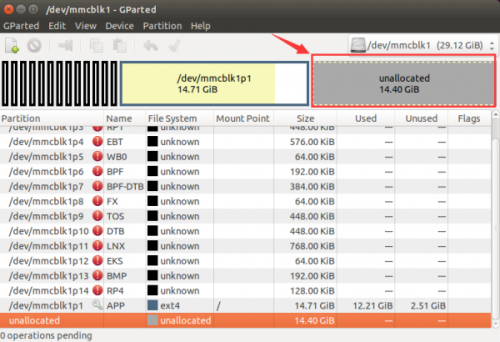

6. Drag the arrow directly to expand the partition to the maximum.
Click "Resize", and the "Apply".
After waiting, we click the green arrow to successfully assign the partition.


7. At this point, the viewing space in the terminal matches the TF card space.
df -h
Login
Offline Login
- Use the image provided by Waveshare, the user name and user password are as follows:
Username: waveshare
User password: waveshare
Remote Login
Preparation
- Please connect Jetson Nano by a network cable, and then connect the LAN port of the router with the other end of the cable.
- Please make sure Jetson Nano and your computer are under the same router or the network segment.
Get Jetson Nano IP
- Method 1: Log in to the router to find the IP of Jetson Nano.
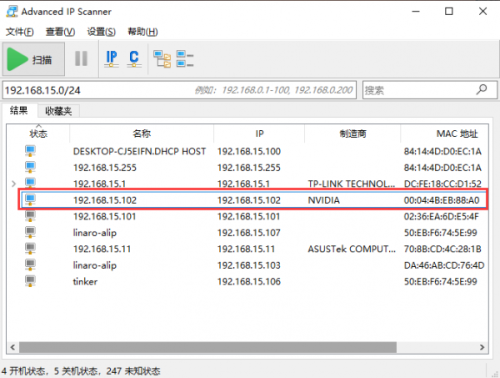
- Method 2: You can use some LAN IP scanning tools, here is an example of Advanced IP Scanner.
- Run Advanced IP Scanner.
- Click the "Scan" button to scan the IP in the current LAN.
- Find "all" IP with the word "NVIDIA" in Manufacture and then record.
- 4. Power on the device and connect to the network.
- 5. Please click the "Scan" button again to scan the IP in the current LAN.
- 6. Exclude all the IP addresses with the word "NVIDIA" in the previously recorded Manufacturer, and the rest is your NVIDIA IP address.
Log in with MobaXterm
Terminal Window
- Download MobaXterm and unzip it to use.
- Open XobaXterm, click Session and choose "ssh".
- Enter the IP address 192.168.15.102 we queried earlier in the Remote host (fill in according to your actual IP), after filling in, click ok.
- 4. Click "Accept". Waveshare provides the image login name: waveshare, enter the login password: waveshare (when entering the password, the screen does not change is a normal phenomenon, click Enter to confirm.)
Nomachine Login
- Compared with SSH and VNC, you may not know much about Nomachine. Nomachine is free remote desktop software.
- NoMachine basically covers all major operating systems, including Windows, Mac, Linux, iOS, Android and Raspberry, etc.
Install on Jetson Nano
- Download and unzip NoMachine
- After unzipping, please use U disk or file transmission to copy ".deb" file to Jetson Nano.
- Install it with the following commands:
sudo dpkg -i nomachine_7.10.1_1_arm64.deb
Install on Windows PC
- Download NoMachine and then install. After clicking "Finish", you have to reboot your computer.
Connect to Jetson Nano
1. Open NoMachine and then enter the IP of Jetson Nano in the "Search" bar. For example, "192.168.15.100".

2. Click "Connect to new hos 192.168.15.100", and then enter the username and password of Jetson Nano. Click "login".

3. After loading, there is an interface for software introduction, and we just need to click "OK".

4. By now, we can log in to Jetson Nano successfully.

VMC Login
- In the absence of a display screen, if you want to enter the desktop of the Jetson Nano, you need to use the remote desktop to log in. (It is recommended to use the display screen, VNC has a certain delay).
Configure the VNC Server
- Jetson Nano uses vino as the default VNC server, but the default settings need some modifications.
1. Configure VNC Server:
gsettings set org.gnome.Vino require-encryption false
gsettings set org.gnome.Vino prompt-enabled false
gsettings set org.gnome.Vino authentication-methods "['vnc']"
gsettings set org.gnome.Vino lock-screen-on-disconnect false
gsettings set org.gnome.Vino vnc-password $(echo -n "mypassword"|base64)
- It should be noted that do not use sudo to run the above command, mypassword is the password to connect to VNC.
2. Set the desktop to start automatically at boot, and create a new self-starting file in the .config path.
 mkdir -p .config/autostart
sudo vim ~/.config/autostart/vino-server.desktop
Add the following content:
[Desktop Entry]
Type=Application
Name=Vino VNC server
Exec=/usr/lib/vino/vino-server
NoDisplay=true
3. Check what manager you are currently using:
cat /etc/X11/default-display-manager
4. Edit the file:
sudo vim /etc/gdm3/custom.conf
5. Remove the comments on the following three lines, and modify the AutomaticLogin line to your own username.
WaylandEnable=false
AutomaticLoginEnable = true
AutomaticLogin = waveshare
6. Reboot Jetson Nano:
sudo reboot
Download and Install VNC Viewer
- Download and install VNC Viewer
Remotely connect to Jetson Nano using VNC Viewer
1. Open VNC Viewer, enter the IP address of Jetson Nano and press Enter to confirm. For example:
192.168.15.102
2. Enter the VNC login password set earlier and click "Ok":
3. At this point, you have successfully logged in to Jetson Nano.
500px


