
Template: ESP8266 Guides for SPI e-Paper
From Waveshare Wiki
Revision as of 09:42, 7 February 2021 by Waveshare-eng11 (talk | contribs)
Setup Arduino IDE (Winodws)
To use the ESP8266 board with Arduino IDE, you need to first add the support of the board package to the IDE. We use Windows PC as an example.
The ESP8266 used here is the Waveshare ESP8266 e-Paper Driver Board
- Download the Arduino IDE from Arduino website
- Install the Arduino-ESP8266 Support Page:
- 1. Open the Arduino IDE
- 2. Go to File->Preferences Menu, open the Settings tab
- 3. Text http://arduino.esp8266.com/stable/package_esp8266com_index.json into the text box Additional Boards Manager URLs and click OK

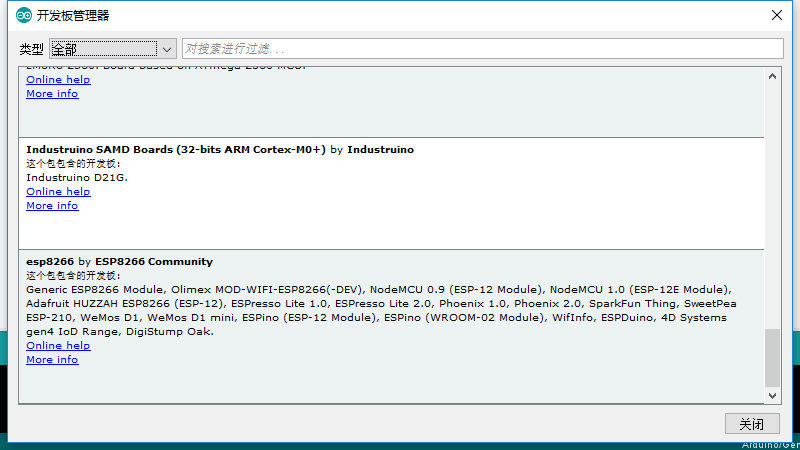
- 4. Go to Tools->Board-> Boards Manager.... find and/or install ESP8266 by ESP8266 Community.


- After installing, restart the Arduino IDE, and you can find the NodeMCU1.0(ESP-12E Module) options in the Tools->Boards menu of IDE
Download Demo Codes
- Download the ESP8266 Demo codes e-Paper ESP8266 Driver Codes to your PC.
- Unzip the demo codes
- The demo codes are included in the examples folder.


- You should copy the esp8266-waveshare-epd folder to the %LOCALAPPDATA%\Arduino15\packages\esp8266\hardware\esp8266\2.7.1\libraries folder which is under the installation directory of IDE.
- The path may be different according to the version of Arduino IDE and the ESP8266 libraries, you need to modify it if it is different.
- The esp8266-waveshare-epd is saved under the examples directory.

Hardware connection
- Raw panel + ESP8266 Driver Board
- If you have the ESP8266 e-Paper Driver board as well as an e-Paper raw panel. You can just connect the e-paper panel to the ESP8266 board
- Configure the switch according to the type of display


| Trigger state | e-Paper |
|---|---|
| A | 1.54inch e-Paper, 2.13inch e-Paper, 2.13inch e-Paper (D), 2.9inch e-Paper |
| B | 1.54inch e-Paper (B), 1.54inch e-Paper (C)
2.13inch e-Paper (B), 2.13inch e-Paper (C) |
Note: The ACeP e-Paper doesn't support this connecting method.
- e-Paper Module/HAT + ESP8266 Board
- If you have the ESP8266 Board as well as the e-Paper module/HAT which has PCB already, you can wire the displays by 8-pin cable pin
| e-Paper | ESP8266 |
| Vcc | 3.3V |
| GND | GND |
| DIN | GPIO13 |
| CLK | GPIO14 |
| CS | GPIO15 |
| DC | GPIO4 |
| RST | GPIO2 |
| BUSY | GPIO5 |
Run the Demo Codes
- Open the Arduino IDE
- Choose File->Examples-> waveshae-e-Paper -> And the project according to the type of display

- Build and program the ESP8266 board
- Open the serial monitor, you can check the debug information when running the demo codes