
Difference between revisions of "Template:E-Paper Cloud Module Manual"
(Created page with "=<big>'''e-Paper Cloud Module用户手册'''</big>= <big> <font color=red>'''APP可以通过浏览器扫描下方二维码进行下载'''</font><br /> File:Cloud_APP.png|400...") |
|||
| Line 1: | Line 1: | ||
| − | |||
<big> | <big> | ||
| − | <font color=red>''' | + | <font color=red>'''You can download and install the APP by scanning the QR codes'''</font><br /> |
[[File:Cloud_APP.png|400px]] | [[File:Cloud_APP.png|400px]] | ||
| − | ==<big><big>''' | + | ==<big><big>'''Lead Information'''</big></big>== |
| − | + | Every time the device start, it will do partial refresh and display status icons.<br /> | |
| − | + | Hereby provide the refrence of icons.<br /> | |
{| style="width:400px;" | {| style="width:400px;" | ||
|- | |- | ||
| [[File:Cloud_ESP32_e-Paper_Board_wait.png|32px]] || [[File:Cloud_ESP32_e-Paper_Board_set.png|32px]] || [[File:Cloud_ESP32_e-Paper_Board_batter.png|32px]] || [[File:Cloud_ESP32_e-Paper_Board_wifi.png|32px]] || [[File:Cloud_ESP32_e-Paper_Board_wifi_connect.png|32px]] | | [[File:Cloud_ESP32_e-Paper_Board_wait.png|32px]] || [[File:Cloud_ESP32_e-Paper_Board_set.png|32px]] || [[File:Cloud_ESP32_e-Paper_Board_batter.png|32px]] || [[File:Cloud_ESP32_e-Paper_Board_wifi.png|32px]] || [[File:Cloud_ESP32_e-Paper_Board_wifi_connect.png|32px]] | ||
| + | |- | ||
| + | |Waiting || Setting || Low Voltage || WIFI || Host | ||
|} | |} | ||
| − | * | + | *Waiting: The device is waiting for commands. |
| − | * | + | *Setting: Setting is finished. |
| − | * | + | *Low Voltage: The voltage of battareis is lower than warnning value. |
| − | * | + | *WIFI: The wifi is connected. |
| − | * | + | *Host: The devices is connected to target host by IP address. |
| − | * | + | *Generally, you should press the button to wake up the device and check the icons. The warnning voltage is 3600mv, once the voltage is 150mv lower than warnning voltage (3450mv), the devices will shutdown automatically to protect the stable of the whole system. |
| − | ==<big><big>''' | + | ==<big><big>'''1. Configure Device'''</big></big>== |
| − | ===<big>'''1.1 | + | ===<big>'''1.1 First Setup'''</big>=== |
| − | + | If you didn't configure the device before, you should configure the device by APP after pressing the Wakeup button to update the display①. Please refer to [[#1.4 Configure Device by APP]] to configure the device.②<br /> | |
| − | + | Note:<br /> | |
| − | + | ①If the device isn't configured, Waiting icon is displaed in the top-right area. If the Low Voltage icon is displayed without Waiting, it means that the batteris is less than 3450mv and it is going to shutdown.<br /> | |
| − | + | ②If the device doesn't connect to Bluetooth, it will shutdown after 90s after booting and refreshing the display. | |
| − | ===<big>'''1. | + | ===<big>'''1.2 Reconfiguration'''</big>=== |
| − | + | If the device was configured, the device will update and display Setted icon in the top-right area① after pressing wakeup button. The Bluetooth is disabled by default, if required, you should hold the wakeup button for 5s at least to enable the Bluetooth②. The updating process of device will not be interrupted③ while enabling the Bluetooth. After enabling the Bluetooth, you can re-configure the device by referring to [[#1.4 Configure Device by APP]] ④.<br /> | |
注:<br /> | 注:<br /> | ||
| − | + | ①The update time of device is determined the speed of WIFI, It should less than 30s as we test.。<br /> | |
| − | + | ②You can holding the wakeup button untill your phone scan the device vi Bluetooth. Otherwise, the device auto-sutdown if the bluetooth is disconnected.。<br /> | |
| − | + | ③If you enable the Bluetooth of device, it will try to connet to master (phone) in 30s if th shutdown command is received via wifi. If the device is connected to phone by Bluetooth, it will keep waking, otherwise it will be turned off after 30s.<br /> | |
| − | + | ④You should reboot the device after configurating to make the configuration effect. Please do not reboot the device when transmitting data via WIFI, it will cost data losing. | |
| − | ===<big>'''1. | + | ===<big>'''1.3 APP Description'''</big>=== |
::[[File:Cloud_Epd_app_1.png|300px]] | ::[[File:Cloud_Epd_app_1.png|300px]] | ||
| − | ::::'''<big> | + | ::::'''<big>Bluetooth Connectiono Button and the information</big>''' <br\> |
::[[File:Cloud_Epd_app_2.png|300px]] | ::[[File:Cloud_Epd_app_2.png|300px]] | ||
| − | :::'''<big> | + | :::'''<big>Device ID: for distinguish devices</big>'''<br\> |
::[[File:Cloud_Epd_app_3.png|300px]] | ::[[File:Cloud_Epd_app_3.png|300px]] | ||
| − | ::'''<big> | + | ::'''<big>WIFI_SSID</big>'''<br\> |
::[[File:Cloud_Epd_app_4.png|300px]] | ::[[File:Cloud_Epd_app_4.png|300px]] | ||
| − | :::'''<big> | + | :::'''<big>Check the current SSID connected</big>'''<br\> |
::[[File:Cloud_Epd_app_5.png|300px]] | ::[[File:Cloud_Epd_app_5.png|300px]] | ||
| − | :::::'''<big> | + | :::::'''<big>WIFI_Password</big>'''<br\> |
::[[File:Cloud_Epd_app_6.png|300px]] | ::[[File:Cloud_Epd_app_6.png|300px]] | ||
| − | :::'''<big> | + | :::'''<big>Host_IP, The IP of host, for example, the IP of Raspberry Pi.</big>'''<br\> |
::[[File:Cloud_Epd_app_8.png|300px]] | ::[[File:Cloud_Epd_app_8.png|300px]] | ||
| − | ::'''<big> | + | ::'''<big>Device_IP: This is used to set the static IP. If you enable DHCP, the static IP is unavailable</big>'''<br\> |
::[[File:Cloud_Epd_app_7.png|300px]] | ::[[File:Cloud_Epd_app_7.png|300px]] | ||
| − | :'''<big> | + | :'''<big>Device_Password, you should input the device password to vertify if the device is locked.</big>'''<br\> |
| − | + | Note: The default device password of Raspberry Pi example is 123456. If you lock the device you have to unlock it with password 123456, otherwise, the device cannot work.<br\> | |
::[[File:Cloud_Epd_app_9.png|300px]] | ::[[File:Cloud_Epd_app_9.png|300px]] | ||
| − | '''<big> | + | '''<big>Warning_voltage: If the voltage of batteries is less than the warning voltage, device will display the warnning icon. If the battert is 150mV lower than the warning voltage, device will shutdown automatically.</big>'''<br\> |
::[[File:Cloud_Epd_app_10.png|300px]] | ::[[File:Cloud_Epd_app_10.png|300px]] | ||
| − | ::'''<big> | + | ::'''<big>Load the configuration saved</big>'''<br\> |
::[[File:Cloud_Epd_app_11.png|300px]] | ::[[File:Cloud_Epd_app_11.png|300px]] | ||
| − | ::'''<big> | + | ::'''<big> Save the current configuration, you can save up to four sets of configuration</big>'''<br\> |
::[[File:Cloud_Epd_app_12.png|300px]] | ::[[File:Cloud_Epd_app_12.png|300px]] | ||
| − | ::::'''<big> | + | ::::'''<big>Upload the current configuration to device.</big>'''<br\> |
::[[File:Cloud_Epd_app_13.png|300px]] | ::[[File:Cloud_Epd_app_13.png|300px]] | ||
| − | ::::'''<big> | + | ::::'''<big> Formating: Clean the current configuration</big>'''<br\> |
| − | ===<big>'''1. | + | ===<big>'''1.4 Configure Device by APP'''</big>=== |
| − | ::Ⅰ. | + | ::Ⅰ.Open APP(APP will auto-save the last configuration information) |
::[[File:Cloud_ESP32_e-Paper_Board_manual_1.png|300px]] | ::[[File:Cloud_ESP32_e-Paper_Board_manual_1.png|300px]] | ||
| − | ::Ⅱ. | + | ::Ⅱ.Click Bluetooth CONNECTION button, the default Bluetooth device is WaveShare_EPD or the Device ID configured. |
| − | ::[[File:Cloud_ESP32_e-Paper_Board_manual_2.png|300px| | + | ::[[File:Cloud_ESP32_e-Paper_Board_manual_2.png|300px|Unpaired]] |
| − | ::::::: | + | :::::::Unparied |
| − | ::[[File:Cloud_ESP32_e-Paper_Board_manual_3.png|300px| | + | ::[[File:Cloud_ESP32_e-Paper_Board_manual_3.png|300px|Paried]] |
| − | ::::::: | + | :::::::Paried |
| − | ::Ⅲ. | + | ::Ⅲ.Choose the device, for example connect the WaveShare_EPD. If you are the first time to connect the WaveShare_EPD device, it should be paired first. |
::[[File:Cloud_ESP32_e-Paper_Board_manual_4.png|300px]] | ::[[File:Cloud_ESP32_e-Paper_Board_manual_4.png|300px]] | ||
| − | ::Ⅳ. | + | ::Ⅳ. Modify the configuration information and Upload(If you have configured the password, you need to input the paddword as well.) |
::[[File:Cloud_ESP32_e-Paper_Board_manual_5.png|300px]] | ::[[File:Cloud_ESP32_e-Paper_Board_manual_5.png|300px]] | ||
| − | ::Ⅴ. | + | ::Ⅴ.The APP will disconnect and reboot the device if configuration are uploaded successfully. |
::[[File:Cloud_ESP32_e-Paper_Board_manual_6.png|300px]] | ::[[File:Cloud_ESP32_e-Paper_Board_manual_6.png|300px]] | ||
| − | :: | + | ::Note: We recommend you to set static IP for device. |
| − | ==<big><big>''' | + | ==<big><big>'''2. Communicating Protocol '''</big></big>== |
| − | + | The Communicating is divided into two modes: Command mode and the data mode. Command mode is used for sending command. data Mode is sued for sending image data to e-Paper. | |
| − | ====<big>''' | + | ====<big>'''Command Format'''</big>==== |
| − | ‘;’+<font color=red> | + | ‘;’+<font color=red>Command(+Data)</font>+'/'+Veriry |
| − | ====<big>''' | + | ====<big>'''Data Format'''</big>==== |
| − | 0x57+<font color=red>4Byte addr+ 4Byte len +1Byte num + len Byte data </font>+ | + | 0x57+<font color=red>4Byte addr+ 4Byte len +1Byte num + len Byte data </font>+Verify |
| − | ====<big>''' | + | ====<big>'''Return Format'''</big>==== |
| − | '$'+ | + | '$'+Data+'#' |
| − | + | The format of response of Command and Data are the same | |
| − | + | Note:<font color=red>The Verity is the XOR result of data which is marked in red </font> | |
| − | ===''' | + | ==='''Command Mode:'''=== |
| − | ==== | + | ====Command Format==== |
| − | ::‘;’+<font color=red> | + | ::‘;’+<font color=red>Comamnd(+Data)</font>+'/'+Verify |
| − | ==== | + | ====Commands (locked)==== |
[[File:Cloud_ESP32_e-Paper_Board_manual_7.png|700px]] | [[File:Cloud_ESP32_e-Paper_Board_manual_7.png|700px]] | ||
| − | ==== | + | :These commands can be used if the device is locked. |
| + | ====Comamnds (unlocked)==== | ||
[[File:Cloud_ESP32_e-Paper_Board_manual_8.png|700px]] | [[File:Cloud_ESP32_e-Paper_Board_manual_8.png|700px]] | ||
| − | + | :These command can be used when the device is unlocked. | |
| − | ===''' | + | ==='''Data Mode:'''=== |
| − | ==== | + | ====Data Format==== |
| − | ::0x57+<font color=red>4Byte addr+ 4Byte len +1Byte num + len Byte data </font>+ | + | ::0x57+<font color=red>4Byte addr+ 4Byte len +1Byte num + len Byte data </font>+Verify |
[[File:Cloud_ESP32_e-Paper_Board_manual_9.png|700px]] | [[File:Cloud_ESP32_e-Paper_Board_manual_9.png|700px]] | ||
| − | ==== | + | ====Note:==== |
| − | # | + | #Recommend you to transmit the frames with same lenght |
| − | #<font color="red">''' | + | #<font color="red">'''The size of frame transmitted should not larger than 1100Byte, otherwise it cose data lose.'''</font> |
| − | # | + | #num should be static variable because it may be invalid because of version update. |
| − | # | + | #The data frame doesn have stop bit, you need to wait for the verity data before sending the next frame, otherwise it causes failure. |
| − | # | + | #The e-Paper will update automatically and exit from update mode when the addr and len are 0. |
| − | + | For mare detailes, please refer to the python3 examples provided.<br /> | |
</big> | </big> | ||
Revision as of 11:15, 3 December 2020
You can download and install the APP by scanning the QR codes

Lead Information
Every time the device start, it will do partial refresh and display status icons.
Hereby provide the refrence of icons.
| Waiting | Setting | Low Voltage | WIFI | Host |
- Waiting: The device is waiting for commands.
- Setting: Setting is finished.
- Low Voltage: The voltage of battareis is lower than warnning value.
- WIFI: The wifi is connected.
- Host: The devices is connected to target host by IP address.
- Generally, you should press the button to wake up the device and check the icons. The warnning voltage is 3600mv, once the voltage is 150mv lower than warnning voltage (3450mv), the devices will shutdown automatically to protect the stable of the whole system.
1. Configure Device
1.1 First Setup
If you didn't configure the device before, you should configure the device by APP after pressing the Wakeup button to update the display①. Please refer to #1.4 Configure Device by APP to configure the device.②
Note:
①If the device isn't configured, Waiting icon is displaed in the top-right area. If the Low Voltage icon is displayed without Waiting, it means that the batteris is less than 3450mv and it is going to shutdown.
②If the device doesn't connect to Bluetooth, it will shutdown after 90s after booting and refreshing the display.
1.2 Reconfiguration
If the device was configured, the device will update and display Setted icon in the top-right area① after pressing wakeup button. The Bluetooth is disabled by default, if required, you should hold the wakeup button for 5s at least to enable the Bluetooth②. The updating process of device will not be interrupted③ while enabling the Bluetooth. After enabling the Bluetooth, you can re-configure the device by referring to #1.4 Configure Device by APP ④.
注:
①The update time of device is determined the speed of WIFI, It should less than 30s as we test.。
②You can holding the wakeup button untill your phone scan the device vi Bluetooth. Otherwise, the device auto-sutdown if the bluetooth is disconnected.。
③If you enable the Bluetooth of device, it will try to connet to master (phone) in 30s if th shutdown command is received via wifi. If the device is connected to phone by Bluetooth, it will keep waking, otherwise it will be turned off after 30s.
④You should reboot the device after configurating to make the configuration effect. Please do not reboot the device when transmitting data via WIFI, it will cost data losing.
1.3 APP Description

- Bluetooth Connectiono Button and the information <br\>

- Device ID: for distinguish devices<br\>

- WIFI_SSID<br\>

- Check the current SSID connected<br\>

- WIFI_Password<br\>

- Host_IP, The IP of host, for example, the IP of Raspberry Pi.<br\>
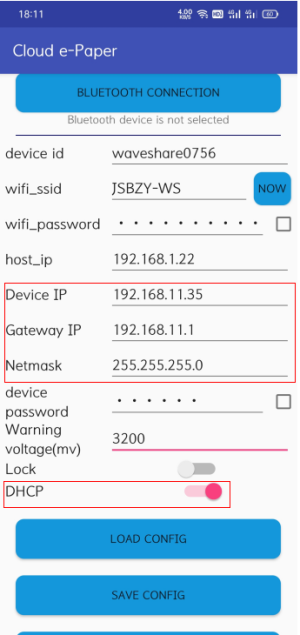
- Device_IP: This is used to set the static IP. If you enable DHCP, the static IP is unavailable<br\>

- Device_Password, you should input the device password to vertify if the device is locked.<br\>


Note: The default device password of Raspberry Pi example is 123456. If you lock the device you have to unlock it with password 123456, otherwise, the device cannot work.<br\>

Warning_voltage: If the voltage of batteries is less than the warning voltage, device will display the warnning icon. If the battert is 150mV lower than the warning voltage, device will shutdown automatically.<br\>

- Load the configuration saved<br\>

- Save the current configuration, you can save up to four sets of configuration<br\>

- Upload the current configuration to device.<br\>
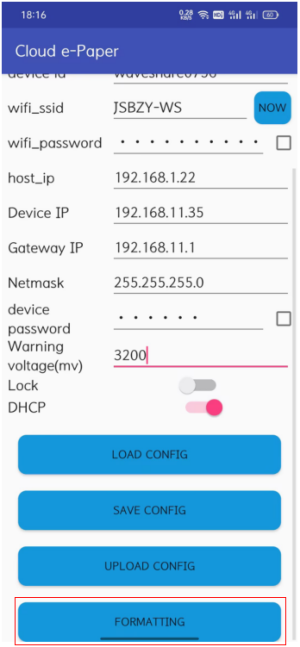
- Formating: Clean the current configuration<br\>


1.4 Configure Device by APP
- Ⅰ.Open APP(APP will auto-save the last configuration information)

- Ⅱ.Click Bluetooth CONNECTION button, the default Bluetooth device is WaveShare_EPD or the Device ID configured.

- Unparied

- Paried
- Ⅲ.Choose the device, for example connect the WaveShare_EPD. If you are the first time to connect the WaveShare_EPD device, it should be paired first.

- Ⅳ. Modify the configuration information and Upload(If you have configured the password, you need to input the paddword as well.)

- Ⅴ.The APP will disconnect and reboot the device if configuration are uploaded successfully.

- Note: We recommend you to set static IP for device.


2. Communicating Protocol
The Communicating is divided into two modes: Command mode and the data mode. Command mode is used for sending command. data Mode is sued for sending image data to e-Paper.
Command Format
‘;’+Command(+Data)+'/'+Veriry
Data Format
0x57+4Byte addr+ 4Byte len +1Byte num + len Byte data +Verify
Return Format
'$'+Data+'#' The format of response of Command and Data are the same
Note:The Verity is the XOR result of data which is marked in red
Command Mode:
Command Format
- ‘;’+Comamnd(+Data)+'/'+Verify
Commands (locked)

- These commands can be used if the device is locked.
Comamnds (unlocked)

- These command can be used when the device is unlocked.
Data Mode:
Data Format
- 0x57+4Byte addr+ 4Byte len +1Byte num + len Byte data +Verify

Note:
- Recommend you to transmit the frames with same lenght
- The size of frame transmitted should not larger than 1100Byte, otherwise it cose data lose.
- num should be static variable because it may be invalid because of version update.
- The data frame doesn have stop bit, you need to wait for the verity data before sending the next frame, otherwise it causes failure.
- The e-Paper will update automatically and exit from update mode when the addr and len are 0.
For mare detailes, please refer to the python3 examples provided.