
Difference between revisions of "Template:AF Camera Quick Start"
| (15 intermediate revisions by 3 users not shown) | |||
| Line 1: | Line 1: | ||
| − | = | + | =Driver Installation & Quick Test= |
==Hardware Connection== | ==Hardware Connection== | ||
| − | <font color=red>'''To test the Camera, you need to connect | + | <font color=red>'''To test the Camera, you need to connect an HDMI display or a DIS display for previewing.'''</font> <br /> |
| − | The connectors of the DSI | + | The connectors of the DSI (display) and the CSI (camera) are similar, please note that the CSI interface is between the audio interface and the HDMI interface, and the camera interface of the Raspberry Pi Zero series is next to the Power interface. If you use Compute Module, please check the actual place of the carrier board. |
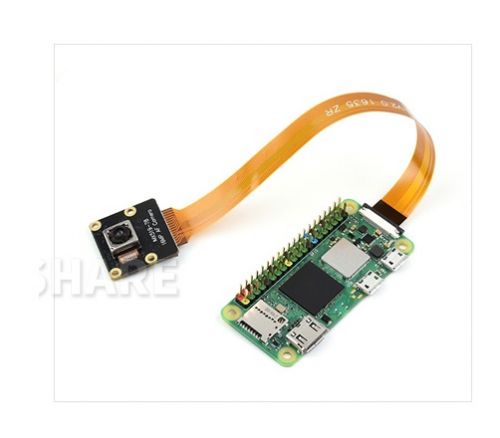
| − | *Connect | + | *Connect to Pi Zero Series |
| − | : | + | : Put the metal surface of the FFC cable downward, and then connect to the CSI interface. |
:[[File:RPi_Camera_Connect_Zero01.jpg|500px]] | :[[File:RPi_Camera_Connect_Zero01.jpg|500px]] | ||
| − | * | + | *Connect to other Raspberry Pi boards |
| − | : | + | : Put the metal surface of the FFC cable toward the HDMI interface, and then connect to the CSI interface. |
:[[File:RPi_Camera_Connect_Pi402.jpg|500px]] | :[[File:RPi_Camera_Connect_Pi402.jpg|500px]] | ||
| + | ==User the provided image== | ||
| + | *[https://drive.google.com/file/d/1-4S7k5UZhr-Dr74Q0F4jDlUQpNhrqRcB/view?usp=share_link Ready to use Image] | ||
==Driver Description== | ==Driver Description== | ||
| − | Please make sure that you have programmed the newest system of the Raspberry Pi before installing the driver. As the driver is based on the libcamera library, it supports all the commands of libcamera library. The driver only supports the Raspberry Pi system and does not support other systems | + | Please make sure that you have programmed the newest system of the Raspberry Pi before installing the driver.<br/> As the driver is based on the libcamera library, it supports all the commands of libcamera library. The driver only supports the Raspberry Pi system and does not support other systems or boards. Currently, the latest version the driver supports is 5.1.32.<br/> |
| − | We provide the driver file including two categories: opencam_V4L2-Driver focus tool and package driver support | + | We provide the driver file including two categories: the "opencam_V4L2-Driver" focus tool and the "package" for driver support.<br/> |
==Download the Driver== | ==Download the Driver== | ||
===Install the Camera Driver=== | ===Install the Camera Driver=== | ||
| − | Open the Raspberry Pi terminal, download the driver and install it.<br/> | + | Open the Raspberry Pi terminal, download the driver, and install it.<br/> |
<pre> | <pre> | ||
| − | wget https:// | + | wget https://files.waveshare.com/upload/8/8c/IMX519_Driver.zip |
| − | unzip | + | unzip IMX519_Driver.zip |
| − | cd | + | cd IMX519_Driver/package/ |
sudo chmod +x install_pkgs.sh | sudo chmod +x install_pkgs.sh | ||
./install_pkgs.sh -p libcamera_dev | ./install_pkgs.sh -p libcamera_dev | ||
./install_pkgs.sh -p libcamera_apps | ./install_pkgs.sh -p libcamera_apps | ||
| − | ./install_pkgs.sh -p | + | ./install_pkgs.sh -p imx519_kernel_driver |
</pre> | </pre> | ||
| − | After installation, you will be prompted to | + | After installation, you will be prompted to reboot the system. Please enter "y" and press "Enter" to reboot the system.<br/> |
===Install the Focus Tool=== | ===Install the Focus Tool=== | ||
| Line 35: | Line 37: | ||
sudo python3 FocuserExample.py | sudo python3 FocuserExample.py | ||
</pre> | </pre> | ||
| + | |||
==Camera Test== | ==Camera Test== | ||
If it is connected via SSH, you can input "export DISPLAY=:0" for remote control. Note that the Raspberry Pi needs to be connected to an HDMI screen for previewing.<br/> | If it is connected via SSH, you can input "export DISPLAY=:0" for remote control. Note that the Raspberry Pi needs to be connected to an HDMI screen for previewing.<br/> | ||
| − | The following commands are used to preview the camera display and set the autofocus parameter, which will | + | The following commands are used to preview the camera display and set the autofocus parameter, which will make the camera focus automatically when it is on.<br/> |
libcamera-still --autofocus | libcamera-still --autofocus | ||
If you need to keep focusing, you need to use the terminal to open the camera preview.<br/> | If you need to keep focusing, you need to use the terminal to open the camera preview.<br/> | ||
Latest revision as of 02:48, 20 March 2024
Driver Installation & Quick Test
Hardware Connection
To test the Camera, you need to connect an HDMI display or a DIS display for previewing.
The connectors of the DSI (display) and the CSI (camera) are similar, please note that the CSI interface is between the audio interface and the HDMI interface, and the camera interface of the Raspberry Pi Zero series is next to the Power interface. If you use Compute Module, please check the actual place of the carrier board.
- Connect to Pi Zero Series
- Put the metal surface of the FFC cable downward, and then connect to the CSI interface.

- Connect to other Raspberry Pi boards
- Put the metal surface of the FFC cable toward the HDMI interface, and then connect to the CSI interface.


User the provided image
Driver Description
Please make sure that you have programmed the newest system of the Raspberry Pi before installing the driver.
As the driver is based on the libcamera library, it supports all the commands of libcamera library. The driver only supports the Raspberry Pi system and does not support other systems or boards. Currently, the latest version the driver supports is 5.1.32.
We provide the driver file including two categories: the "opencam_V4L2-Driver" focus tool and the "package" for driver support.
Download the Driver
Install the Camera Driver
Open the Raspberry Pi terminal, download the driver, and install it.
wget https://files.waveshare.com/upload/8/8c/IMX519_Driver.zip
unzip IMX519_Driver.zip
cd IMX519_Driver/package/
sudo chmod +x install_pkgs.sh
./install_pkgs.sh -p libcamera_dev
./install_pkgs.sh -p libcamera_apps
./install_pkgs.sh -p imx519_kernel_driver
After installation, you will be prompted to reboot the system. Please enter "y" and press "Enter" to reboot the system.
Install the Focus Tool
Open the Raspberry Pi terminal and install the tool.
cd IMX519_Drive/opencam-V4L2-Driver/focus
sudo python3 FocuserExample.py
Camera Test
If it is connected via SSH, you can input "export DISPLAY=:0" for remote control. Note that the Raspberry Pi needs to be connected to an HDMI screen for previewing.
The following commands are used to preview the camera display and set the autofocus parameter, which will make the camera focus automatically when it is on.
libcamera-still --autofocus
If you need to keep focusing, you need to use the terminal to open the camera preview.
libcamera-vid -t 0
Open another terminal and adjust the focus with the focus tool.
cd IMX519_Drive/opencam-V4L2-Driver/focus
sudo python3 FocuserExample.py -d /dev/v4l-subdev1
The command will open another control window, and you can use the up and down arrow keys on the keyboard to adjust the focus position of the camera.