Template: A7600X Cat-1/GSM/GPRS HAT User Manual
Features
- Standard Raspberry Pi 40PIN GPIO extension header, supports Raspberry Pi series boards, Jetson Nano
- Supports protocols including TCP/IP, HTTP(s), MQTT(s), FTP(s), and SSL
- Supports dial-up, telephone call, SMS
- Supports LBS base station positioning, it is able to get the approximate position info via mobile network
- TTS (Text To Speech) feature, texts in Chinese/English can be converted into spoken words
- Onboard USB interface, for testing AT Commands, network communication, and so on
- Onboard audio jack for sound recording, making telephone call, listening the TTS resulting speech, etc.
- Onboard USB to UART converter, for serial debugging, or accessing the Raspberry Pi
- Breakout common used control pins of the A7600X module, make it easy to connect with hosts boards like Arduino/STM32
- SIM card slot, supports 1.8V/3V SIM card
- TF card slot for storing data like files, audio data, etc.
- 2x LED indicators, easy to monitor the operating status
- Onboard voltage translator, operating voltage can be configured to 3.3V or 5V via 0Ω resistor jumper
- Baudrate: 300bps ~ 4Mbps (default: 115200bps)
- Comes with development resources and manual (examples for Raspberry Pi/Jetson Nano/Arduino/STM32)
Testing
Hardware connection
- Prepare the following things before using the module::
4G SIM card (China Mobile, China Unicom or Telecom card, without shutdown and GPRS enabled);
Headset cable with microphone (optional);
Micro SD card (optional);
micro USB cable
LTE antenna
- Insert the SIM card and earphone to the A7600X board, if you want to test the TF card slot, you can also insert a TF card to the card slot.
- Connect the USB interface of A7600X board to PC.
- The PWR indicator turns on after connecting
- When the default jumper cap is set to 3V3<->PWR (as shown in the figure above), the module will automatically turn on when it is powered on.
If it is set to PWR<->P22, you must manually press the PWR button to turn on: Press the PWR button for about 1 second, wait for about ten seconds to turn on;
When the NET light starts to flash, the module starts to network normally. - Open the device manager and install the windows driver file Windows Driver,Refer to the figure below:
PPPD dial-up Internet In Windows system
LTE Cat-1 dial-up Internet operation
- In Windows 10, the operation is as follows:
Note:
The ideal uplink and downlink rates that Cat-1 and 2G can achieve are as follows,The actual test will be affected by network coverage and congestion:
| Network | Uplink | Downlink |
|---|---|---|
| LTE Cat-1 | 5Mbps | 10Mbps |
| EDGE | 236.8Kbps | 236.8Kbps |
| GPRS | 85.6Kbps | 85.6Kbps |
Serial assistant debugging
For software settings, refer to the frame selection in the following figure:

Common AT Commands
| AT Command | Description | Return |
|---|---|---|
| AT | AT test command | OK |
| ATE | ATE1 set echo ATE0 close echo |
OK |
| AT+SIMCOMATI | Query module information | OK |
| AT+IPREX | Set the module hardware serial port baud rate | +IPREX: OK |
| AT+CRESET | Reset module | OK |
| AT+CSQ | Network signal quality query, return signal value | +CSQ: 25,99 OK |
| AT+CPIN? | Query the status of the SIM card and return READY, indicating that the SIM card can be recognized normally | +CPIN: READY |
| AT+COPS? | Query the current operator, the operator information will be returned after the normal network | +COPS: OK |
| AT+CREG? | Query network registration status | +CREG: OK |
| AT+CPSI? | Query UE system information | |
| AT+CNMP | Network mode selection command: 2:Automatic 13:GSM only 14:WCDMA only 38:LTE only |
OK |
- For more information about the AT command, you can refer to AT command manual:File:A7600 Series_AT Command Manual_V1.01.pdf
TCP/UDP data transparent transmission
| AT Command | Description | Return |
|---|---|---|
| AT+NETOPEN | Start Socket Service | OK +NETOPEN: 0 |
| AT+CIPRXGET=1 | Set the Mode to Retrieve Data | OK |
| AT+CIPOPEN=0,"TCP","118.190.93.84",2317 | Establish Connection in Multi-Socket Mode | +CIPOPEN: 0,0 OK |
| AT+CIPSEND=0,9 | Send data through TCP or UDP Connection | > |
| wavehare | data | OK +CIPSEND: 0,9,9 |
| AT+CIPCLOSE=0 | Close TCP or UDP Socket | +CSQ: 25,99 OK |
| AT+NETCLOSE | Stop Socket Service | OK +NETCLOSE: 0 |
- For more information about the AT command, you can refer to AT command manual:File:A7600_Series_TCPIP_Applicati0n_Note_V1.00.pdf
TTS text-to-speech
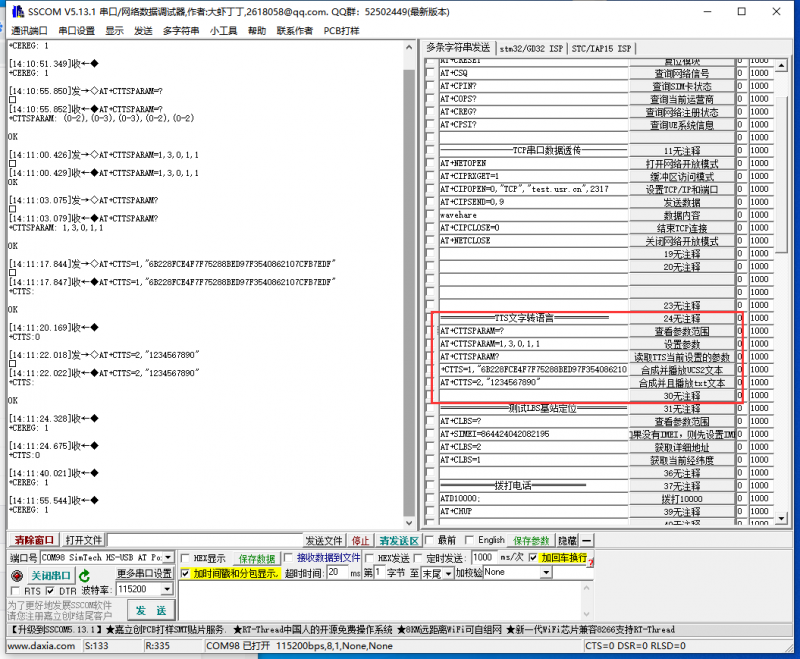
AT commands for TTS text-to-speech are as follows:
AT+CTTSPARAM=? //TTS parameters setting help
AT+CTTSPARAM=1,3,0,1,1 //Set TTS parameters
AT+CTTSPARAM? //Read TTS parameters
AT+CTTS=1,"6B228FCE4F7F75288BED97F3540862107CFB7EDF" //synth and play UCS2 text
AT+CTTS=2,"1234567890" //synth and play ASCII text
- For more information:A7600_Series_Audio_Application Note
LBS (Location Based Services)
LBS Commands:
AT+CLBS=?  //Check base station location parameters
AT+SIMEI=864424042082195 //set IMEI first if no IMEI
AT+CLBS=2 //type = 2,get detail address
AT+CLBS=1 ///type = 1,get longitude and latitude
- For more information:A7600_Series_LBS_Application Note
Phone Call
ATD<phone_number>;  //For example, dial 10000: ATD10000;
AT+CHUP //Hang up the call
If you think the output volume is too low, you can use the following command to adjust::
AT+COUTGAIN=?  //Adjust the volume, (0-7)
AT+COUTGAIN=7   //Set the volume to 7, return OK
SMS
Send English SMS
AT+CMGF=1 //Set the SMS mode to TEXT
AT+CMGS="phone number" //Set the receiver's mobile phone number
AT+CMGR=20 //read the 20th information (AT+CMGL="ALL" means to read all information)
Raspberry Pi
实物连接
- AT7600X Cat-1/GSM/GPRS Hat 板载树莓派GPIO接口,可直接插入各版本的树莓派使用
- 硬件连接图
File:A7600X-Cat-Hat pi connect.png
注意要将跳线帽跳到B处,3V3-PWR
- 树莓派串口配置
由于树莓派串口默认用于终端调试,如需使用串口,则需要修改树莓派设置。执行如下命令进入树莓派配置:
sudo raspi-config
选择Interfacing Options ->Serial ->no -> yes,关闭串口调试功能。

需要重启
sudo reboot
打开/boot/config.txt文件,找到如下配置语句使能串口,如果没有,可添加在文件最后面:
enable_uart=1
重启生效
树莓派minicom串口调试
1.将树莓派插入树莓派中
2.安装minicom,minicom是linux平台串口调试工具:
sudo apt-get install minicom
3.执行sudo minicom -D /dev/ttyS0(ttyS0为树莓派3B/3B+/4B,ttyAMA0为树莓派2B/zero的串口),默认波特率为115200
4.以AT同步测试为例,发送相关指令,如下图所示:

【注意】:minicom可通过按Ctrl+a,再按下z进入设置模式,选择X退出。
树莓派拨号上网
- 把micro USB线一端接树莓派USB接口,另一端接A7600C1-Cat-1 GSM GPRS-HAT的USB接口
- 关于树莓派拨号上网相关的具体操作,请参考以下链接:
- 拨号上网后,如果DNS解析不了,上不了网,可以在终端输入指令:
route add -net 0.0.0.0 ppp0
示例程序
1、将模块插入到树莓派中
2、下载示例程序到/home/pi/路径下
cd ~
wget https://www.waveshare.com/w/upload/f/f3/AT7600X_Cat_Hat_Demo.7z
sudo apt-get install p7zip-full
7z x A7600X_Cat_HAT_Demo.7z   -r -o/home/pi
sudo chmod 777 -R /home/pi/A7600X_Cat_HAT_Demo
- TCP透传例程
- LBS基站定位例程
- HTTP通信协议例程
- MQTT通信协议例程
- SSL通信协议例程
- FTP通信协议例程
- TTS文字转语音例程
Jetson Nano
硬件连接图
Jetson nano串口调试
1.将A7600X Cat-1/GSM/GPRS HAT 接入Jetson Nano中。 2.安装minicom,在终端输入sudo apt-get install minicom 3.打开minicom进行串口调试,在终端输入
sudo minicom -D /dev/ttyTHS1 -b 115200

发送AT指令测试,退出minicom先按Ctrl+A,再按X,最后按ENTER
Jetson nano ppp拨号上网
需将跳线帽跳到B处,另一个跳线帽连3V3-PWR
关于Jetson nano ppp拨号上网相关资料参考如下:
Jetson nano ppp拨号
需要注意的点
800px
测试方法:
ping -I ppp0 www.baidu.com
如还不能上网,为避免DNS解析不了,添加以下默认路由
route add -net 0.0.0.0 ppp0
Python例程
安装函数库
sudo apt-get python3-pip
sudo pip3 install pyserial
sudo apt-get install p7zip
使用wget工具下载源码到Jetson Nano指定文件夹,复制下面命令
cd ~
wget https://www.waveshare.com/w/upload/f/f3/AT7600X_Cat_Hat_Demo.7z
sudo apt-get install p7zip-full
7z x A7600X_Cat_HAT_Demo.7z   -r -o./
sudo chmod 777 -R /home/pi/A7600X_Cat_HAT_Demo
运行示例程序
sudo python TCP.py
STM32
硬件简介
本例程利用STM32与A7600C1-Cat-1 GSM GPRS-HAT进行通信时,STM32的主芯片类型为STM32F103ZET6,当然也可以是其他芯片类型的STM32主板。原理都是一样的,利用UART2与A7600C1-Cat-1 GSM GPRS-HAT进行通信用于发生AT指令,利用UART1与PC端进行通信用于模块反馈信息的打印。
示例程序
主要代码如下:

点击下载即可下载到相关的示例程序
代码效果回显如下:


