
Difference between revisions of "Template:12.48e-Paper-connecting-settings"
| Line 70: | Line 70: | ||
gpio -v | gpio -v | ||
# Run gpio -v and version 2.60 will appear. If it does not appear, it means that there is an installation error | # Run gpio -v and version 2.60 will appear. If it does not appear, it means that there is an installation error | ||
| − | |||
| − | |||
| − | |||
| − | |||
| − | |||
| − | |||
| − | |||
| − | |||
</pre> | </pre> | ||
*Install python3 | *Install python3 | ||
| Line 90: | Line 82: | ||
Open terminal and run commands to download codes. | Open terminal and run commands to download codes. | ||
<pre> | <pre> | ||
| − | + | git clone https://github.com/waveshare/12.48inch-e-paper.git | |
| − | + | cd 12.48inch-e-paper/RaspberryPi | |
| − | |||
| − | |||
| − | |||
</pre> | </pre> | ||
| Line 124: | Line 113: | ||
: For two-color version | : For two-color version | ||
<pre> | <pre> | ||
| − | sudo | + | sudo python3 epd_12in48_test.py |
</pre> | </pre> | ||
: For three-color version | : For three-color version | ||
<pre> | <pre> | ||
| − | sudo | + | sudo python3 epd_12in48B_test.py |
</pre> | </pre> | ||
*Python codes-Weather | *Python codes-Weather | ||
| Line 138: | Line 127: | ||
: For two-color display | : For two-color display | ||
<pre> | <pre> | ||
| − | sudo | + | sudo python3 Show_EN_Weather.py |
</pre> | </pre> | ||
: For three-color display | : For three-color display | ||
<pre> | <pre> | ||
| − | sudo | + | sudo python3 Show_EN_Weather.py B |
</pre> | </pre> | ||
: For help information | : For help information | ||
Revision as of 07:22, 28 November 2022
We provide demo codes for four popular hardware platforms, Raspberry Pi, Arduino UNO, STM32 and the ESP32. The product you receive may be pre-assembled, you need to remove the back panel and connect your device like Raspberry Pi.
Preface
How to Install
Since it was assembled by us when you got the product, it has a bottom plate, you need to take the screwdriver delivered to unscrew the screws on the back and put it into the main control.
- The Raspberry Pi, Arduino UNO, and ESP32 directly provide interface connections, and the specific control pins are introduced in the following sections.
- For STM32, the demo is based on the STM32F103ZET6 chip, which was tested using our Open103Z, and connected using the pin headers of the board.
Software Description
Raspberry Pi Programs
We provide two program drivers, C and Python.
It takes about 8S to brush a frame of a picture in C language, and about 10S in python. In addition to the basic brushing effect, python also adds the ability to crawl the weather:
- For the foreign version, we use weather data crawled from https://www.msn.com/en-us/Weather/?day=1 webpage.
Arduino UNO
We provide a C program, and the .c suffix is changed to .cpp to be compatible with CPP.
Because the RAM of UNO is too small, 3 23LC1024 chips are used onboard to expand the memory of UNO. You need to build a picture of the whole picture and initialize it. For black and white pictures, you need 1304/8*984=160392 pieces Bytes, and a 23LC1024 can only have a maximum size of 128K. For black and white red, it needs 160392*2 = 320784 bytes, so 3 chips are needed, so the display speed of the whole frame picture is very slow, about 1 minute. to display a black and white image.
- The jumper cap needs to be connected to 5V.
STM32
We provide a C program.
- Since STM32F103ZET6 has no interface for direct use, it needs to be connected with the delivered Dupont cable. For the specific connection method, please refer to the pin connection diagram below. There are only some examples here, because the STM32F103ZET6 cannot establish a complete image cache, only part of the screen demos.
ESP32
We provide a C program for the Arduino test program and an example that can be controlled using the web page.
- Arduino: It can be used according to the corresponding ESP32 chapters. ESP32 cannot create a 1304/8*984 cache, so it is refreshed in a different way, 4304/8*492 data is transmitted at one time, and black and white needs to be transmitted twice. Black and white red transmission 4 times. The refresh speed of black and white is about 8S, and the refresh speed of black and white is about 16S.
- Web page control: Due to my limited skills, I develop web pages while learning the front-end. There may be some bugs in web page control, and you may not be able to complain, but the function can be completed in the end. The IP address will be displayed on the serial port. Under the same wifi, you can use the web page to open the IP address to control it, which will be described in detail in the subsequent chapters.
Raspberry Pi
Hardware Connection

The pins used can be found on schematic according to codes.

Enable SPI interface
- The communication interface of e-Paper is SPI, to use it, we should first enable the SPI interface.
- Open terminal of Raspberry Pi, and open the configuration by the following command:
sudo raspi-config
- Choose Interfacing Options -> SPI -> Yes.
- Restart Raspberry Pi.
sudo reboot

And then reboot the Raspberry Pi:
sudo reboot
You can check whether the SPI is occupied by other devices in /boot/config.txt.
Libraries installation
- Install BCM2835
wget http://www.airspayce.com/mikem/bcm2835/bcm2835-1.71.tar.gz
tar zxvf bcm2835-1.71.tar.gz
cd bcm2835-1.71/
sudo ./configure && sudo make && sudo make check && sudo make install
- Install wiringPi
#Open the Raspberry Pi terminal and run the following command
sudo apt-get install wiringpi
#For Raspberry Pi systems after May 2019 (earlier than before, you may not need to execute), you may need to upgrade:
wget https://project-downloads.drogon.net/wiringpi-latest.deb
sudo dpkg -i wiringpi-latest.deb
gpio -v
# Run gpio -v and version 2.52 will appear. If it does not appear, the installation is wrong

#Bullseye branch system use the following command:
git clone https://github.com/WiringPi/WiringPi
cd WiringPi
./build
gpio -v
# Run gpio -v and version 2.60 will appear. If it does not appear, it means that there is an installation error
- Install python3
sudo apt-get update
sudo apt-get install python3-pip
sudo apt-get install python3-pil
sudo pip3 install RPi.GPIO
sudo pip3 install spidev
Download
Open terminal and run commands to download codes.
git clone https://github.com/waveshare/12.48inch-e-paper.git
cd 12.48inch-e-paper/RaspberryPi
Run codes

- C codes
cd c
sudo nano examples/main.c
- Confirm which kind of 12.48inch e-Paper you use. If you use the two-color display, modify the file as below.
- If you use the tree-color display, modify the file as below.

- Save then compile and run the code.
sudo make clean
sudo make
sudo ./epd
- Python codes
- Open a terminal and run the demo codes by commands:
cd python/examples


- For two-color version
sudo python3 epd_12in48_test.py
- For three-color version
sudo python3 epd_12in48B_test.py
- Python codes-Weather
cd python/examples
- For two-color display
sudo python3 Show_EN_Weather.py
- For three-color display
sudo python3 Show_EN_Weather.py B
- For help information
sudo python Show_EN_Weather.py help
Arduino
Hardware connection
You can directly insert the Arduino UNO to PCB.

About the pins used:

Run codes
- Download demo codes from the wiki and unzip them.
- Copy the 12in48 folder to the libraries directory which is under the installation directory of Arduino IDE. (The installation directory generally is C:\Program Files (x86)\Arduino\libraries)
- Open Arduino IDE software, choose Tool->Board->Arduino UNO:

- Click File -> Examples -> EPD12in48 to open demo code.

- If your e-Paper is a two-color version, use the epd12in48-demo, otherwise, use the epd12in48b-demo.
- Compile and download the codes to the board.


If you are using a black and white screen, select epd12in48-demo on the right.
If you are using a black and white red screen, select epd12in48b-demo on the right.
Finally, select the corresponding COM port, and then click Compile and Download.
- Note that the refresh process may take a long time. You can open the serial monitor to check the progress. Generally, it takes 1 minute for black and white, and 2 minutes for black and white.
STM32
The development board we use is Waveshare Open103Z. The project is developed based on STM32 HAL libraries.
Hardware connection
To assemble the Open32, you should connect it to the wires provided.

About the pins used, you can refer to e-paper.ioc file.


Run codes
Open the project (~\STM32\NUCLEO-F103RB\MDK-ARM\e-paper.uvprojx), compile and download to developmen board. It requires about 10s for the two-color version and 20s for three-color display.
ESP32
The demo codes for ESP32 are developed with Arduino IDE as well.
Software setup
To develop ESP32, you should first set up the environment.
- Download the newest Arduino IDE from Arduino website: https://www.arduino.cc/en/Main/Software
- Download ESP32 pack from github: https://github.com/espressif/arduino-esp32/archive/master.zip . Unzip the achieve to [Arduino IDE installation direcotry]/Hardare/espressif/esp32 directory. (If you didn't find the path under the installation directory, please create the folders manually.)

- Enter the tools folder, and run the get.exe file as administrator. After installing, Copy the esp32-epd-12in48 folder of ESP32 demo codes to [Arduino IDE installation directory]/Hardware/espressif/esp32/libraries

Hardware connection
Here we use Waveshare e-Paper ESP32 Driver Board as an example. Attach it on PCB.

About the pins used, you can refer to schematic and codes

Arduino Example
Open Arduino IDE software, and find the examples on File->Examples.

If you use two-color e-Paper, choose the epd12in48-demo, otherwise, please use the epd12in48B-demo.
WiFi Example
As we know, ESP32 features WIFI, you can set it as master or slave. Here we provide demo codes that control the e-Paper on the web by WIFI.
- You need to first modify the wifi connection information. Open the Web_App.cpp file and modify line 50 and line 51:
:
- Open wifi.ino file, compile and download it to your ESP32 board. Open the Serial monitor to query the IP address.

- Open the Chrome browser, and enter the web with the IP address.

- Select the display type, here we take 12.48inch e-Paper (two-color version) as an example:
- Click 12.48 e-Paper, and there are six functions provided. You can use them to draw points, lines and so on. On the top of the webpage, the type of e-Paper and display color are shown.


- The corresponding coordination of display is as below:

- Draw points
- Click Draw point then you will get the window as below:

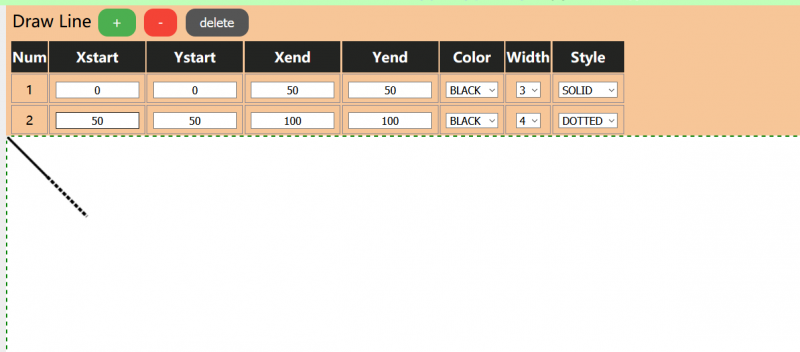
- Draw lines
- Click Draw Line, you will get the window below:
- Draw Rectangle
- Click Draw Rectangle, you will get the window below:

- Draw circle
- Click Draw Circle, and you will get the window below:

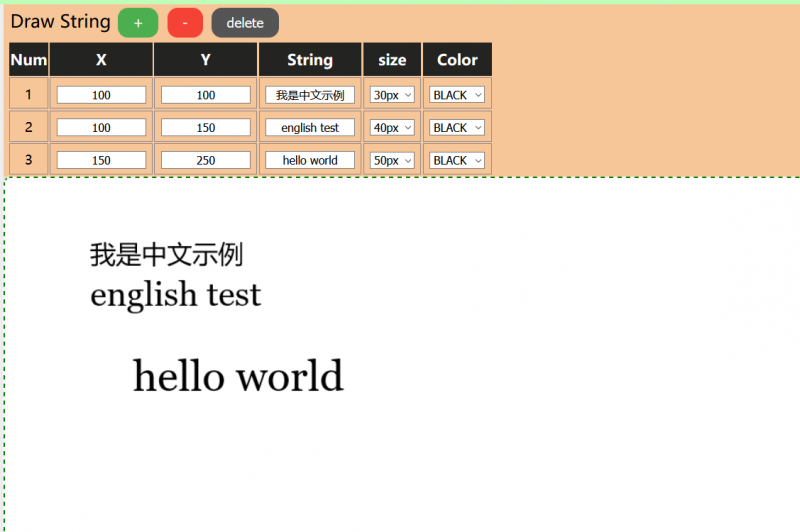
- Draw String
- Click Draw String, and you will get the windows below:
- Display picture
- Click Show picture, you will get the window like below. Click upload image to choose a picture.

- Draw the page to the bottom to check the original picture.

- Select a process algorithm, for a two-color display, only the mono methods work.
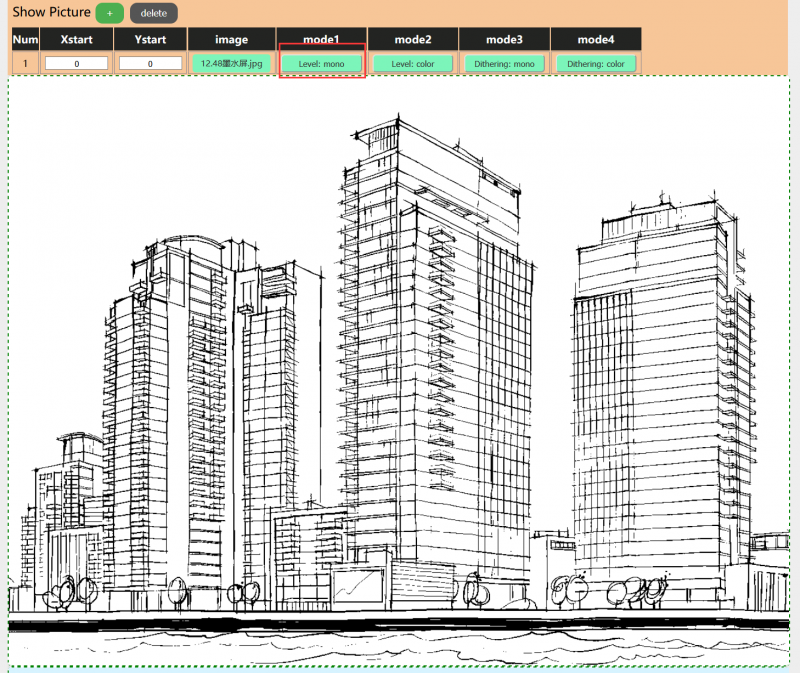

- Finally, click the upload image button on left to upload the image to the e-Paper for displaying.


- You can open the Serial monitor of IDE to check the debug information.

- You can also press the F12 button to open the debug console of the browser.


