
SIM7600X 4G DONGLE
| ||


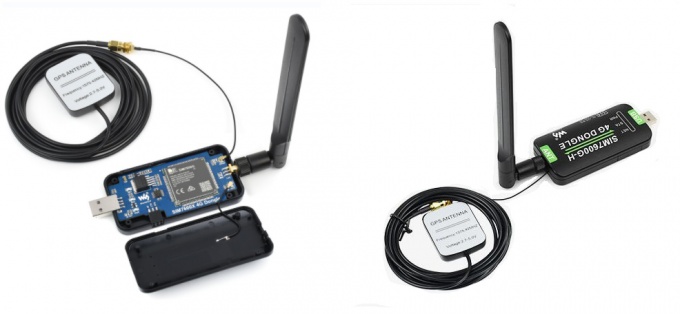
Introduction
SIM7600X 4G DONGLE is an industrial-grade 4G dongle, which features up to 150Mbps downlink rate and 50Mbps uplink rate, supports operating systems including Windows/Linux/Android. By simply connecting it to a laptop, PC, Raspberry Pi, drone, industrial computer, or other IoT host device, it is easy to use a 4G network connection on the go.
Selection Guide
| Type | GNSS | Avaialbel Area |
|---|---|---|
| SIM7600CE 4G DONGLE | No | Mainly for China |
| SIM7600G-H 4G DONGLE | Support(GNSS antenna should be purchased separately) | Global |
Features
- Supports 2G/3G/4G network connection.
- Driver provided, for operating systems including Windows/Linux/Android.
- Supports TCP/UDP/FTP/FTPS HTTP/HTTPS protocols.
- Supports network protocols such as TCP/IP/IPV4/IPV6/Multi-PDP/FTP/FTPS/HTTP/HTTPS/DNS.
- Onboard USB port, for directly connecting with ARM/X86 hosts or other industrial computers.
- Onboard UART port with hardware flow control, for connecting with host boards like Arduino/STM32.
- Nano SIM card slot; supports 1.8V / 3V nano-SIM card.
- 3 x LED indicators, easy to monitor the working status.
- Portable customized enclosure, mini size, nice looking.
- Baudrate support: 300bps ~ 4Mbps (115200bps by default).
- Baudrate auto-negotiation: 9600bps ~ 115200bps.
Hardware Connection
- Prepare:
- SIM7600X 4G DONGLE
- A 4G Nano SIM card (The card should be workable and 4G accessible)
- Assemble the 4G antenna.
- Open the SIM card buckle, and pull the SIM card slot according to the arrow below;

- Plug the 4G SIM card and LOCK the SIM card slot according to the arrow, then close the buckle.
- Connect the USB port of the DONGLE to your PC. Raspberry Pi or other devices
- If you want to use GPS, please make sure that the DONGLE you bought is the SIM7600G-H version. You should set the receiver on the outside for GPS testing.
4G Connecting
Networking in Windows PC
1. Hardware Connection

2. Driver Installation
- Download Driver: SIM7600X driver.
- Connect the DONGLE to Windows PC (Hereafter we use Windows 10 PC as an example).
- Unzip the driver file --> Double-click the exe driver file with the left mouse button --> Select the installation path --> NEXT --> Wait for the installation to complete --> Restart the computer --> Complete the driver installation.
.jpg)
.png)
.png)
.png)
.png)
.png)
- After installation, all the devices should be recognized normally as below:
.png)
3. Dailing up
NDIS Dail-up
- Currently access to Windows 10 operating system use, connected to the 4G DONGLE module (equipped with mobile / telecom / Unicom 4G card), after installation of the driver, most of the current computers will automatically connect.
- If Windows can not access the Internet, you need to manually start NDIS dial-up.
- Download SIM7600 SSCOM.
- Open SIM7600 AT port and send the command:
AT$QCRMCALL=1,1+Enter

At this point, NDIS dial-up takes effect and the computer is ready to connect to the network.
RNDIS Dail-up
- Installed the SIM card and antenna, USB connected to the computer, and provide the power supply.
- Refer to the above to install the USB driver.
- Open the serial assistant, find the serial port number corresponding to AT serial port, and send:
AT+CPSI? //query if it is registered on the network
- If you have successfully registered to the network, send another AT command to enable USB dial-up access:
at+Cusbpidswitch=9011,1,1
- Sending is successful, return OK, and Dongle will reboot automatically.
- Observe the device manager and find some unrecognized devices, such as RNDIS (with an exclamation mark):
- Right-click RNDIS, search for the device software prompt window, and select "Browse My Computer". Select "Network Adapters" from the list of devices.
- Select Microsoft Corporation from the list of manufacturers in the network adapter window, and then select "Remote NDIS Compatible Device" from the list on the right.
Click Next and wait for the installation to finish, the RNDIS Kitl device will be installed successfully. At this point, the dial-up function setup is complete and you can see that the PC can access the Internet through Dongle.

.png)


at+Cusbpidswitch=9001,1,1
PPP Dail-up
- Connect the 4G DONGLE to Windows 10 PC, and install drivers as the guide above. Then most of the PC will auto-connect to the 4G network.
If your PC cannot auto-connect, you can try with PPPoE method:


In theory, the uplink speed of a 4G network is up to 150Mbps and the downlink speed is up to 50Mpbs.
However, the actual speed is influenced by the Network coverage rate, time, network situation and the base station, etc.
Therefore, the actual speed of the 4G network will be slower than the expected data. In this case, you can change the area test it again, or try it at other times.
Common AT Command
- SIM7600X module supports AT command control, some basic AT commands are shown in the table below:
(For the complete AT command set, please refer to: For more AT commands, please refer to: SIM7600X series AT command set)
| Command | Description | Return |
|---|---|---|
| AT | AT Test Command | OK |
| ATE | ATE1 set echo ATE0 close echo |
OK |
| AT+CGMI | Query module manufacturer | OK |
| AT+CGMM | Query module model | OK |
| AT+CGSN | Query product serial number | OK |
| AT+CSUB | Query module version and chip | OK |
| AT+CGMR | Query the firmware version serial number | OK |
| AT+IPREX | Set the module hardware serial port baud rate | +IPREX: OK |
| AT+CRESET | reset module | OK |
| AT+CSQ | Network signal quality query, return signal value | +CSQ: 17,99 OK |
| AT+CPIN? | Query the status of the SIM card and return READY, indicating that the SIM card can be recognized normally | +CPIN: READY |
| AT+COPS? | Query the current operator, the operator information will be returned after normal networking | +COPS: OK |
| AT+CREG? | Query network registration status | +CREG: OK |
| AT+CPSI? | Query UE system information | |
| AT+CNMP? | Network mode selection command: 2:Automatic 13:GSM only 38:LTE only 48 : Any modes but LTE ... .... |
OK |
Setup 4G Connection for Raspberry Pi (Raspbian)
1. Hardware connection

2. Setting
The driver of SIM7600X has been pre-installed in Raspberry Pi OS (Raspbian), you need to install it again. You can be following the following guide to set up a 4G network connection. There are three ways:
- Raspberry Pi networked via RNDIS ——(Simplest)
- SIM868 PPP Dail-up Networking ——(Simple)
- Setup wwan0 interface for 4G network (Related code) ——(Complicated)
Set up Network for Jetson Nano
1. Hardware connection

2. Setting
Please connect all the hardware and start Jetson Nano.
- Check and make sure that the module work normally by the demo codes above.
- Open minicom by command
sudo minicom -D /dev/ttyUSB2
- Type the following command to check.
AT+CNMP=38
AT+CSQ
AT+CREG?
AT+COPS?
AT+CPSI?
- Download driver
cd
wget https://files.waveshare.com/upload/4/46/Simcom_wwan.zip
tar zxvf Simcom_wwan.zip
cd Simcom_wwan
sudo make
- Use root permission to install the driver.
sudo su
insmod simcom_wwan.ko
lsmod
dmesg
- Check if the wwan0 interface is recognized.
ifconfig -a
- Enable the wwan0 interface.
ifconfig wwan0 up
- Dailing by minicom.
minicom -D /dev/ttyUSB2
AT$QCRMCALL=1,1
- Allocate IP.
apt-get install udhcpc
udhcpc -i wwan0
- Now you can use a 4G network.
- If you get a DNS error, please fix it with this command.
route add -net 0.0.0.0 wwan0
USB Voice Call
Due to the need to reduce size, the SIM7600G-H 4G Module does not come with built-in audio input-output interfaces in its design. However, the SIM7600 chip can input and output audio data in binary form through the Audio port in the USB port when using the voice call function. This example uses the audio output interface of the Raspberry Pi and the input function of a USB sound card to achieve real-time voice calls through data transmission via the USB port.
Hardware Preparation:
- Raspberry Pi development board
- SIM7600G-H 4G Module
- USB Type-C cable
- A SIM card capable of regular call services
- An external sound card device with a microphone (a USB sound card is used in this example)
Hardware Connections:
- Insert the SIM card into the SIM7600G-H 4G Module's card slot before powering it up.
- Connect the SIM7600G-H 4G Module to the Raspberry Pi development board using the USB data cable.
- Wait for the module to power on and connect to the communication network (as described in the previous section, 'NET LED Working Status').
- Connect the sound card device to the Raspberry Pi.
Software Preparation:
Enter the running command to confirm the status of the SIM7600G-H driver.
ls /dev/ttyUSB*
If it's the latest Raspberry Pi system, the system should come with the driver for this module. It should display five ports from ttyUSB0 to ttyUSB4, indicating that there's no need for additional installation.
Install python function library:
#pyaudio is the python module, installing pyaudio under Raspberry Pi, First you need to install portaudio.dev
sudo apt-get install portaudio.dev
#And then use
sudo apt-get install python-pyaudio
#Or
sudo apt-get install python3-pyaudio   #python3
Download demo and unzip.
Check the sound card driver status according to the selected sound card device (the USB sound card used in this example is a driverless sound card).
Querying the selected audio device number can be done with the pyaudio module:
sudo python Audio_check.py
The program will list all available devices along with their corresponding numbers. Once you find the device based on its name, make a note of its corresponding number.
Test Process
As there are differences between the Raspberry Pi system and the audio device, it is recommended to modify the parameters before running the demo:
stream_in=p.open(format=p.get_format_from_width(2),channels=1,rate=8000,input=True,input_device_index=1,stream_callback=pcm_out)
#This code initializes the audio input object, "input_device_index=1" indicates this object corresponds to the audio input device number, which may vary somewhat from device to device.
If there's an issue with the audio input, first check if the device is functioning properly. If the device is working correctly, the problem might be due to selecting the wrong device number. You can try the loopback test program below:
sudo python Audio_test_R
This program will play audio data received from the audio input device on the audio output device. If there is no sound, you can try referring to the previously obtained list of audio devices. Modify the 'input_device_index' and 'output_device_index' parameters in the PyAudio initialization object statement.
stream1=p.open(format=p.get_format_from_width(2), channels=1, rate=8000, input=True,input_device_index=1,stream_callback=pcm_in,frames_per_buffer=800)    #Parameter input_device_index
stream2=p.open(format=p.get_format_from_width(2), channels=1, rate=8000, output=True,output_device_index=0,stream_callback=pcm_out,frames_per_buffer=800)    #Parameter output_device_index
GNSS
GPS Positioning
1. Hardware connection
- Note: SIM7600CE-CNSE 4G DONGLE doesn't feature GPS function. If you want to use GPS, please purchase SIM7600G-H 4G DONGLE and GPS antenna separately.
- Remove the case, assemble the GPS antenna and replace it, and close.
- When testing, you should set the receiver of the GPS antenna outside, and please test it on a sunny day. Power on and wait for several minutes to get the position;

2. AT Commands for GPS
- Commands and test results:
AT+CGPS=1	    //Open GPS
AT+CGPSINFO       //Print GPS information to the serial port
AT+CGPS=0       //Close GPS

3. Obtain GPS data by software
Send SMS
- Assemble SIM card and LTE antenna. Connect DONGLE to the PC and power on it.
- Check if the indicators work normally, PWR keeps lighting and NET is blinking.
- Set local SMS center: AT+CSCA="+8613800755500"+ ENTER,It will response OK.
Note: the number of SMS centers is different among different areas, please confirm your local SMS center and modify it. - AT+CMGF=1: Set the SMS mode as TEXT.
- AT+CMGS=" phone number"<ENTEER>, Set the target phone number, and it will respond: ">", input the content and send, for example: "Send message test!", Add 1A in hex at the end of the content to confirm the SMS content and send it without ENTER (You can also send 1B in hex to cancel the sending), Module response +CMGS: 15 if SNS is sent successfully.

Receive Message
- Send a message from the phone to the SIM7600 DONGLE: "This is a receive test for SIM7600X!"
- The serial port will print data when receiving, for example: "SM" 20 means that there are 20 messages in SM and the last message received is the 20th message.
- Read message: AT+CMGR=20 Read the 20th message (AT+CMGL="ALL" to read all messages)
- Delete message: AT+CMGD=20
- Convert the message to the string by convertor.


...