
Pico UPS A
| ||

Overview
The Pico-UPS-A is a dedicated UPS (Uninterruptible Power Supply) module designed for Raspberry Pi Pico. It incorporates a Li-ion battery switching charger with power path management, and a voltage/current monitoring chip, which allows monitoring of the battery operating status via the I2C bus.
Features
- Standard Raspberry Pi Pico header supports Raspberry Pi Pico series boards.
- Incorporates Li-ion battery switching charger with dynamic power path management and a more stable power supply.
- I2C bus communication, monitoring the battery voltage, current, power, and remaining capacity in real-time.
- Multi battery protection circuits: overcharge/discharge protection, over current protection, short circuit protection, and reverse protection, along with the equalizing charge feature, are safer and stable.
- Onboard recharging indicator, power indicator, and battery warning indicator to check if the battery is connected correctly.
- Comes with online development resources and manual (Raspberry Pi Pico C/C++ and MicroPython examples)
Specifications
- Recharge voltage: 5V
- Control bus: I2C
- Battery support: 800mAh 14500 battery (Not included)
- Dimensions: 60 x 21mm
Pinout

Dimension

SAFETY CAUTIONS
- Li-ion and Li-po batteries are quite unstable. They may cause fire, personal injury, or property damage, if they're not properly recharged or used.
- Do not reversely connect the polarities when recharging or discharging the battery. Do not use inferior charger/charging panel to recharge the battery.
- Do not mix use old batteries with new ones, avoid using batteries of different brands.
- When buying Lithium battery, should always make sure the battery specification is compatible with the expansion board. Choose batteries from formal manufacturer, and ensure the batteries will work stably and safely by aging test.
- Lithium batteries have limited cycle life, they will also deteriorate as time goes by. Should be replaced with new ones when the batteries reaching their max cycle life, or working over two years, whichever comes first.
- Should be placed carefully and properly, keep it away from inflammables and explosives articles, away from children, avoid any safety accident caused by careless storage.
Setup Environment
1. For the Raspberry Pi environment setting, please refer to link.
2. For the Windows environment setting, please refer to link.
Working with Raspberry Pi
1. Open a terminal of Raspberry Pi by SSH or press Ctrl+Alt+T at the same time while using the screen to open the terminal.
2. Download and unzip the demo codes to the directory Pico C/C++ SDK. Reference for users who have not yet installed the SDK.
wget -P ~/pico https://files.waveshare.com/upload/9/92/Pico-UPS-A.zip
cd ~/pico
unzip Pico-UPS-A.zip
C examples
- Press the BOOTSEL button of Pico and connect the Pico to your Raspberry Pi by USB cable and then release it.
- Build and run the C examples
cd ~/pico/Pico-UPS-A/c/build/
cmake ..
make
sudo mount /dev/sda1 /mnt && sudo cp Pico_UPS.uf2 /mnt && sudo sync && sudo umount /mnt && sleep 2 && sudo minicom -b 115200 -o -D /dev/ttyACM0
- The expected result should be as figure below:

Python examples
- Access Raspberry Pi and open the Thonny.
- Open the example by the IDE and save

- Click the Run button to run the codes

Windows
- Download and unzip Demo to the Windows desktop, refer to Windows software environment settings.
- Press and hold the BOOTSEL button of Pico, connect Pico's USB to the PC with a MicroUSB cable, and import a c or python program into Pico to make it run.
- Use the serial port to view the virtual serial port of Pico's USB enumeration to view the printing information, pay attention to turning on DTR, the baud rate is 115200, as shown in the figure.

Resource
Documents
Demo codes
Development Software
Pico Quick Start
Download Firmware
- MicroPython Firmware Download

- C_Blink Firmware Download

Video Tutorial
- Pico Tutorial I - Basic Introduction
- Pico Tutorial II - GPIO
- Pico Tutorial III - PWM
- Pico Tutorial IV - ADC
- Pico Tutorial V - UART
- Pico Tutorial VI - To be continued...
MicroPython Series
- 【MicroPython】 machine.Pin Function
- 【MicroPython】 machine.PWM Function
- 【MicroPython】 machine.ADC Function
- 【MicroPython】 machine.UART Function
- 【MicroPython】 machine.I2C Function
- 【MicroPython】 machine.SPI Function
- 【MicroPython】 rp2.StateMachine
C/C++ Series
Arduino IDE Series
Install Arduino IDE
-
Download the Arduino IDE installation package from Arduino website.

-
Just click on "JUST DOWNLOAD".

-
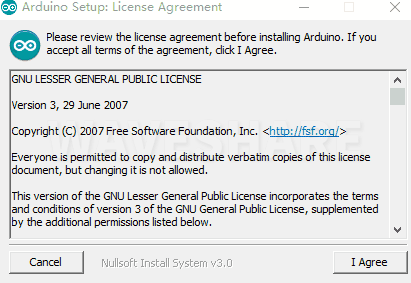
Click to install after downloading.
-
Note: You will be prompted to install the driver during the installation process, we can click Install.


Install Arduino-Pico Core on Arduino IDE
-
Open Arduino IDE, click the File on the left corner and choose "Preferences".

-
Add the following link in the additional development board manager URL, then click OK.
https://github.com/earlephilhower/arduino-pico/releases/download/global/package_rp2040_index.json

Note: If you already have the ESP8266 board URL, you can separate the URLs with commas like this:https://dl.espressif.com/dl/package_esp32_index.json,https://github.com/earlephilhower/arduino-pico/releases/download/global/package_rp2040_index.json
-
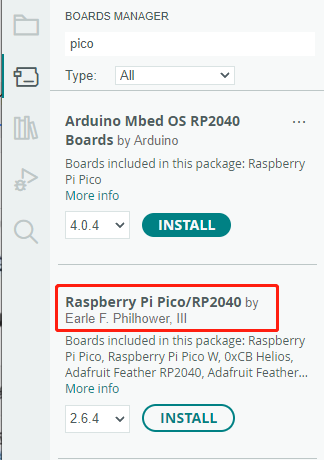
Click on Tools -> Dev Board -> Dev Board Manager -> Search for pico, it shows installed since my computer has already installed it.


Upload Demo At the First Time
-
Press and hold the BOOTSET button on the Pico board, connect the Pico to the USB port of the computer via the Micro USB cable, and release the button when the computer recognizes a removable hard drive (RPI-RP2).

- Download the demo, open arduino\PWM\D1-LED path under the D1-LED.ino.
-
Click Tools -> Port, remember the existing COM, do not need to click this COM (different computers show different COM, remember the existing COM on your computer).

-
Connect the driver board to the computer with a USB cable, then click Tools -> Ports, select uf2 Board for the first connection, and after the upload is complete, connecting again will result in an additional COM port.

-
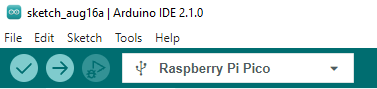
Click Tool -> Dev Board -> Raspberry Pi Pico/RP2040 -> Raspberry Pi Pico.

-
After setting, click the right arrow to upload.
- If you encounter problems during the period, you need to reinstall or replace the Arduino IDE version, uninstall the Arduino IDE needs to be uninstalled cleanly, after uninstalling the software you need to manually delete all the contents of the folder C:\Users\[name]\AppData\Local\Arduino15 (you need to show the hidden files in order to see it) and then reinstall.


Open Source Demo
- MicroPython Demo (GitHub)
- MicroPython Firmware/Blink Demo (C)
- Official Raspberry Pi C/C++ Demo
- Official Raspberry Pi MicroPython Demo
- Arduino Official C/C++ Demo
Support
Technical Support
If you need technical support or have any feedback/review, please click the Submit Now button to submit a ticket, Our support team will check and reply to you within 1 to 2 working days. Please be patient as we make every effort to help you to resolve the issue.
Working Time: 9 AM - 6 AM GMT+8 (Monday to Friday)