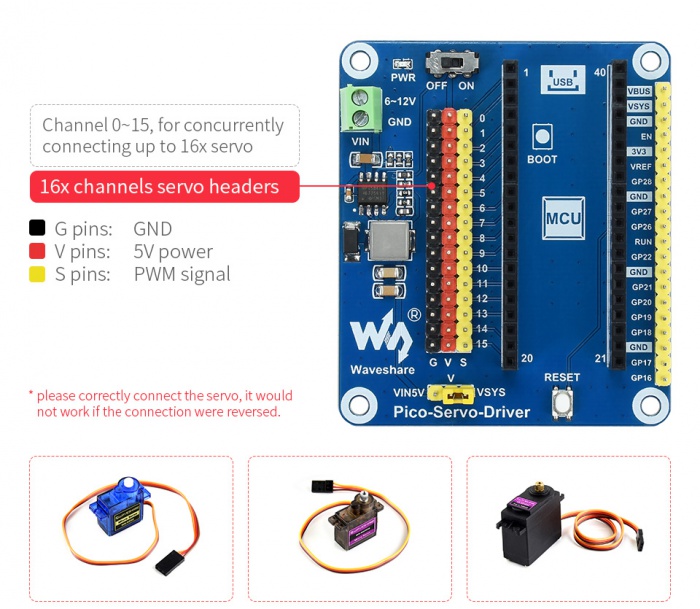
Pico Servo Driver
| ||
Overview
Servo Driver Module For Raspberry Pi Pico, 16-Channel Outputs, 16-Bit Resolution
Features
- Standard Raspberry Pi Pico header, supports Raspberry Pi Pico series boards
- Up to 16-Channel servo/PWM outputs, 16-bit resolution for each channel
- Integrates 5V regulator, up to 3A output current, allows battery power supply from the VIN terminal
- Standard servo interface, supports commonly used servo such as SG90, MG90S, MG996R, etc.
- Exposes unused pins of Pico, easy expansion
Specification
- Operating voltage: 5V (Pico) or 6~12V (VIN terminal)
- Logic voltage: 3.3V
- Servo voltage level: 5V
- Control interface: GPIO
- Mounting hole size: 3.0mm
- Dimensions: 65 × 56mm
Pinout
Dimensions
User Guide
Hardware Connection
When connecting the Pico, please be careful not to reverse the corresponding direction. You can observe the end of the module with USB silkscreen and the end of Pico's USB interface to determine the direction (you can also judge the pin number of the motherboard on the module and the pin number of Pico).

Demo Download
Raspberry Pi
1. Open a terminal of Raspberry Pi.
2. Download and unzip the demo codes to the directory Pico C/C++ SDK.
sudo apt-get install p7zip-full
cd ~
sudo wget  https://files.waveshare.com/upload/3/31/Pico_Servo_Driver_Code.7z
7z Pico_Servo_Driver_Code.7z -o./Pico_Servo_Driver_Code.7z
cd ~/Pico_Servo_Driver_Code
c
- The following tutorials are operated on Raspberry Pi. As CMake has multi-platforms and can be ported, you also can successfully compile on a PC in different ways.
To compile, make sure you are in the c directory:
cd ~/Pico_Servo_Driver_Code/c/
Create and enter the "build" directory in the folder, and add the SDK:
where ../../pico-sdk is the directory of your SDK.
There is a "build" in our sample program, just enter it directly.
cd build
export PICO_SDK_PATH=../../pico-sdk
(Note: Be sure to write the path where your own SDK is located)
Execute cmake to automatically generate Makefile files
cmake..
Execute make to generate executable files, the first compilation time is relatively long.
make -j9
After the compilation is complete, the uf2 file will be generated.
Press and hold the button on the Pico board, connect the pico to the USB port of the Raspberry Pi through the Micro USB cable, and release the button. After connecting, the Raspberry Pi will automatically recognize a removable disk (RPI-RP2) and copy the main.uf2 file in the build folder to the recognized removable disk (RPI-RP2).
cp main.uf2 /media/pi/RPI-RP2/
python
- 1. Flash the Micropython firmware and copy the pico_micropython_xxxxx.uf2 file into pico (detailed in the Windows tutorial below).
- 2. Open Thonny IDE on the Raspberry Pi (click the Raspberry Pi logo -> Programming -> Thonny Python IDE ), you can check the version information in Help->About Thonny.
- To make sure your version has Pico support package, also you can click Tools -> Options... -> Interpreter to select MicroPython (Raspberry Pi Pico and ttyACM0 port.
As shown:

If your current version of Thonny does not have the pico support package, enter the following command to update the Thonny IDE.
sudo apt upgrade thonny
3. Click File->Open...->python/Pico_Servo_Driver_Code/python/servo.py to run the script.
As soon as the experimental phenomenon channel is connected to the servo, it will rotate from 0 degrees to 180 degrees, and cycle three times.
Support
If you require technical support, please go to the Support page and open a ticket.


