
Difference between revisions of "Pico-SIM7080G-Cat-M/NB-IoT"
| (49 intermediate revisions by 4 users not shown) | |||
| Line 1: | Line 1: | ||
| + | <div class="wiki-pages jet-green-color"> | ||
{{DISPLAYTITLE:Pico SIM7080G Cat-M/NB-IoT}} | {{DISPLAYTITLE:Pico SIM7080G Cat-M/NB-IoT}} | ||
| − | |||
| − | |||
{{Infobox item | {{Infobox item | ||
|name=Pico-SIM7080G-Cat-M-NB-IoT | |name=Pico-SIM7080G-Cat-M-NB-IoT | ||
| − | |img=[[File:Pico-sim7080g-cat-m-nb-iot-4.jpg|300px|link=https://www.waveshare.com/Pico-SIM7080G-Cat-M-NB-IoT.htm|Pico-SIM7080G-Cat-M-NB-IoT]] | + | |img=[[File:Pico-sim7080g-cat-m-nb-iot-4.jpg|300px|{{Amazon_nolink|default={{#ifeq: {{#urlget:amazon|0}}|{{#urlget:Amazon|0}}| default|}}|url=link=https://www.waveshare.com/Pico-SIM7080G-Cat-M-NB-IoT.htm?amazon}}|Pico-SIM7080G-Cat-M-NB-IoT]] |
|caption=SIM7080G NB-IoT / Cat-M(EMTC) / GNSS Module For Raspberry Pi Pico, Global Band Support | |caption=SIM7080G NB-IoT / Cat-M(EMTC) / GNSS Module For Raspberry Pi Pico, Global Band Support | ||
|category= | |category= | ||
|brand=Waveshare | |brand=Waveshare | ||
| − | |{{#urlget:amazon|default}}=display | + | |{{#ifeq: {{#urlget:amazon|0}}|{{#urlget:Amazon|0}}| default|}}=display |
|website_cn=[https://www.waveshare.net/shop/ 官方中文站点] | |website_cn=[https://www.waveshare.net/shop/ 官方中文站点] | ||
|website_en=[https://www.waveshare.com/Pico-SIM7080G-Cat-M-NB-IoT.htm Waveshare website] | |website_en=[https://www.waveshare.com/Pico-SIM7080G-Cat-M-NB-IoT.htm Waveshare website] | ||
| + | |Interface1=UART | ||
|related= | |related= | ||
{{Product List|MCU Tools/RaspberryPi/Accessories}} | {{Product List|MCU Tools/RaspberryPi/Accessories}} | ||
}} | }} | ||
| − | + | ||
{{Pico-SIM7080G-Cat-M-NB-IoT Use}} | {{Pico-SIM7080G-Cat-M-NB-IoT Use}} | ||
| − | |||
| − | |||
{{Pico-SIM7080G-Manual}} | {{Pico-SIM7080G-Manual}} | ||
| − | </ | + | ==MQTT== |
| + | ===Software Download=== | ||
| + | *MQTT software download [http://www.jensd.de/apps/mqttfx/1.7.1/ Version1.7.1] | ||
| + | <gallery> | ||
| + | File:mqtt.png|Setup information<br/> | ||
| + | File:mqtt2.png|Create subscription<br/> | ||
| + | </gallery> | ||
| + | ===Operating Phenomenon=== | ||
| + | Run MQTT.py, then Pico controls Pico-SIM7080G-Cat-M/NB-IoT for initial configuration, and then subscribes to MQTT and sends "on".<br/> | ||
| + | [[File:pico2.png]]<br/> | ||
| + | |||
| + | ==GPS== | ||
| + | '''Example'''<br/> | ||
| + | This example mainly demonstrates related tests about GPS. Before testing, the receiver head of the GPS antenna must be placed outdoors (or on a window, where the sky can be seen), and the GPS cannot be obtained in rainy weather.<br/> | ||
| + | '''Operating Phenomenon'''<br/> | ||
| + | [[File:gps.png]]<br/> | ||
| + | |||
| + | ==C Demo== | ||
| + | ===Environment Setup=== | ||
| + | [http://pico.wiki/index.php/2021/01/27/pico-c-c-windows%e6%95%99%e7%a8%8b1.html 【C/C++】 Windows Tutorial 1——Environment Setup]<br> | ||
| + | [http://pico.wiki/index.php/2021/01/27/pico-c-c-windows%e6%95%99%e7%a8%8b2.html 【C/C++】 Windows Tutorial 2——New project]<br> | ||
| + | ===Demo=== | ||
| + | 1. Open the C program folder.<br> | ||
| + | [[File:demo.png]]<br> | ||
| + | 2. Open the demo through Vs coed, select the corresponding compilation tool and the demo to be run (annotate the demo you don't use, delete annotation in the demo you need and run one demo each time).<br> | ||
| + | [[File:C.png]]<br> | ||
| + | [[File:demo2.png]]<br> | ||
| + | 3. Click compile.<br> | ||
| + | [[File:demo3.png]]<br> | ||
| − | + | 4. Press and hold the BOOT button of Pico and then power it on, and enable Pico to enter the disk mode. Drag the UF2 file under the build file to the RPI-RP2 drive letter. | |
| − | + | [[File:boot.png]]<br/> | |
| − | + | 5. At this point, Pico starts to run the corresponding program, and you can check the running status through the serial port assistant. | |
| − | |||
| + | =Resources= | ||
| + | ==Document== | ||
| + | *[https://files.waveshare.com/upload/b/bb/Pico-SIM7080G-Cat-M-NB-IoT-GNSS-Schematic.pdf Schematic] | ||
| + | ==Demo== | ||
| + | *[https://files.waveshare.com/upload/8/81/Pico-SIM7080G-Cat-M-NB-IoT-Demo-Code.zip Demo] | ||
| + | *[https://files.waveshare.com/upload/b/b5/Pico-web.zip Webpage source code] | ||
== Tools == | == Tools == | ||
| − | *[[: | + | *[https://files.waveshare.com/upload/2/2f/SIM7070_SIM7080_WIN7_WIN10_USB_Driver_V1.00.rar SIM7070 & SIM7080 Driver] |
| − | *[ | + | *[https://files.waveshare.com/upload/6/6e/SIM7080G-sscom.zip sscom] |
| − | *[ | + | *[https://files.waveshare.com/upload/9/9f/SIMCom_GPS_DEMO.7z SIMCom GPS] |
| − | + | *[https://files.waveshare.com/upload/f/f6/NetAssist.7z NetAssist] | |
| − | == | + | *[https://files.waveshare.com/upload/a/a6/TCP-Test_Tool.7z TCP testing tool] |
| − | *[ | + | == Datasheets == |
| + | *[https://files.waveshare.com/upload/3/39/SIM7080_Series_AT_Command_Manual_V1.02.pdf SIM7080 Series_AT Command Manual_V1.02] | ||
| + | *[https://files.waveshare.com/upload/e/e7/SIM7080G_Hardware_Design_V1.03.pdf SIM7080G Hardware Design_V1.03] | ||
| + | *[https://files.waveshare.com/upload/b/bb/SIM7070_SIM7080_SIM7090_Series_Email_Application_Note_V1.02.pdf SIM7070_SIM7080_SIM7090_Series_Email_Application_Note_V1.02] | ||
| + | *[https://files.waveshare.com/upload/b/bb/SIM7070_SIM7080_SIM7090_Series_HTTP(S)_Application_Note_V1.02.pdf SIM7070_SIM7080_SIM7090_Series_HTTP(S)_Application_Note_V1.02] | ||
| + | *[https://files.waveshare.com/upload/b/bb/SIM7070_SIM7080_SIM7090_Series_MQTT(S)_Application_Note_V1.02.pdf SIM7070_SIM7080_SIM7090_Series_MQTT(S)_Application_Note_V1.02] | ||
| + | *[https://files.waveshare.com/upload/b/bb/SIM7070_SIM7080_SIM7090_Series_TCPUDP(S)_Application_Note_V1.03.pdf SIM7070_SIM7080_SIM7090_Series_TCPUDP(S)_Application_Note_V1.03] | ||
| + | *[https://www.simcom.com/product/SIM7080G.html More...] | ||
| + | <!-- | ||
| + | *[[:File:SIM7080 Series_MQTT(S)_Application Note_V1.01.pdf]] | ||
| + | *[[:File:SIM7080 Series_TCPUDP(S)_Application Note_V1.01.pdf]] | ||
*[[:File:SIM7080G_SPEC_201911.pdf]] | *[[:File:SIM7080G_SPEC_201911.pdf]] | ||
| − | |||
*[[:File:SIM7080 Series_CoAP_Application Note_V1.01.pdf]] | *[[:File:SIM7080 Series_CoAP_Application Note_V1.01.pdf]] | ||
*[[:File:SIM7080 Series_CTBURST_Application Note_V1.01.pdf]] | *[[:File:SIM7080 Series_CTBURST_Application Note_V1.01.pdf]] | ||
| Line 49: | Line 89: | ||
*[[:File:SIM7080 Series_Low Power Mode_Application Note_V1.01.pdf]] | *[[:File:SIM7080 Series_Low Power Mode_Application Note_V1.01.pdf]] | ||
*[[:File:SIM7080 Series_LwM2M_Application Note_V1.01.pdf]] | *[[:File:SIM7080 Series_LwM2M_Application Note_V1.01.pdf]] | ||
| − | |||
*[[:File:SIM7080 Series_PING_Application Note_V1.01.pdf]] | *[[:File:SIM7080 Series_PING_Application Note_V1.01.pdf]] | ||
*[[:File:SIM7080 Series_SAT_Application Note_V1.01.pdf]] | *[[:File:SIM7080 Series_SAT_Application Note_V1.01.pdf]] | ||
| − | + | --> | |
| − | + | {{Raspberry Pi Pico Software}} | |
| − | + | {{Pico Get Start Quick}} | |
| − | </ | + | = FAQ = |
| − | < | + | {{FAQ| Can SIM7080G use ordinary SIM cards? | |
| + | This is an NB module, which only supports NB SIM cards in China. | ||
| + | |||}} | ||
| + | {{FAQ| Can SIM7080G use a cellular network and GPS positioning at the same time? | | ||
| + | SIM7080X and SIM7070X series cannot connect to cellular networks and GPS positioning at the same time. | ||
| + | |||}} | ||
| + | {{FAQ| Why SIM7080G has no signal? | | ||
| + | * Fixed NB-IOT or CAT-M to get the signal easier. | ||
| + | <pre> | ||
| + | AT+CMNB=2 //Fix NB-IOT | ||
| + | AT+CMNB=1 //fix CAT-M | ||
| + | </pre> | ||
| + | * Fixed LTE mode can register to the network faster | ||
| + | <pre> | ||
| + | AT+CNMP=38 | ||
| + | </pre> | ||
| + | For specific instructions, please refer to the following manuals:<br> | ||
| + | [https://files.waveshare.com/upload/0/02/SIM7070_SIM7080_SIM7090_Series_AT_Command_Manual_V1.03.pdf SIM7070_SIM7080_SIM7090_Series_AT_Command_Manual_V1.03.pdf] | ||
| + | |||}} | ||
| − | + | =Support= | |
| − | + | {{Servicebox1}} | |
| − | {{ | ||
| − | |||
</div> | </div> | ||
Latest revision as of 01:30, 28 February 2024
| ||

Overview
Introduction
The Pico-SIM7080G-Cat-M/NB-IoT is an NB-IoT (NarrowBand-Internet of Things), Cat-M (aka eMTC, enhanced Machine Type Communication), and GNSS (Global Navigation Satellite System) module designed for Raspberry Pi Pico. It supports multiple NB-IoT frequency band, can be controlled via serial AT commands, and supports communication protocols like HTTP/MQTT/LWM2M/COAP, etc. Due to the advantages of low delay, low power, low cost, and wide coverage, it is the ideal choice for IoT applications such as intelligent instruments, asset tracking, remote monitoring, and so on.
Features
- Standard Raspberry Pi Pico header, supports Raspberry Pi Pico series boards.
- UART communication, serial AT commands control.
- Communication protocol support: TCP/UDP/HTTP/HTTPS/TLS/DTLS/PING/LWM2M/COAP/MQTT...
- GNSS positioning support: GPS, GLONASS, BeiDou, and Galileo.
- Integrates 3.7V Li-po battery connector and recharge circuit, allowing being powered from external rechargeable Li-po battery, or recharge it in turn.
- 2 x LED indicators, for monitoring the module operating status.
- Onboard Nano SIM card slot, supports ONLY 1.8V SIM card (3V SIM card is not available).
- Comes with online development resources and manuals (MicroPython examples).
Specifications
|
Product |
SIM7080G |
SIM7020C / SIM7020E |
|---|---|---|
|
FREQUENCY BAND | ||
|
NB-IoT |
B1/B2/B3/B4/B5/B8/B12/B13/B18/B19/ |
SIM7020C: |
|
Cat-M |
B1/B2/B3/B4/B5/B8/B12/B13/B14/B18/ |
- |
|
GNSS |
GPS, GLONASS, BeiDou, Galileo |
- |
|
Applicable region |
global applicable |
SIM7020C:China |
|
DATA RATE | ||
|
NB-IoT (Kbps) |
136 (DL)/150 (UL) |
26.15 (DL)/62.5 (UL) |
|
Cat-M (Kbps) |
589 (DL)/1119 (UL) |
- |
|
OTHERS | ||
|
Communication protocol |
TCP/UDP/HTTP/HTTPS/TLS/DTLS/PING/LWM2M/COAP/MQTT | |
|
Power supply |
External Li-po battery OR Raspberry Pi Pico USB port | |
|
Battery interface |
3.7V ~ 4.2V | |
|
Logic level |
3.3V | |
|
Module standalone current |
Idle mode:10mA |
Idle mode:5.6mA |
|
Sleep mode:1.2mA |
Sleep mode:0.4mA | |
|
PSM mode:3.2uA |
PSM mode:3.4uA | |
|
Indicator |
NET:NET: network indicator | |
|
Switch |
Li-po battery power supply switch | |
|
SIM card |
NB-IoT / Cat-M card (1.8V ONLY) |
NB card (1.8V / 3V) |
|
Antenna connector |
LTE, GNSS |
LTE |
|
Dimensions |
73.5 × 24.00mm | |
Pinout Definition

Outline Dimensions

Example
Python Demo
Use in Windows
- 1. Press and hold the BOOTSET button on the Pico board, connect the Pico to the USB port of the computer through the Micro USB cable, and release the button after the computer recognizes a removable hard disk (RPI-RP2).
- 2. Copy the pico_micropython_xxxxxxxx.uf2 file in the python directory to the recognized removable disk (RPI-RP2).
- 3. Open Thonny IDE (note: use the latest version of Thonny, otherwise there is no Pico support package, the latest version under Windows is v3.3.3).
- 4. Click Tools -> Settings -> Interpreter, select Pico and the corresponding port as shown in the figure:

- 5. File -> Open -> main.py, click to run, as shown below:

This demo provides a simple program.
Use in Raspberry Pi Environment
- 1. The process of flashing the firmware is the same as that on Windows, you can choose to copy the pico_micropython_xxxxxxxx.uf2 file into pico on PC or Raspberry Pi.
- 2. Open Thonny IDE on the Raspberry Pi Mountain (click the Raspberry logo -> Programming -> Thonny Python IDE ), you can check the version information in Help -> About Thonny.
To make sure your version has a Pico support package, you can also click Tools -> Options... -> Interpreter to select MicroPython (Raspberry Pi Pico and ttyACM0 port.
as the picture shows:

If your current Thonny version does not have the pico support package, enter the following command to update the Thonny IDE.
sudo apt upgrade thonny
- 3. Click File -> Open... -> python/main.py to run the script.
AT Test
Example description
This demo is mainly to facilitate the user to directly test the AT command transmission and reception of the verification module through the Thony software. The main program will first power on the module directly, and then check the network condition, then it will loop to detect the AT command input by the user, send it to the module through the serial port, and then return the AT command of the module to the Pico serial port for printing.
For the detailed AT command set, please see: SIM7080_Series_AT_Command_Manual_V1.02.pdf
Expected result

HTTP
With this example, The Raspberry Pico can connect to the network by NB-IoT. You can use HTTP GET to get the weather information from weather websites and post the temperature of Pico to the server by HTTP POST .
You can access the webpage and check the real-time data posted.

Setup Hardware
Solder female/male pin headers to Pico-SIM7080G and connect the NB-IoT board to Pico. Connect the battery, Antenna and Insert the NB-IoT card.

Setup Server
Use http://pico.wiki/esp-chart.php as an example, we set up the webpage of the server for testing.

1. Build environments like php and mysql, etc. Create database file, for example:
- Database:example_esp_data
- Password:your_password
- User Name:your_username
- Create database table:
CREATE TABLE Sensor (
   id INT(6) UNSIGNED AUTO_INCREMENT PRIMARY KEY,
   value1 VARCHAR(10),
   value2 VARCHAR(10),
   value3 VARCHAR(10),
   reading_time TIMESTAMP DEFAULT CURRENT_TIMESTAMP ON UPDATE CURRENT_TIMESTAMP)
2. Two example files are provided for the server. they are post-data.php and esp-chart.php.
- post-data.php:API of HTTP POST (server). SIM7080G module can POST data to the server by using this API.
- esp-chart.php:Webpage of Client. You can get the newest data that SIM7080G uploaded by this webpage and show it with the chart.
Software setup in Pico
Reference tutorial: Template:Raspberry Pi Pico Quick Start Choose to run the MicroPython development environment under Windows or Raspberry Pi system
(Windows development environment is recommended, and the Windows development environment is used as an example below).
Download the Python example: HTTP.py, the preview of the code is as follows:
- HTTP GET:
# HTTP GET TEST
def http_get():
  send_at('AT+SHDISC', 'OK')
  send_at('AT+SHCONF="URL",\"'+http_get_server[0]+'\"', 'OK')
  set_http_length()
  send_at('AT+SHCONN', 'OK', 3000)
  if send_at('AT+SHSTATE?', '1'):
      set_http_content()
      resp = str(send_at_wait_resp('AT+SHREQ=\"'+http_get_server[1]+'\",1', 'OK',8000))
      # print("resp is :", resp)
      try:
          get_pack_len = int(resp[resp.rfind(',')+1:-5])
          if get_pack_len > 0:
              send_at_wait_resp('AT+SHREAD=0,'+str(get_pack_len), 'OK', 5000)
              send_at('AT+SHDISC', 'OK')
          else:
              print("HTTP Get failed!\n")
      except ValueError:
          print("ValueError!\n")
  else:
      print("HTTP connection disconnected, please check and try again\n")
- HTTP POST:
def http_post():
  send_at('AT+SHDISC', 'OK')
  send_at('AT+SHCONF="URL",\"' + http_post_server[0] + '\"', 'OK')
  set_http_length()
  send_at('AT+SHCONN', 'OK', 3000)
  if send_at('AT+SHSTATE?', '1'):
      set_http_content()
      send_at('AT+SHCPARA', 'OK')
      if send_at('AT+SHBOD=62,10000', '>', 1000) :
          send_at(http_post_tmp, 'OK')
          resp = str(send_at_wait_resp('AT+SHREQ=\"/'+http_post_server[1]+'\",3','OK', 8000))
          # print("resp is :", resp)
          try:
              get_pack = int(resp[resp.rfind(',')+1:-5])
              print(get_pack)
              if get_pack > 0:
                  send_at_wait_resp('AT+SHREAD=0,' + str(get_pack), 'OK', 3000)
                  send_at('AT+SHDISC', 'OK')
              else:
                  print("HTTP Post failed!\n")
          except ValueError:
              print("ValueError!\n")
      else:
          print("Send failed\n")
  else:
      print("HTTP connection disconnected, please check and try again\n")
For more information about the HTTP function of SIM7080G module, please refer to SIM7070/SIM7080_Series_HTTP_Application_Note_V1.02.pdf
3. Connect the Pico-SIM7080G to Pico and connect the Pico to Raspberry Pi or PC by USB cable.
- Open the Thonny software, Choose MicroPython(Raspberry Pi Pico), and open the sample codes.
- Please first click Stop(No.1), and then click the Run(No.2) buttons to run the demo codes. You can check the status by the Shell window(No. 3) for example:

4. You can check, modify or run/debug the sample code with the Thonny software.
- If you want to make the codes auto-run, please choose File -> Save as -> Raspberry Pi Pico, and save it as main.py.

Expected Result
With the HTTP.py example, Pico can get the weather information from the weather website by HTTP GET and post the temperature of Puco to pico.wiki by HTTP POST.
At the same time, users can go to the http://pico.wiki/esp-chart.php webpage to check the uploaded data which are showed by charts. For example:


MQTT
Software Download
- MQTT software download Version1.7.1

Setup information

Create subscription


Operating Phenomenon
Run MQTT.py, then Pico controls Pico-SIM7080G-Cat-M/NB-IoT for initial configuration, and then subscribes to MQTT and sends "on".

GPS
Example
This example mainly demonstrates related tests about GPS. Before testing, the receiver head of the GPS antenna must be placed outdoors (or on a window, where the sky can be seen), and the GPS cannot be obtained in rainy weather.
Operating Phenomenon

C Demo
Environment Setup
【C/C++】 Windows Tutorial 1——Environment Setup
【C/C++】 Windows Tutorial 2——New project
Demo
1. Open the C program folder.

2. Open the demo through Vs coed, select the corresponding compilation tool and the demo to be run (annotate the demo you don't use, delete annotation in the demo you need and run one demo each time).


3. Click compile.

4. Press and hold the BOOT button of Pico and then power it on, and enable Pico to enter the disk mode. Drag the UF2 file under the build file to the RPI-RP2 drive letter.

5. At this point, Pico starts to run the corresponding program, and you can check the running status through the serial port assistant.
Resources
Document
Demo
Tools
Datasheets
- SIM7080 Series_AT Command Manual_V1.02
- SIM7080G Hardware Design_V1.03
- SIM7070_SIM7080_SIM7090_Series_Email_Application_Note_V1.02
- SIM7070_SIM7080_SIM7090_Series_HTTP(S)_Application_Note_V1.02
- SIM7070_SIM7080_SIM7090_Series_MQTT(S)_Application_Note_V1.02
- SIM7070_SIM7080_SIM7090_Series_TCPUDP(S)_Application_Note_V1.03
- More...
Development Software
Pico Quick Start
Download Firmware
- MicroPython Firmware Download

- C_Blink Firmware Download

Video Tutorial
- Pico Tutorial I - Basic Introduction
- Pico Tutorial II - GPIO
- Pico Tutorial III - PWM
- Pico Tutorial IV - ADC
- Pico Tutorial V - UART
- Pico Tutorial VI - To be continued...
MicroPython Series
- 【MicroPython】 machine.Pin Function
- 【MicroPython】 machine.PWM Function
- 【MicroPython】 machine.ADC Function
- 【MicroPython】 machine.UART Function
- 【MicroPython】 machine.I2C Function
- 【MicroPython】 machine.SPI Function
- 【MicroPython】 rp2.StateMachine
C/C++ Series
Arduino IDE Series
Install Arduino IDE
-
Download the Arduino IDE installation package from Arduino website.

-
Just click on "JUST DOWNLOAD".

-
Click to install after downloading.
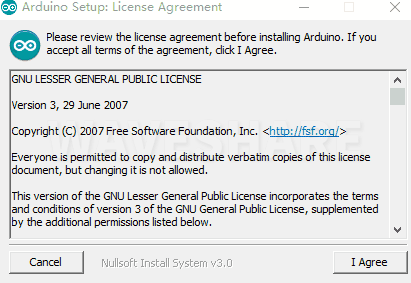
-
Note: You will be prompted to install the driver during the installation process, we can click Install.


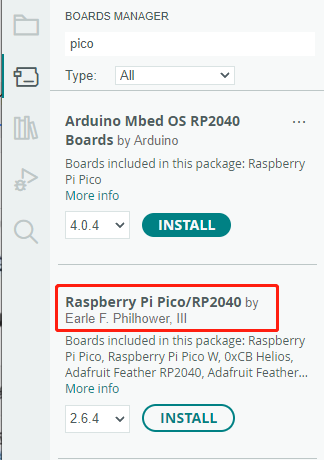
Install Arduino-Pico Core on Arduino IDE
-
Open Arduino IDE, click the File on the left corner and choose "Preferences".

-
Add the following link in the additional development board manager URL, then click OK.
https://github.com/earlephilhower/arduino-pico/releases/download/global/package_rp2040_index.json

Note: If you already have the ESP8266 board URL, you can separate the URLs with commas like this:https://dl.espressif.com/dl/package_esp32_index.json,https://github.com/earlephilhower/arduino-pico/releases/download/global/package_rp2040_index.json
-
Click on Tools -> Dev Board -> Dev Board Manager -> Search for pico, it shows installed since my computer has already installed it.


Upload Demo At the First Time
-
Press and hold the BOOTSET button on the Pico board, connect the Pico to the USB port of the computer via the Micro USB cable, and release the button when the computer recognizes a removable hard drive (RPI-RP2).

- Download the demo, open arduino\PWM\D1-LED path under the D1-LED.ino.
-
Click Tools -> Port, remember the existing COM, do not need to click this COM (different computers show different COM, remember the existing COM on your computer).

-
Connect the driver board to the computer with a USB cable, then click Tools -> Ports, select uf2 Board for the first connection, and after the upload is complete, connecting again will result in an additional COM port.

-
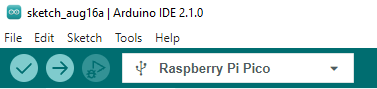
Click Tool -> Dev Board -> Raspberry Pi Pico/RP2040 -> Raspberry Pi Pico.

-
After setting, click the right arrow to upload.
- If you encounter problems during the period, you need to reinstall or replace the Arduino IDE version, uninstall the Arduino IDE needs to be uninstalled cleanly, after uninstalling the software you need to manually delete all the contents of the folder C:\Users\[name]\AppData\Local\Arduino15 (you need to show the hidden files in order to see it) and then reinstall.


Open Source Demo
- MicroPython Demo (GitHub)
- MicroPython Firmware/Blink Demo (C)
- Official Raspberry Pi C/C++ Demo
- Official Raspberry Pi MicroPython Demo
- Arduino Official C/C++ Demo
FAQ
This is an NB module, which only supports NB SIM cards in China.
SIM7080X and SIM7070X series cannot connect to cellular networks and GPS positioning at the same time.
- Fixed NB-IOT or CAT-M to get the signal easier.
AT+CMNB=2 //Fix NB-IOT
AT+CMNB=1 //fix CAT-M
- Fixed LTE mode can register to the network faster
AT+CNMP=38
For specific instructions, please refer to the following manuals:
SIM7070_SIM7080_SIM7090_Series_AT_Command_Manual_V1.03.pdf
Support
Technical Support
If you need technical support or have any feedback/review, please click the Submit Now button to submit a ticket, Our support team will check and reply to you within 1 to 2 working days. Please be patient as we make every effort to help you to resolve the issue.
Working Time: 9 AM - 6 AM GMT+8 (Monday to Friday)