
Pico ESP8266
| ||

Overview
The Pico-ESP8266 is a WiFi expansion module designed for Raspberry Pi Pico, which can be controlled via UART AT command, and supports TCP/UDP communication protocol. It is an easy solution to enable WiFi feature for Raspberry Pi Pico, suitable for sorts of IoT communication projects.
Features
- Standard Raspberry Pi Pico header supports Raspberry Pi Pico series.
- UART communication, controlled via AT command, helps you get started quickly.
- Supports STA, AP, and STA+AP three WiFi operating modes, embedded LWIP protocol stack, supports TCP/UDP communication.
- Based on ESP8266 module, four-layers process, enhanced impedance matching, stronger signal, more stable connection.
- 2 x functional buttons, convenient for the user to update AT firmware through Raspberry Pi Pico.
- Comes with online development resources and manual (Raspberry Pi Pico C/C++ and MicroPython examples).
Specification
- Communication interface: UART
- UART baud rate: 115200 bps
- WIFI standard: IEEE 802.11b/g/n
- Frequency range: 2400 ~ 2483.5MHz
- WIFI operating mode: WiFi STA, WiFi AP, WiFi STA+AP
- Antenna: PCB antenna
- Operating voltage: 3.3V
- Operating temperature: -40°C ~ 85°C
- Dimensions: 58 x 25mm
Pinout

Dimensions

Quick start
Hardware connection
- Press and hold the BOOTSEL button of Pico, the pico will be recognized as a movable disk, copy the dev_cdc_ports.uf2 file from demo codes to the Pico, the Pico will automatically restart and work as the USB to serial adapter.
- Connect the Pico_EPS8266 board to Pico, then connect the Pico to PC by USB cable.
- Open an SSCOM software, choose the correct COM port, and set the baud rate to 115200.
- Test the module by AT command.

AT commands
- 1. AT:
AT
Response:
AT

OK
- 2. AT+RST Restart device:
AT+RST
Response:
AT+RST

OK
- 3. AT+GMR Check version:
AT+GMR
Response:
AT+GMR
AT version:1.2.0.0(Jul  1 2016 20:04:45)
SDK version:1.5.4.1(39cb9a32)
Ai-Thinker Technology Co. Ltd.
v1.5.4.1-a Nov 30 2017 15:54:29
OK
TCP Client
- 1. Configure WiFi mode.
AT+CWMODE=3	//softAP+station mode
Response: :
OK
- 2. Connect to the router.
AT+CWJAP="SSID","password"	//SSID and password of the router
Response: :
AT+CWJAP="SSID","password"
OK
- If it succeeds in connecting the WIFI, it will respond and get an IP address.
WIFI CONNECTED
WIFI GOT IP
- 3. Check the IP address of ESP8266.
AT+CIFSR
Response: :
+CIFSR:APIP,"192.168.4.1"
+CIFSR:APMAC,"1a:fe:34:a5:8d:c6"
+CIFSR:STAIP,"192.168.3.133"
+CIFSR:STAMAC,"18:fe:34:a5:8d:c6"

OK
- 4. PC and ESP8266 are connected to the same router, use the network debugging tool on the PC end, and establish a TCP server.
- For example, build a server on a PC with IP address 192.168.3.116 and port 8080.
- 5. ESP8266 works as a TCP client and connects to the server.
AT+CIPSTART="TCP","192.168.3.116",8080		 //protocol, server IP and port
Response :
CONNECT

OK
- 6. ESP8266 device ends data of a specified length to the server.
AT+CIPSEND=4                            //set date length which will be sent, such as 4 bytes
>test                                   //enter the data, no CR
Response :
Recv 4 bytes
SEND OK
- 7. The data is printed if ESP8266 receives data from the server.
+IPD,n:xxxxxxxxxx //received n bytes, data=xxxxxxxxxxx
- 8. Enable the transparent transmission mode, data can be directly transmitted
AT+CIPMODE=1
Response :
OK
- 9. If the transparent transmission mode is enabled, data can be directly transmitted
AT+CIPSEND

>	 //From now on, data received from UART will be	transmitted to	the server automatically.
- 10. Exit sending data:
If +++ is detected in a single packet of data during transparent transmission, the system stops transparent transmission.
- - If you use the keyboard to type +++, it may take too long and is not considered as three consecutive + s. You are advised to use a serial port tool to send +++ at a time and not carry invisible characters such as Spaces or newlines.
- - Please send the next AT command AT least one second later
- 11. Exit the transparent transmission mode.
AT+CIPMODE=0
Response :
OK
- 12. Disconnect TCP.
AT+CIPCLOSE
Response :
CLOSED
OK
TCP Server
- 1. Configure WiFi mode:
AT+CWMODE=3	//softAP+station mode
Response :
OK
- 2. Connect to router:
AT+CWJAP="SSID","password"	//SSID and password of the router
Response :
OK
- 3. Check the IP address of the ESP8266 device:
AT+CIFSR
Response :
+CIFSR:APIP,"192.168.4.1"
+CIFSR:APMAC,"1a:fe:34:a5:8d:c6"
+CIFSR:STAIP,"192.168.3.133"
+CIFSR:STAMAC,"18:fe:34:a5:8d:c6"
OK
- 4. Enable multiple connection:
AT+CIPMUX=1
Response :
OK
Note: If "IPMODE must be 0" appears, it is necessary to disconnect ESP8266 and then enter the command. If not, press the button or power off to restart the module and then operate it again.
- 5. Build TCP server
AT+CIPSERVER=1	 	 //	default	port	=	333
Response :
OK
- 6. The PC and THE ESP8266 are connected to the same router. Use the network debugging tool on the PC to establish a TCP client and connect to the TCP server of the ESP8266.
- 7. Send data:
//ID number of connection is	defaulted	to be 0.
AT+CIPSEND=0,4   //send 4	bytes to connection NO.0
>test            //enter the	data, no CR
Response :
Recv 4 bytes

SEND OK
- 8. When the ESP8266 device receives data from the server, the following message is displayed:
+IPD,0,n:xxxxxxxxxx //received n bytes, data=xxxxxxxxxxx
- 9. Disconnect TCP:
AT+CIPCLOSE
Response :
CLOSED
OK
UDP
UDP transmission does not distinguish between server and client and is established by the AT+CIPSTART command.
- 1. Configure WiFi mode.
AT+CWMODE=3	//softAP+station mode
Response :
OK
- 2. Connect to the router.
AT+CWJAP="SSID","password"	//SSID and password of router
Response :
AT+CWJAP="SSID","password"
OK
- If the connection is normal, it may prompt you to connect to WIFI and obtain the IP address.
WIFI CONNECTED
WIFI GOT IP
- 3. Example Query the IP address of the ESP8266.
AT+CIFSR
Response :
+CIFSR:APIP,"192.168.4.1"
+CIFSR:APMAC,"1a:fe:34:a5:8d:c6"
+CIFSR:STAIP,"192.168.3.133"
+CIFSR:STAMAC,"18:fe:34:a5:8d:c6"

OK
- 4. The PC and the ESP8266 are connected to the same router. Use the network debugging tool on the PC to set up a TCP server.
- For example, build a server on a PC with IP 192.168.3.116, and the port is set as 8080.
- 5. Enable multiple connections.
AT+CIPMUX=1
Response :
OK
Note: If "IPMODE must be 0" appears, it is necessary to disconnect ESP8266 and then enter the command. If not, press the button or power off to restart the module and then operate it again.
- 6. Create a UDP transport. For example, to assign a joined number of 4, the instruction is as follows:
AT+CIPSTART=4,"UDP","192.168.101.110",8080,1112,0
Response :
4, CONNECT

OK
Note:
About the command:
- "192.168.101.110", 8080 is the remote IP and port transmitted, that is the UDP port built in step 4;
- 1112 is the local UDP port of ESP8266, it is configurable, or a random port
- 0 Indicates that after the current UDP transmission is established, the UDP remote device will not be changed by other devices. Even if other devices send data to ESP8266 UDP port 1112 through UDP protocol, the remote end of THE UDP transmission no. 4 of ESP8266 will not be replaced. If the command "AT+CIPSEND=4, X" is used to send data, the current PC will still receive the data.
- "192.168.101.110", 8080 is the remote IP and port transmitted, that is the UDP port built in step 4;
- 7. Send data
AT+CIPSEND=4,7	 //Send 7 bytes to transmission NO.4
>UDPtest  // enter the data, no CR
Response :
Recv 7 bytes

SEND OK
Note:
- • When sending data, if the number of bytes entered exceeds the set length(n):
- - The system prompts BUSY, sends the first N bytes of data, and responds SEND OK when the sending is complete.
- - The data that exceeds the length is considered invalid and is not accepted.
- - The system prompts BUSY, sends the first N bytes of data, and responds SEND OK when the sending is complete.
- 8. Receive data. When the ESP8266 device receives data from the server, the following information is displayed:
+IPD,4,n:xxxxxxxxxx //received n bytes, data=xxxxxxxxxxx
- 9. If the transparent transmission mode is enabled, data can be directly transmitted.
AT+CIPMODE=1
Response :
OK
- 10. The ESP8266 device transmits data to the server through transmission
AT+CIPSEND

>	 //From now on, data received from UART will be	transmitted to the server automatically.
- 11. Exit sending data:
If +++ is detected in a single packet of data during transparent transmission, the system stops transparent transmission.
- - If you use the keyboard to type +++, it may take too long and is not considered as three consecutive + s. You are advised to use a serial port tool to send +++ at a time and not carry invisible characters such as Spaces or newlines.
- - After that, send the next AT command AT least one second later.
- 12. Exit the transparent transmission mode
AT+CIPMODE=0
Response :
OK
- 13. Disconnect UDP transmission
AT+CIPCLOSE=4
Response :
4, CLOSED

OK
MicroPython Example
Before Pico can run MicroPython programs, you need to download the MicroPython firmware, install the Thonny IDE, and configure the motherboard environment with the Rasberry Pi option.
TCP Client
- Open the TCP&UDP test tool, create the server, and start the server.

- Open tcp_client.py in Thonny IDE and change the SSID and password to the actual WiFi account and password. Change the values of ServerIP and Port in the program to the IP and Port of the actual TCP server.

- Click run program. After running, the program will connect to WiFi and send data to the server. The information sent by the server is displayed in the shell.
TCP Server
- Open the tcp_server.py program in Thonny IDE and change SSID and password values to the actual WiFi account password.
- Click to run the program. After the program runs, it will connect to WiFi and start the server. The SHELL displays the STAIP address of ESP8266.

- Open the TCP&UDP test tool, create a connection, set the type to TCP, and target IP to the STAIP address displayed in the shell, port 8080.

- Click the "connect" button to connect to the server. After a normal connection, the icon changes from a blue dot to a green triangle.
UDP
- Open the TCP&UDP test tool, create a connection, and select UDP as the type, the destination IP address is the STAIP address displayed in the shell after running the program, the port is 1112, and the local port is 8087. Select Create and Connect.

- Open the tcp_server.py program in Thonny IDE and change the SSID and password to the actual WiFi account and password. Set remote_IP to the actual IP address of the computer

- After the program runs, it will connect to WiFi and send data to UDP on the computer side. Enter a string in the send area and send it. ESP8266 receives the message and sends it back for display in the receiving area. The shell port will also display the received information.
C/C++ codes
- C/C++ is compiled in Raspberry PI. This step can be skipped if the Pico compilation environment has been configured for Raspberry PI. If the Pico compilation environment has not been configured, perform the following operations.
wget https://raw.githubusercontent.com/raspberrypi/pico-setup/master/pico_setup.sh
chmod +x pico_setup.sh
./pico_setup.sh
- Download the demo codes:
cd ~
wget  https://files.waveshare.com/upload/4/41/Pico-ESP8266.zip
unzip Pico-ESP8266.zip
cp -r Pico-ESP8266/c/pico-esp8266  pico
- Before compiling the program, you need to modify the program and change the values of SSID and password to the actual WiFi account password. Change the values of ServerIP and Port in the program to the IP and Port of the actual TCP server.
- Compiler:
cd pico/pico-esp8266/build
cmake ..
make
Download AT Firmware
- Hold the Pico's BOOTSEL button and power on. The computer will recognize a USB flash drive and copy the dev_CDC_ports.uf2 file from the sample program to the flash drive to download the program. The Pico will become a USB-to-serial device.
- Run the flash_download_tool software.

- The factory default of the module is C1.5.4.1 AT firmware 32Mbit version. Select ai-thinker_esp8266_dout_32mbit_V1.5.4.1 -a_20171130.bin and set the address to 0x0. Set SPI SPEED to 40MHz, SPI MODE to DOUT, and FLASH SIZE to 32Mb-C1.

- Hold the IO0 button of the PICo-ESP8266 and then press the RESET button to enter download mode. Select the corresponding serial port and set the baud rate to 115200. Click START and wait for the download to complete.
- To set the AT firmware for nonOS_AT_BIN_V1.7.4, follow the following figure.

Resource
Document
Examples
Software
Pico Quick Start
Download Firmware
- MicroPython Firmware Download

- C_Blink Firmware Download

Video Tutorial
- Pico Tutorial I - Basic Introduction
- Pico Tutorial II - GPIO
- Pico Tutorial III - PWM
- Pico Tutorial IV - ADC
- Pico Tutorial V - UART
- Pico Tutorial VI - To be continued...
MicroPython Series
- 【MicroPython】 machine.Pin Function
- 【MicroPython】 machine.PWM Function
- 【MicroPython】 machine.ADC Function
- 【MicroPython】 machine.UART Function
- 【MicroPython】 machine.I2C Function
- 【MicroPython】 machine.SPI Function
- 【MicroPython】 rp2.StateMachine
C/C++ Series
Arduino IDE Series
Install Arduino IDE
-
Download the Arduino IDE installation package from Arduino website.

-
Just click on "JUST DOWNLOAD".

-
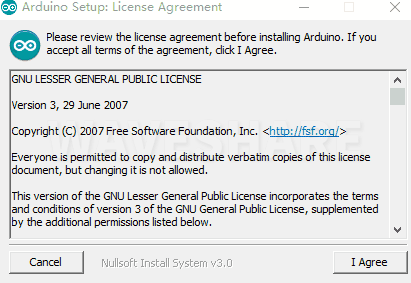
Click to install after downloading.
-
Note: You will be prompted to install the driver during the installation process, we can click Install.


Install Arduino-Pico Core on Arduino IDE
-
Open Arduino IDE, click the File on the left corner and choose "Preferences".

-
Add the following link in the additional development board manager URL, then click OK.
https://github.com/earlephilhower/arduino-pico/releases/download/global/package_rp2040_index.json

Note: If you already have the ESP8266 board URL, you can separate the URLs with commas like this:https://dl.espressif.com/dl/package_esp32_index.json,https://github.com/earlephilhower/arduino-pico/releases/download/global/package_rp2040_index.json
-
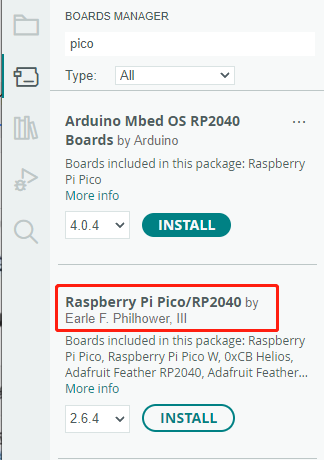
Click on Tools -> Dev Board -> Dev Board Manager -> Search for pico, it shows installed since my computer has already installed it.


Upload Demo At the First Time
-
Press and hold the BOOTSET button on the Pico board, connect the Pico to the USB port of the computer via the Micro USB cable, and release the button when the computer recognizes a removable hard drive (RPI-RP2).

- Download the demo, open arduino\PWM\D1-LED path under the D1-LED.ino.
-
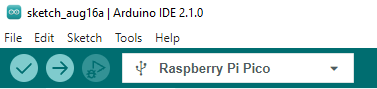
Click Tools -> Port, remember the existing COM, do not need to click this COM (different computers show different COM, remember the existing COM on your computer).

-
Connect the driver board to the computer with a USB cable, then click Tools -> Ports, select uf2 Board for the first connection, and after the upload is complete, connecting again will result in an additional COM port.

-
Click Tool -> Dev Board -> Raspberry Pi Pico/RP2040 -> Raspberry Pi Pico.

-
After setting, click the right arrow to upload.
- If you encounter problems during the period, you need to reinstall or replace the Arduino IDE version, uninstall the Arduino IDE needs to be uninstalled cleanly, after uninstalling the software you need to manually delete all the contents of the folder C:\Users\[name]\AppData\Local\Arduino15 (you need to show the hidden files in order to see it) and then reinstall.


Open Source Demo
Support
Technical Support
If you need technical support or have any feedback/review, please click the Submit Now button to submit a ticket, Our support team will check and reply to you within 1 to 2 working days. Please be patient as we make every effort to help you to resolve the issue.
Working Time: 9 AM - 6 AM GMT+8 (Monday to Friday)