
Difference between revisions of "Pico-BLE"
m (Text replacement - "{{#urlget:amazon|default}}=display" to "{{#ifeq: {{#urlget:amazon|0}}|{{#urlget:Amazon|0}}| default|}}=display") |
|||
| Line 4: | Line 4: | ||
|img=[[File:Pico-BEL-2.jpg|360px|link= https://www.waveshare.com/pico-ble.htm|Pico-BLE]] | |img=[[File:Pico-BEL-2.jpg|360px|link= https://www.waveshare.com/pico-ble.htm|Pico-BLE]] | ||
|brand=Waveshare | |brand=Waveshare | ||
| − | |{{#urlget:amazon|default}}=display | + | |{{#ifeq: {{#urlget:amazon|0}}|{{#urlget:Amazon|0}}| default|}}=display |
|website_cn=[https://www.waveshare.net/shop/Pico-BLE.htm 官网] | |website_cn=[https://www.waveshare.net/shop/Pico-BLE.htm 官网] | ||
|website_en=[https://www.waveshare.com/pico-ble.htm Website] | |website_en=[https://www.waveshare.com/pico-ble.htm Website] | ||
Revision as of 02:09, 13 May 2022
| ||

Introduction
Note
The module can only be connected to the mobile phone currently.
V1.1 (purchased after 2022/02/20), supports connection with Raspberry PI.
Introduction
The Pico-BLE is a dual-mode Bluetooth 5.1 expansion module designed for Raspberry Pi Pico, which is controlled via UART AT commands, with SPP and BLE support. Combined with the Raspberry Pi Pico, it can be used for Bluetooth wireless communication applications.
Features
- Standard Raspberry Pi Pico header, supports Raspberry Pi Pico series.
- Controlled via UART AT commands, get started quickly.
- Comes with online development resources and manual (Raspberry Pi Pico C/C++ and MicroPython examples).
Specifications
- Input voltage: 3.3V/5V
- Communication: UART
- Communication rate: up to 1,000,000 bps
- Dimensions: 56.5 × 21mm
Pinout

Dimensions

Examples
For the Pico-BLE module, we provide an serial example. Hereby we take C codes to explain the function.
Hardware Interface
BLE.c
The Bluetooth module initialization function mainly judges whether the Bluetooth module is successfully connected to the mobile phone, whether the notify function is enabled, querying the baud rate of the Bluetooth module, judges whether it is in low power mode, name, address, and modifying the name of the module.
void BLE_Init()
Execute and process BLE commands.
uint8_t Cmd_Process(uint8_t *data)
    data: the address of the command pointer to send
Transparent transmission receiving function, what data the mobile phone sends to the module, the module receives and returns the same data with this function.
void UART_RX()     Query receive
void UART_RX_IRQ() Interrupt receive
Parameter Modification
BLE.h
#define UART_ID uart0       Pico serial port selection
#define BAUD_RATE 115200    Serial port baud rate selection
#define DATA_BITS 8         Serial port data bits
#define STOP_BITS 1         Serial port data stop bits
#define PARITY UART_PARITY_NONE  Whether the serial port performs parity check
#define UART_TX_PIN 0       Pico serial port TX pin selection
#define UART_RX_PIN 1       Pico serial port RX pin selection
#define BLE_MODE_PIN 15     Bluetooth module status detection pin
Module Command
CMD.h
For specific use, please refer to the user manual.
Demonstration
Mobile Phone APP Demo
Connect the Pico and Pico-BLE:
Open the Python demo and run:

Open the software on the smartphone. (This is just a demo, you can download any Bluetooth APP from the app store.)

Click to pair:

Click on Pairing and the following will appear on the computer and the phone:


Enter the data on your cell phone and click send (your computer will show you the screen where you sent it):


PS: Apps using the BLE protocol on the mobile side need to open the notify interface.
Computer AT command demonstration
Use the USB to serial port module to connect the computer and Pico-BLE, open the SSCOM software, select the corresponding baud rate (the default is 115200), enter the command, and enable "carriage return and line feed" (must be, otherwise the command will be invalid)

The above command is a reset command, please refer to the user manual for more commands
Supporting information
User manual
Documentation
Demo codes
Pico Quick Start
Download Firmware
- MicroPython Firmware Download

- C_Blink Firmware Download

Video Tutorial
- Pico Tutorial I - Basic Introduction
- Pico Tutorial II - GPIO
- Pico Tutorial III - PWM
- Pico Tutorial IV - ADC
- Pico Tutorial V - UART
- Pico Tutorial VI - To be continued...
MicroPython Series
- 【MicroPython】 machine.Pin Function
- 【MicroPython】 machine.PWM Function
- 【MicroPython】 machine.ADC Function
- 【MicroPython】 machine.UART Function
- 【MicroPython】 machine.I2C Function
- 【MicroPython】 machine.SPI Function
- 【MicroPython】 rp2.StateMachine
C/C++ Series
Arduino IDE Series
Install Arduino IDE
-
Download the Arduino IDE installation package from Arduino website.

-
Just click on "JUST DOWNLOAD".

-
Click to install after downloading.
-
Note: You will be prompted to install the driver during the installation process, we can click Install.


Install Arduino-Pico Core on Arduino IDE
-
Open Arduino IDE, click the File on the left corner and choose "Preferences".

-
Add the following link in the additional development board manager URL, then click OK.
https://github.com/earlephilhower/arduino-pico/releases/download/global/package_rp2040_index.json

Note: If you already have the ESP8266 board URL, you can separate the URLs with commas like this:https://dl.espressif.com/dl/package_esp32_index.json,https://github.com/earlephilhower/arduino-pico/releases/download/global/package_rp2040_index.json
-
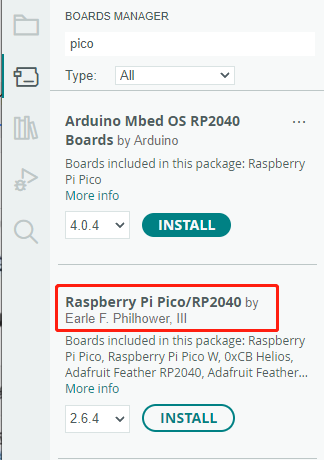
Click on Tools -> Dev Board -> Dev Board Manager -> Search for pico, it shows installed since my computer has already installed it.


Upload Demo At the First Time
-
Press and hold the BOOTSET button on the Pico board, connect the Pico to the USB port of the computer via the Micro USB cable, and release the button when the computer recognizes a removable hard drive (RPI-RP2).

- Download the demo, open arduino\PWM\D1-LED path under the D1-LED.ino.
-
Click Tools -> Port, remember the existing COM, do not need to click this COM (different computers show different COM, remember the existing COM on your computer).

-
Connect the driver board to the computer with a USB cable, then click Tools -> Ports, select uf2 Board for the first connection, and after the upload is complete, connecting again will result in an additional COM port.

-
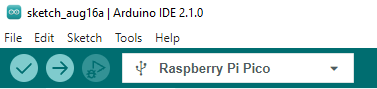
Click Tool -> Dev Board -> Raspberry Pi Pico/RP2040 -> Raspberry Pi Pico.

-
After setting, click the right arrow to upload.
- If you encounter problems during the period, you need to reinstall or replace the Arduino IDE version, uninstall the Arduino IDE needs to be uninstalled cleanly, after uninstalling the software you need to manually delete all the contents of the folder C:\Users\[name]\AppData\Local\Arduino15 (you need to show the hidden files in order to see it) and then reinstall.


Open Source Demo
- MicroPython Demo (GitHub)
- MicroPython Firmware/Blink Demo (C)
- Official Raspberry Pi C/C++ Demo
- Official Raspberry Pi MicroPython Demo
- Arduino Official C/C++ Demo
Resource
Example Demo
Official Document
Pico W
Firmware
Pico
User Manual
Schematic & Datasheet
Related Books
Raspberry Pi Open-source Demo
Development Software
FAQ
|
|