
PI400-KIT-13.3inch-UK
| ||

Features
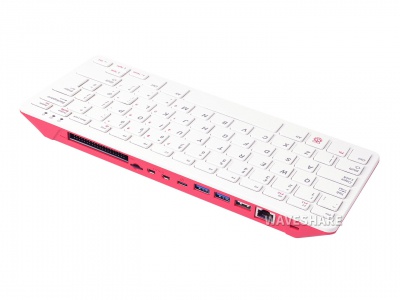
- Raspberry Pi 400 incorporates a purpose-built board based on Raspberry Pi 4. portable. You can use it as a mini-PC by combining a Mouse and display.
- CPU:1.8GHz ARM Cortex-A72(Pi4为1.5GHz)
- RAM:4GB LPDDR4-3200
- Connectivity:
- Dual-band (2.4GHz and 5.0GHz) IEEE 802.11b/g/n/ac wireless LAN;
- Bluetooth 5.0, BLE;
- Gigabit Ethernet;
- 2 × USB 3.0 and 1 × USB 2.0 ports;
- Video&Sound:2 × micro HDMI ports (supports up to 4Kp60)
- DIMENSIONS: 286 mm × 122 mm × 23 mm (maximum)
Interfaces

·Type-C Interface: Power interface, require 5V/3A power adapter.
·40PIN GPIO: Standart 40PIn GPIO for accessories.
·Micro SD card slot: For operating system and data storage
·Micro HDMI Interface: Support dual-displays 4K video output.
- Raspberry Pi Kit

- Waveshare Kit

13.3inch HDMI LCD(H) V2 Touch Screen
This product adopts an HDMI display with 1920 x 1080 HD resolution and tempered glass capacitive touch panel. It supports Raspberry Pi and can be used as a computer monitor.
Features
- IPS screen, 1920 × 1080 ultra-clear resolution.
- Tempered glass capacitive touch panel, hardness up to 6H.
- When used with Raspberry Pi, it supports Raspbian / Ubuntu / Kali / Retropie and WIN10 IoT, free drive.
- When used as a computer monitor, support Windows 10 / 8.1 / 8 / 7, ten-point touch, free drive.
- Support multi-language OSD menu (can be used for power control, adjusting brightness/contrast, etc.)
- With 3.5mm audio interface, support HDMI audio output.
- Built-in black magnetic hi-fi speakers (no external speakers required).
- Support VGA input (requires additional VGA adapter cable).
- Supports universal wall mounts, with 100×100mm wall mount fixing holes (M4 screw holes) on the back.
- Comes with 60° tilt-angle bracket.
How to Use
1. For PC Windows system, use HDMI interface to communicate. This LCD can work on PC version Windows 7 / 8 / 8.1 / 10 system. Instructions:
- 1) Connect the 12V/1A power supply to the DC interface of the LCD, and you can see that the LCD backlight is lit normally.
- 2) Connect the TOUCH interface of the LCD to the USB interface of the PC. After a while, Windows will automatically recognize the touch function.
- 3) If HDMI communication is used, connect the HDMI port of the LCD to the HDMI port of the PC, and you can see the LCD display normally after about 3 seconds. If you need to output sound, you can connect 3.5mm headphones through the HP audio output.
- 4) If using VGA communication, connect the VGA interface of LCD to PC via mini HDMI male to VGA female adapter cable. The VGA interface of the machine, waits about 3 seconds, and you can see the LCD display normally.
Notice:
- 1) When the PC is connected to multiple monitors at the same time, the cursor on the main monitor can only be controlled through the LCD, so it is recommended to set the LCD as the main monitor.
- 2) Some PCs do not support plug-and-play with HDMI devices. Generally, they can be used normally after restarting the system.
- 3) The HP audio output can be used normally only during HDMI communication.
- 4) If you use VGA communication, you need to purchase a mini HDMI male to VGA female adapter cable.
2. Raspbian/Ubuntu/Kali/Retropie and WIN10 IoT system for Raspberry Pi.
When the LCD works on the Raspberry Pi system, the resolution must be set manually, otherwise it will be recognized as the default resolution of the system. When the LCD works on the PC version of the Windows system, there is no such problem.
- 1) Write the Raspberry Pi image to the TF card.
- 2) Edit the config.txt file in the root directory of the TF card. Add at the end of the config.txt file:
max_usb_current=1
hdmi_group=2
hdmi_mode=82
hdmi_cvt 1920 1080 60 6 0 0 0
- must ensure that there are no spaces around the equal sign.
- 3) Save and insert the TF card into the Raspberry Pi.
- 4) Connect the Touch interface of the LCD to the USB interface of the Raspberry Pi.
- 5) Connect the HDMI port of the LCD to the HDMI port of the Raspberry Pi, power on the Raspberry Pi, and wait for a few seconds to display normally.
Rotate
- Display rotation
Add a statement to the config.txt file (the config file is located in the root directory of the TF card, namely /boot):
display_rotate=1 #1: 90; 2: 180; 3: 270
Note: If it is Raspberry Pi 4, you also need to comment out dtoverlay=vc4-fkms-V3D.
After saving, restart the Raspberry Pi
sudo reboot
- Touch to rotate
After the display rotation is performed, the touch position is not correct because the touch does not change with the display angle. So touch needs to be modified.
1. Install libinput
sudo apt-get install xserver-xorg-input-libinput
- If you installed Ubuntu system, or Jetson Nano. The installation instructions are
sudo apt install xserver-xorg-input-synaptics
2. Create the xorg.conf.d directory under /etc/X11/ (if the directory already exists, go directly to step 3)
sudo mkdir /etc/X11/xorg.conf.d
3. Copy the 40-libinput-conf file to the directory just created
sudo cp /usr/share/X11/xorg.conf.d/40-libinput.conf /etc/X11/xorg.conf.d/
4. Edit the file
sudo nano /etc/X11/xorg.conf.d/40-libinput.conf
Find the touchscreen part, add the following statement in it, and save it
Option "CalibrationMatrix" "0 1 0 -1 0 1 0 0 1"
Similar to the following picture:

5. Restart the Raspberry Pi
sudo reboot
Complete the above steps to perform a 90-degree rotation.
Note:
90 degree rotation: Option "CalibrationMatrix" "0 1 0 -1 0 1 0 0 1"
180 degree rotation: Option "CalibrationMatrix" "-1 0 1 0 -1 1 0 0 1"
270 degree rotation: Option "CalibrationMatrix" "0 -1 1 1 0 0 0 0 1"
Key Introduction

- Power: Backlit power button. Switch the backlight power on and off. If you do not need to use the LCD for a long time, you can use this button to turn off the backlight and reduce power consumption
- Menu: Menu button. Press the key to open the OSD menu. When using the menu, it can also be used as a confirmation button.
- Up/Left: Arrow keys.
- Down/Right: Arrow keys
- Exit: Exit key
Resource
Software
FAQ
1.Open a terminal and input command: xrandr, and check the HDMI-ID of the main display.;

2.Open a terminal and input command: xinput, to check the touch ID of the main display;

3.Run the command: xinput map-to-output <touch ID> <HDMI-ID>
(The ID value should be changed according to the actual ID checked. for example: xinput map-to-output 7 HDMI-1 )
![]()
4.If you want to configure the touchscreen and save the setting, you have to set it to auto-start. sudo nano /etc/xdg/lxsession/LXDE-pi/autostart
Add the line: xinput map-to-output 7 HDMI-1
Note that You need to change the ID and reboot Raspberry Pi.
