
Difference between revisions of "OAK-D"
m (Text replacement - "{{#urlget:amazon|default}}=display" to "{{#ifeq: {{#urlget:amazon|0}}|{{#urlget:Amazon|0}}| default|}}=display") |
|||
| Line 4: | Line 4: | ||
{{infobox item | {{infobox item | ||
|name =OAK-D | |name =OAK-D | ||
| − | |img=<div class="tabber"><div class="tabbertab" title="OAK-D">[[File:OAK-D-1.jpg|360px |link=https://www.waveshare.com/oak-d.htm| OAK-D]]</div><div class="tabbertab" title="OAK-D-PoE">[[File:OAK-D-POE-1.jpg|360px|link=https://www.waveshare.com/product/oak-d-poe.htm|OAK-D-PoE]]</div></div> | + | |img=<div class="tabber"><div class="tabbertab" title="OAK-D">[[File:OAK-D-1.jpg|360px |{{Amazon_nolink|default={{#ifeq: {{#urlget:amazon|0}}|{{#urlget:Amazon|0}}| default|}}|url=link=https://www.waveshare.com/oak-d.htm}}| OAK-D]]</div><div class="tabbertab" title="OAK-D-PoE">[[File:OAK-D-POE-1.jpg|360px|{{Amazon_nolink|default={{#ifeq: {{#urlget:amazon|0}}|{{#urlget:Amazon|0}}| default|}}|url=link=https://www.waveshare.com/product/oak-d-poe.htm}}|OAK-D-PoE]]</div></div> |
|category=[[Category:AI|Camera]] | |category=[[Category:AI|Camera]] | ||
|{{#ifeq: {{#urlget:amazon|0}}|{{#urlget:Amazon|0}}| default|}}=display | |{{#ifeq: {{#urlget:amazon|0}}|{{#urlget:Amazon|0}}| default|}}=display | ||
Revision as of 06:02, 16 May 2022
| ||

Overview
Onboard Intel® Movidius™ Myriad™ X
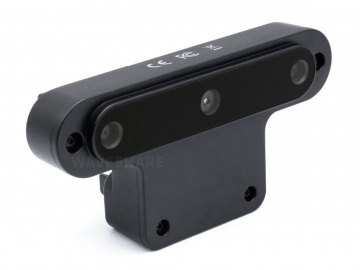
vision processor, OAK-D is an AI vision intelligent kit designed and produced by the OpenCV team. Although it is tiny, it integrates a 4K RGB binocular depth camera, IMU, and a high-performance AI processing chip to realize the binocular depth visual computing and neural network reasoning. The inertial navigation sensor is integrated into a single camera, allowing users to obtain binocular vision measurement positioning, AI neural network acceleration, and 4K H.265 30-frame real-time streaming with a low power consumption of 2.5W. It meets the needs of users in intelligent driving, intelligent transportation, intelligent security, robots, teaching competitions, etc.
OAK-D-PoE is based on the OAK-D with a PoE power supply circuit that allows a single Cat5e (or higher) Ethernet cable (up to 100 meters (328 feet)) to power and provides a 1,000 Mbps (1 Gbps) full-duplex connection to devices. With the IP67 protection grade shell, it is suitable for users to use in environments that have requirements.
OAK-D-Lite is the most cost-effective product in the OAK USB series. Except for no IMU, the performance is comparable to OAK-D, but the price is lower. It combines depth perception, object detection (neural reasoning), and object tracking, and helps you achieve these functions with a simple and easy-to-use Python API. This OAK-D-Lite includes three onboard cameras (a 4K/30fps RGB camera, two monochrome binocular cameras) and a USB3.0 Type-C interface, you can use it on an ordinary computer, Raspberry Pi, or other popular embedded host to access the OAK through the USB interface.
OAK-D-Pro is an upgraded version of the OAK-D with structured light ranging, featuring an IR laser dot matrix emitter (active depth vision), and IR illuminated LEDs (for "night vision"). It is also smaller, lighter, and more precise than the OAK-D. With built-in high-performance Myriad X VPU, it adopts the active binocular vision technology and structured light, which improves the positioning accuracy to the sub-millimeter level, meeting the needs of close-range high-precision positioning and identification, such as automatic welding robots, the positioning, identification, and calibration of surface defects of parts, etc. and enhancing the robot's perception capabilities.
OAK-D-S2 is more compact than ODK-D. Its functions, performance, and lenses are the same as OAK-D, but smaller in size and lighter in weight, and can be used in scenes where space is limited and quality is required. In addition, compared with OAK-D, OAK-D-S2 removes the 5V power port in the structure and has a larger depth measurement range than OAK-D in performance.
Parameters
- Depth measuring range: 0.2 ~ 35m
- Depth camera: Global shutter 120fps / 3MP 200fps
- RGB camera: 12MP 60fps / 13MP 60fps
- AI chip: Intel Myriad X 4TOPS computing performance
- Video plug flow: 4K 30 fps H.265 plug flow
- Interface: USB3.0 Type-C (OAK-D/OAK-D-Lite/OAK-D-Pro) / PoE (OAK-D-PoE)
- Expansion interfaces: GPIO, SPI, UART
- NN platform support: all platforms
- Average power consumption: 2.5W (average)
- Development language: Python, C++
- Enclosure: Metal enclosure
Camera Specifications
| Camera | Color camera | Monochrome camera |
|---|---|---|
| Shutter | Rolling | Global |
| Sensor | IMX378 | OV9282 |
| Max Framerate | 60fps | 120fps |
| H.265 Framerate | 30fps | / |
| Resolution | 12MP (4056 × 3040 px/1.55um) | 1MP (1280 × 800 px/3um) |
| FoV | 81° DFoV – 68.8° HFoV | 81° DFoV – 71.8° HFoV |
| Lens size | 1/2.3 Inch | 1/4 Inch |
| Focus | 8cm – ∞ (AutoFocus) | 19.6cm – ∞ (FixedFocus) |
| D-number | 2.0 | 2.0 |
| Camera | Color Camera | Monochrome Camera |
|---|---|---|
| Shutter | Rolling | Global |
| Sensor | IMX214 | OV7215 |
| Max Framerate | 60fps | 200fps |
| H.265 Framerate | 30fps | / |
| Resolution | 13MP (4208 × 3120 px) | 0.3MP (640 × 480 px) |
| FoV | 81.3° DFoV | 85.6° DFoV |
| Lens Size | 1/2.3 Inch | 1/2.3 Inch |
| Focus | 8cm – ∞ (FixedFocus) | 6.5cm – ∞ (FixedFocus) |
| D-number | 2.2 | 2.2 |
| Camera | Color Camera | Monochrome Camera |
|---|---|---|
| Shutter | Rolling | Global |
| Sensor | IMX378 | OV9282 |
| Max Framerate | 60fps | 120fps |
| H.265 Framerate | 30fps | / |
| Resolution | 12MP (4032 × 3040px) | 1MP (1280 × 4800px) |
| FoV | 81°DFoV / 69°HFoV / 55°VFoV | 81°DFoV / 72°HFoV / 49°VFoV |
| Lens Size | 1/2.3 Inch | 1/4 Inch |
| Focus Range | 8cm – ∞ (AutoFocus) | 19.6cm – ∞ (FixedFocus) |
| D-number | 2.0 | 2.2 |
| Laser Transmitter Specifications | ||
| Laser Transmitter | Specification | |
| Model | Belago1.1 Dot-Pattern | |
| Number of dots | 4700 | |
| HFOI*50% | 78±7% | |
| VFOI*50% | 61°±7% | |
| VSCEL Wavelength | 940nm | |
| Operating Temperature | 10°C ~ 60°C | |
| Storage Temperature | 0°C ~ 80°C | |
| Laser Safety Standards | EN/IEC 60825-1 3rd Edition (2014) Class 1 Laser Products | |
Supported NN
- Caffe*
- AlexNet
- CaffeNet
- GoogleNet (Inception) v1, v2, v4
- VGG family (VGG16, VGG19)
- SqueezeNet v1.0, v1.1
- ResNet v1 family (18***, 50, 101, 152)
- MobileNet (mobilenet-v1-1.0-224, mobilenet-v2)
- Inception ResNet v2
- DenseNet family (121,161,169,201)
- SSD-300, SSD-512, SSD-MobileNet, SSD-GoogleNet, SSD-SqueezeNet
- TensorFlow*
- AlexNet
- Inception v1, v2, v3, v4
- Inception ResNet v2
- MobileNet v1, v2
- ResNet v1 family (50, 101, 152)
- ResNet v2 family (50, 101, 152)
- SqueezeNet v1.0, v1.1
- VGG family (VGG16, VGG19)
- Yolo family (yolo-v2, yolo-v3, tiny-yolo-v1, tiny-yolo-v2, tiny-yolo-v3)
- faster_rcnn_inception_v2, faster_rcnn_resnet101
- ssd_mobilenet_v1
- DeepLab-v3+
- MXNet*
- AlexNet and CaffeNet
- DenseNet family (121,161,169,201)
- SqueezeNet v1.1
- MobileNet v1, v2
- NiN
- ResNet v1 (101, 152)
- ResNet v2 (101)
- SqueezeNet v1.1
- VGG family (VGG16, VGG19)
- SSD-Inception-v3, SSD-MobileNet, SSD-ResNet-50, SSD-300
Hardware Connection
OAK-D
- Connect the power supply to the OAK-D's power connector.
- Use a Type-C cable to connect OAK-D to the USB3.0 port of a computer or other hosts.
OAK-D-PoE
- To use OAK-D-PoE, you need to use a switch or router that complies with the 802.3af POE power supply standard.
- Remove the plastic waterproof casing and connect the matching network cable to the switch. OAK-D-PoE needs to be connected to the Internet for normal use.
- Note that OAK-D-PoE needs to be connected to the same LAN as the host computer, otherwise the program cannot identify the device.
OAK-D-Lite
- Use a Type-C cable to connect OAK-D to the USB3.0 port of a computer or other hosts.
OAK-D-Pro
- Connect the Y-Adapter to the OAK-D-Pro.
- Use two Type-C cables to connect the Y-type connector, on the other side, connect a UB cable to the USB3,0 interface of other hosts, and connect the other one to the 5V/2A power supply.
OAK-D-S2
- Use Type-C to connect OAK-D-S2 to the USB3.0 interface of the computer or other host.
User Guides
Windows
- Click to download Oak D Windows software.
- Unzip the downloaded zip.
- Double click the "exe" file.
- Follow the prompts to install the OAKEnvironment software.
- It is recommended to change the installation directory to another location.
- Check to add environment variables.
- Click "Install" and wait for the installation to complete.
- After the installation is complete, a shortcut will be added to the desktop. Double-click to run the "depthai-demo.py" program directly.


Linux
If you use the Ubuntu system, you can operate it according to the following steps:
- Install depthai
git clone https://gitee.com/oakchina/depthai.git
- Install depthai-python
git clone https://gitee.com/oakchina/depthai-python.git
- Install depthai-experiments
git clone https://gitee.com/oakchina/depthai-experiments.git
- If you are using the OAK device for the first time, you need to configure the rules first.
echo 'SUBSYSTEM=="usb", ATTRS{idVendor}=="03e7", MODE="0666"' | sudo tee /etc/udev/rules.d/80-movidius.rules
sudo udevadm control --reload-rules && sudo udevadm trigger
- Install dependecy
python3 -m pip install -r depthai/requirements.txt -i https://pypi.tuna.tsinghua.edu.cn/simple
- Test the demo
python3 depthai/depthai_demo.py

Raspberry Pi
- At the beginning, we provided a Raspberry Pi image with an already configured environment, and users can directly download and program it.
- Download Raspberry Pi Official Programming Tool

- Open the software, select the downloaded oak image (note that the .img file is decompressed), and then program it into the SD card.

- Boot the Raspberry Pi and use the following commands to run the demo.
cd depthai
python3 depthai_demo.py
Ubuntu
- Install depthai
git clone https://gitee.com/oakchina/depthai.git
- Install dependency
cd depthai
python3 install_requirements.py
- Run the demo
python3 depthai-demo.py
Note: If opencv reports an error and displays an illegal command after installation, please run the command to add the environment, and then retest.
cho "export OPENBLAS_CORETYPE=ARMV8" >> ~/.bashrc
source ~/.bashrc
Jetson
Note: Do not directly run the dependent scripts in the depthhai package on the jetson platform to avoid OpenCV coverage and cause other programs to fail to use normally.
Please program the system according to the Jetson platform first, and complete the normal configuration.
(Optional) If there is a problem with the subsequent configuration, you can update the software package. Please do not update it for the first configuration.
sudo apt update && sudo apt upgrade
sudo reboot
- s set SWAP
# disable ZRAM:
sudo systemctl disable nvzramconfig
# create 4GB swap file
sudo fallocate -l 4G /mnt/4GB.swap
sudo chmod 600 /mnt/4GB.swap
sudo mkswap /mnt/4GB.swap
- Install pip3
sudo -H apt install -y python3-pip
- Install and config the virtual environment
sudo -H pip3 install virtualenv virtualenvwrapper
- Add the setting to bash script
sudo vi ~/.bashrc

# add the following content to the opened file
export WORKON_HOME=$HOME/.virtualenvs
export VIRTUALENVWRAPPER_PYTHON=/usr/bin/python3
source /usr/local/bin/virtualenvwrapper.sh
- Load the script again and create the virtual environment depthAI
source ~/.bashrc
mkvirtualenv depthAI -p python3
- Install depthai, note that the installation needs to be performed in a virtual environment, please enter the virtual environment first.
#download and install the dependencies script
sudo wget -qO- http://docs.luxonis.com/_static/install_dependencies.sh | bash

#clone depthai respository
git clone https://github.com/luxonis/depthai-python.git
cd depthai-python
- Add the environment config
echo "export OPENBLAS_CORETYPE=ARMV8" >> ~/.bashrc
- Enter the example file and then run the script to install the dependency.
cd examples/
sudo python install_requirements.py
- Run the test script.
sudo python rgb_preview.py