
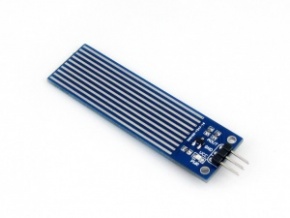
Moisture Sensor
| ||

Overview
- Fork-like design, make it easy to insert into the soil.
- Output voltage boosts along with the soil moisture level increases.
Specification
- Detection depth: 38mm
- Power: 2.0V ~ 5.0V
- Dimension: 20.0mm * 51.0mm
- Mounting holes size: 2.0mm
Pinouts
| PIN | Description |
| VCC | Power input (2.0V~5.0V) |
| GND | Ground |
| AOUT | Analog data output |
Working priciple
This module uses the current amplification principle of the triode. When soil moisture conducts the transistor's base and the positive pole, the triode will produce a certain size between the base and the emitter current, at this point, in the collector of a transistor between the emitter and it will certainly produce a magnification of current, the current through the resistance of the emitter voltage for the AD converter.
Configure Pico
MicroPython and C examples are provided for this sensor, to use it with Pico, you need to first flash firmware to the Pico according to the example.
Please refer to the guides of Raspberry Pi about how to flash the firmware. We recommend you use the firmware from the Demo codes archive.
Hardware connection

| Moisture | Pico | Description |
|---|---|---|
| VCC | 3.3V | Power input |
| GND | GND | Ground |
| AOUT | GP26 | Analog data output |
Examples
Download the example
Open the terminal of Raspberry Pi and run the following command to download the example:
sudo apt-get install p7zip-full
cd ~
sudo wget  https://files.waveshare.com/upload/5/59/Moisture-Sensor-code.7z
7z x Moisture-Sensor-code.7z -o./Moisture-Sensor-code
cd ~/Moisture-Sensor-code
cd Pico/c/build/
C
Here we use the Raspberry Pi board to flashing the Pico.
- Compile the c examples
- Go into the directory of C examples
cd ~/Moisture-Sensor-code/Pico/c/
- Go into the build folder and add the sdk; ../../pico-sdk is the path of the SDK, if may be different if you have saved the SDK in other path.
cd build
export PICO_SDK_PATH=../../pico-sdk
- Generate Makefile by cmake command
cmake ..
- Compile the codes by command make
make -j9
- Note: If you use Pi zero, please run make only.
- After compiling, a uf2 file is generated.
- Hold the button of Pico board, connect the Pico board to Raspberry Pi by USB cable
- After connecting, release the button and a portable disk (RPI_RP2) is recognized.
- Copy the main.uf2 file generated which locates in build folder to the portable disk (RPI-RP2)
cp main.uf2 /media/pi/RPI-RP2/
Python examples
- In windows PC
- Hold the BOOTSET button of the PICO board, connect the Pico board to Raspberry Pi by USB cable
- After connecting, release the button and a portable disk (RPI-RP2) is recognized.
- Copy the rp2-pico-20210418-v1.15.uf2 file to the portable disk (RPI-RP2).
- Open the Thonny IDE (Please install the newest version which supports Pico board or update).
- Choose Tools -> Options ->Interpreter, choose the Pico and the port

- Download the demo codes, unzip and find the MicroPython example
- Choose File -> Open -> Moisture Sensor.py and run it.

- In Raspberry Pi

- Flash the uf2 file to the Pico board just like in the Windows PC
- Open the Thonny IDE of Pi, make sure that it is the newest version, or update it.
- Choose Tools -> Options... -> Interpreter
- Choose Pico and the Port

- If your Thonny IDE cannot support the Pico board, you can update it and try again.

sudo apt upgrade thonny
- Choose File -> Open... -> python/Moisture Sensor.py and run it.
Expected result
Insert the sensor into the soil and gradually add water to the soil. The output data of the serial port changes accordingly
The examples provided are based on the STM32F103RBT6 and the STM32H743, the connection provided is based on the STM32F103RB.
If you want to use other STM32 boards, please change the connection and you may need to port the codes yourself.
Hardware connection

| Moisture | STM32 | Description |
|---|---|---|
| VCC | 3.3V | Power input |
| GND | GND | Ground |
| AOUT | PA6 | Analog data output |
Examples
The examples are based on the HAL library. Please download the demo codes, unzip them and find the STM32 examples.
- Open the project from Moisture-Sensor-code\STM32\STM32F103RB\MDK-ARM by Keil.
- Build the project and program it to the STM32 board.
- connect the UART1 of the STM32 board to the PC and check the serial data by SCCOM software.

Expected result
Insert the sensor into the soil and gradually add water to the soil. The output data of the serial port changes accordingly
The examples provided are based on the Arduino UNO, if you need to use other Arduino boards, please check if the board is compatible with the UNO.
Hardware connection

| Moisture | Arduino | Description |
|---|---|---|
| VCC | 5V | Power input |
| GND | GND | Ground |
| AOUT | A0 | Analog data output |
Examples
- Please download and install Arduino IDE to your PC.
- Download the demo codes, unzip and find the Arduino examples
- Open the Moisture_Senso.ino file by the Arduino IDE
- Build and upload the codes to the UNO board
- After uploading, you can open the Serial Monitor of IDE and check the data
Expected result
Insert the sensor into the soil and gradually add water to the soil. The output data of the serial port changes accordingly
Resources
FAQ
{{{5}}}
{{{5}}}
|


{{{5}}}