JetRacer ROS AI Kit Tutorial VIII: Start the Camera Node
From Waveshare Wiki
JetRacer ROS Kit User Guide
- JetRacer ROS Kit Tutorial I: How to assemble the JetRacer
- JetRacer ROS Kit Tutorial II: How to Install the Jetson Nano Image
- JetRacer ROS Kit Tutorial III: How to install Ubuntu Virtual Image
- JetRacer ROS Kit Tutorial IV: How to congifure multi-machine communication
- JetRacer ROS Kit Tutorial V: Robot Movement Control
- JetRacer ROS Kit Tutorial VI: View Node Topics With ROS
- JetRacer ROS Kit Tutorial VII: Robot Odometer Calibration
- JetRacer ROS Kit Tutorial VIII: Start the Camera Node
- JetRacer ROS Kit Tutorial IX: Enable the Lidar Node
- JetRacer Main Page
Step 1: Enable the Camera Node
- Re-open a terminal in the robot and run the following command to start the CSI camera node.
roslaunch jetracer csi_camera.launch
- After starting the camera node, reopen a terminal in the virtual machine and run the following command to start the image viewing interface.
rosrun rqt_image_view rqt_image_view
- There are two topics, /csi_cam_0/image_raw and /csi_cam_0/image_raw/compressed, in the upper right corner, which represent raw data and compressed data respectively. It is recommended to choose compressed data to reduce bandwidth.
Step 2: View images via RVIZ
- Re-open a terminal in the virtual machine and run the rosrun rviz rviz or rviz command to start the RVIZ interface.
- Add the Image component, and select the corresponding topic/csi_cam_0/image_raw, and select the compressed data as the transmission type to view the image.
- You can modify the resolution and frame rate by modifying the jetbot_pro/launch/csi_camera.launch startup file. Note that the larger the resolution, the higher the frame rate, the larger the bandwidth required, and the easier it is to cause the image to freeze.
- Enter the following commands in jetson nano to modify the resolution and frame rate.
sudo nano catkin_ws/src/jetbot_pro/launch/csi_camera.launch
Step 3: Display the Image Based on Web
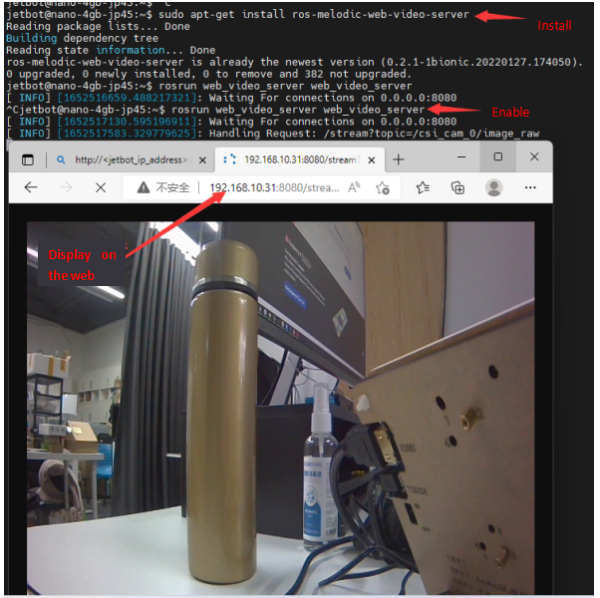
- After the camera is started, an image service can be started through the web_video_server software, and the user can enter the URL in the browser to view the camera data. The specific work is as follows:
- Run the following command in the robot to install web_video_server.
sudo apt-get install ros-melodic-web-video-server
- After installation, run the following command to start web_video_server.
rosrun web_video_server web_video_server
- Enter the following URL in the browser to view the image data, mainly modify the IP address to the actual IP address of the robot. Be careful not to close the camera node, otherwise, the image will not display properly.
http://<jetson_ip_address>:8080/stream?topic=/csi_cam_0/image_raw #Note: Replace <jetson_ip_address> with the IP address of the actual car
E.g:
http://192.168.10.66:8080/stream?topic=/csi_cam_0/image_raw
Step 4: Calibrate the Camera
- Run the following command in the virtual machine to start the calibration image interface
rosrun camera_calibration cameracalibrator.py --size 5x7 --square 0.03 image:=/csi_cam_0/image_raw camera:=/csi_cam_0
- Among which:
- size: The number of intersections of black and white grids to calibrate the chessboard, this uses 5x7 intersections.
- square: the side length of the checkerboard, in meters.
- image and camera: Set the topic of images posted by the camera.
- In order to obtain better calibration results, it is necessary to move the checkerboard to different positions of the image, especially the edge positions of the image. When the CALIBRATE button changes from gray to green, it means that enough data has been collected, you can click CALIBRATE to view the results.
- Click the "CALIBRATE" button, the calibration program automatically calculates the calibration parameters, it takes a while, the interface may become gray and unresponsive, be careful not to close it and wait for a while.
- After the calibration is completed, you can see the calibrated image through the graphical interface. By comparison, you can find that there is a deformation on the right side until a good calibration effect is obtained.
- Click "SAVE" to save the calibration data to the temporary file of the virtual machine, click "COMMIT" to save the calibration file to the robot configuration file, the default directory is jetracer_ros/cfg/camera_celibratio/cam_640x480.yaml.
- After restarting the camera node, run the following command to check that the calibration parameters have been updated.
rostopic echo /camera_info
- [Note: At this time, the image viewed through image_view or RVIZ is still the original image of the camera, not the calibrated image. If the calibration image is displayed, it will be introduced in the OpenCV tutorial.]


