
Difference between revisions of "JetBot AI Kit Assemble Manual"
From Waveshare Wiki
(Created page with "==JetBot AI Kit Assembly== ;Components and screws :Please check the components and screws :File:Jetbot_assemble_manual_1.png ;1. Assemble motors :File:assemble-1.png ;...") |
|||
| Line 1: | Line 1: | ||
==JetBot AI Kit Assembly== | ==JetBot AI Kit Assembly== | ||
| − | ;Components and screws | + | ; Components and screws |
| − | :Please check the components and screws | + | : Please check the components and screws, Jetson Nano (①) and the SD card (②) are not provided if you buy the Acce version. |
| − | :[[File: | + | :[[File:JetBot-AI-Kit-Details 13.jpg|600px]] |
;1. Assemble motors | ;1. Assemble motors | ||
| − | :[[File: | + | :[[File:JetBot-Assembly-1.png|400px]] [[File:JetBot-Assembly-2.png|400px]] |
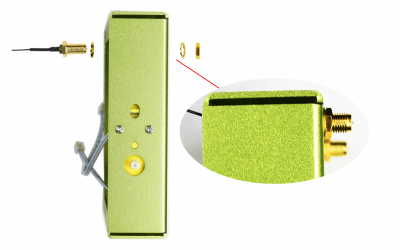
| − | ;2. Assemble the antennas | + | ;2. Assemble the antennas, the antenna was connected to the wireless card by default. |
| − | :[[File: | + | ; Cross the antenna through the big round hole and then assemble. |
| − | ;3. Mounting the Camera holder to | + | :[[File:Assembly-3.png|400px]] |
| − | :[[File: | + | ;3. Mounting the Camera holder to the metal box, fix the camera to the holder, don't forget the Acrylic board. |
| + | :[[File:JetBot-Assembly-6.png|400px]] [[File:File:Assembly-7.png|400px]] | ||
;4. Set standoffs on metal box for assembling JetBot expansion board | ;4. Set standoffs on metal box for assembling JetBot expansion board | ||
| − | :[[File: | + | :[[File:Assembly-4.png|400px]] |
;5. Set standoffs on jetbot expansion board for assembling jetson nano developer kit | ;5. Set standoffs on jetbot expansion board for assembling jetson nano developer kit | ||
| − | : | + | :[File:Assembly-5.png|400px]] |
| − | ;6. Assemble Jetbot expansion board, adjust place of antennas | + | ;6. Assemble Jetbot expansion board, adjust the place of antennas |
| − | :[[File: | + | ; Mounting 18650 batteries to batteries holder, you should check the direction of batteries according to the stickers. |
| − | :Connect motors to jetbot expansion board, connect left motor to the left interface, and right to the right | + | :[[File:Assembly-8.png|400px]] |
| − | :[[File: | + | :7. Connect motors to jetbot expansion board, connect the left motor to the left interface, and right to the right |
| − | + | :[[File:Assembly-15.png|700px]] | |
| − | + | ;8. Turn out screws from Omni-direction wheels, then fix the wheels to the metal bottom board | |
| − | ;8. Turn out screws from Omni-direction wheels, then | + | :[[File:Assembly-14.png|400px]] |
| − | :[[File: | ||
;9. Assemble metal box | ;9. Assemble metal box | ||
| − | :[[File: | + | :[[File:Assembly-16.png|400px]] |
| − | ;10. Assemble wheels | + | ;10. Assemble wheels and fix the Jetson Nano board |
| − | :[[File: | + | :[[File:Assembly-9.png|400px]] |
| − | ;11 | + | ;11. Take out the jetson nano board, and assemble wireless-AC 8265 |
| − | + | :[[File:Assembly-11.png|400px]] | |
| − | + | ;12. Connect the colling FAN | |
| − | :[[File: | + | :[[File:Assembly-12.png|400px]] |
| − | ; | + | ;13. Finally, connect the 8PIN cable according to screen silk printing. |
| − | :[[File: | + | :[[File:Assembly-13.png|400px]] [[File:JetBot-Assembly-18.png|200px]] |
| − | ; | + | ;14. Connect the power adapter to the expansion board and turn the switch to On to power on the Kit. |
| − | :[[File: | + | ===Note=== |
| + | If you the first time to mount the batteries or replace them, you need to connect the power adapter to the expansion board to charge the board for a while to make it work. <br /> | ||
Revision as of 10:28, 30 November 2021
JetBot AI Kit Assembly
- Components and screws
- Please check the components and screws, Jetson Nano (①) and the SD card (②) are not provided if you buy the Acce version.

- 1. Assemble motors


- 2. Assemble the antennas, the antenna was connected to the wireless card by default.
- Cross the antenna through the big round hole and then assemble.
- 3. Mounting the Camera holder to the metal box, fix the camera to the holder, don't forget the Acrylic board.
 400px
400px- 4. Set standoffs on metal box for assembling JetBot expansion board

- 5. Set standoffs on jetbot expansion board for assembling jetson nano developer kit
- [File:Assembly-5.png|400px]]
- 6. Assemble Jetbot expansion board, adjust the place of antennas
- Mounting 18650 batteries to batteries holder, you should check the direction of batteries according to the stickers.

- 7. Connect motors to jetbot expansion board, connect the left motor to the left interface, and right to the right

- 8. Turn out screws from Omni-direction wheels, then fix the wheels to the metal bottom board

- 9. Assemble metal box

- 10. Assemble wheels and fix the Jetson Nano board

- 11. Take out the jetson nano board, and assemble wireless-AC 8265

- 12. Connect the colling FAN

- 13. Finally, connect the 8PIN cable according to screen silk printing.


- 14. Connect the power adapter to the expansion board and turn the switch to On to power on the Kit.


Note
If you the first time to mount the batteries or replace them, you need to connect the power adapter to the expansion board to charge the board for a while to make it work.