
JetBot AI Kit
| ||

Overview
This is an AI Robot kit based on Jetson Nano Developer Kit. Supports facial recognition, object tracking, auto line following or collision avoidance and so on.
Features
- Onboard three 18650 batteries, 7800mAh, up to 12.6V voltage output, and stronger motor power.
- Onboard S-8254AA + AO4407A lithium battery protection circuit, with anti-overcharge, anti-over-discharge, anti-over-current and short-circuit protection functions.
- The onboard APW7313 voltage regulator chip can provide a stable 5V voltage to the Jetson Nano.
- The onboard TB6612FNG dual H-bridge motor driver chip can drive the left and right motors to work.
- Onboard 0.91-inch 128×32 resolution OLED, real-time display of car IP address, memory, power, etc.
- The onboard ADS1115 AD acquisition chip is convenient for real-time monitoring of battery power.
Update
The latest Jetson Nano development kit is equipped with Waveshare's JETSON-IO-BASE-A baseboard and NVIDIA's official Jetson Nano module. If the user purchased the Jetbot package with the development kit, we have already set up the development kit, and the SD card has pre-burned the Jetbot image. After the user gets it, they can start it up and test the demo directly.
If you purchased the Jetson Nano NVIDIA official kit or the Waveshare kit by yourself, please check the installation image tutorial first to install the jetbot image on the SD card.
If you purchased another third-party Jetson Nano kit, please purchase a kit that supports SD card booting. The default 16GB eMMC space of the Jetson Nano module is relatively small, which is not enough to install the jetbot image.
User Guides
Install Image
【Note】
- If you purchased the JetBot AI KIT package (latest) directly, the delivered SD card has been pre-burned with the mirror system, you can skip step 1 directly.
- If you purchased an accessory package, please program the image file according to your board.
- The onboard 16GB eMMC of the Jetson Nano module is not enough to program the Jetbot image, please use the expansion solution (U disk or SD card) directly, and reconfigure the Jetbot image.
Step 1: Write JetBot image to SD card
Method 1: Use the Pre-configured Image
- You need to prepare an SD card which should be at least 64G
- Download the JetBot image which is provided by NVIDIA and unzip it. Click here to download it.
- Connect the SD card to the PC via card reader.
- User Etcher software to write the image (unzip above) to SD card.Click here to download Etcher software.

- After writing, eject the SD card.
Method 2: Use Docker to Configure the Image
- 1, program Jetapck4.5 image
- If you are using a U disk extension, please refer to U disk extension tutorial to program the Jetapck4.5 image.
- If you are using SD card expansion, please refer to the relevant information first, modify SD startup, and use method 1 to burn the configured image file.
- 2, connect to wifi
- You can directly refer to step 3 below to connect to wifi.
- 3, Download the JetBot program
- Open the terminal and enter the following command:
git clone http://github.com/NVIDIA-AI-IOT/jetbot.git
- 4, configure the system
- Open the terminal and enter the following command:
cd jetbot
./scripts/configure_jetson.sh
./scripts/enable_swap.sh
- 5, enable all containers
- Open the terminal and enter the following command to open all jetbot containers.
cd docker
./enable.sh $HOME
Step 2: Startup Jetson Nano Developer Kit
- Insert SD card to Jetson nano (slot is under Jetson Nano board).
- If you use Waveshare's Jetson Nano Dev Kit, note that the SD card slot is on the baseboard, below the core module to the left.
- If it is NVIDA official kit, the SD card slot is on the back side of Jetson Nano core board.
- Connect the power to Jetson Nano, and then power on it.
- Connect HDMI display (if you don't have HDMI or DP display and want to buy one, recommend our HDMI display), keyboard and Mouse to Jetson Nano Developer Kit
【Note】You had better test the Jetson Nano Developer Kit before you assemble JetBot.
Step 3. Connect Jetbot to WIFI
Since the latter program requires a wireless connection, you need to connect the Jetbot to WIFI first.
Screen operation
- If you have an HDMI screen, keyboard and mouse, etc., plug the device into the jetson nano.
- Log in to the system, the default username and password of the Jetbot system are jetbot.
- The terminal uses the following commands to connect and configure wifi.
sudo nmcli wifi connect wifi name password wifi password
- Please note that replace the wifi name and wifi password with the actual wifi information to be connected.
- Power off. Assemble the Jetbot trolley. and start Jetson nano. When starting up, the system will automatically connect to WIFI and display the IP address on the OLED display at the same time.
Remote Operation
Jetson's Micro USB port has a default IP address of 192.168.55.1, users without a screen can remotely operate jetson nano through ssh.
- Power on to start jetson Nano.
- Connect the micro USB port of the Jetson Nano to the computer with a USB cable.
- Use putty or Xshell software to ssh 192.168.55.1 IP address to log in to Jetson Nano remotely.
- The default username and password of the Jetbot system are jetbot.
Step 4. Access JetBot via Web
- After networking. You can remove peripherals and power adapter.
- Turn Power switch of Jetbot into On.
- After booting, IP address of OLED can be displayed on OLED.
- Navigate to http://<jetbot_ip_address>:8888 from your desktop's web browser.
- Use the following command to connect WiFi:
sudo nmcli wifi connect wifi name password wifipassword
- Please replace the WiFi name and password with the actual WiFi and password that you want to connect.
- Please power off, install Jetbot, and enable Jetson Nano. It will connect to the WiFi automatically and display the IP address on the OLED display at the same time.
Step 5. Install the latest software
The JetBot GitHub repository may contain software that is newer than that pre-installed on the SD card image. To install the latest software:
- Access Jetbot by going to http://<jetbot_ip_address>:8888
- Launch a new terminal. Default user name and password are both jetbot.

- Click the terminal icon to open a terminal.
- Look at the container ID number of jetbot-display and remember, for example:
sudo docker ps -a

- Disable the jetbot-display service, be careful not to enter the wrong ID, the ID needs to be filled in according to the actual query result.
sudo docker exec -it cb7c81e62985 /bin/bash
- Modify _init_.py document.
cd /opt/jetbot/jetbot
sudo vi __init__.py
- Add the following statement at the end of the document and save.
from .ina219 import INA219
- Add ina219.py file
cd /opt/jetbot/jetbot
wget https://www.waveshare.net/w/upload/c/ca/Jetbot-ws-script.zip
unzip Jetbot-ws-script.zip
sduo mv state.py apps/stats.py
- Install the software again.
cd /opt/jetbot
python3 setup.py install
exit
- When you reboot, Please do not enter the wrong ID, which needs to be filled according to the actual result.
sudo docker restart 198acf2fea98
Step 6. Configure Power Mode
- The following command can be used to switch the power consumption mode of Jetson Nano to 5W mode to ensure that the battery pack can supply power normally.
- Open the browser http://<jetbot_ip_address>:8888 to connect to the car, and start another terminal.
- Switch to 10W power mode.
sudo nvpmodel -m0
- Check to make sure the JetBot is in 10W power mode.
nvpmodel -q
Additional Function 1: Enable Graphical Desktop
- By default, the Jetbot system disables the graphical interface. If you need to enable the graphical desktop, you can use the terminal, enter the following commands and restart to take effect.
sudo systemctl set-default graphical.target
Additional Function 2: Expanding the Jetbot Image
This expansion method is for the SD card or U disk with enough space, but the space allocated after the image is programmed is smaller than the space of the actual storage device. The reason for this is that the provided Jetbot image file is based on a 32G SD card configuration, resulting in a fixed partition and capacity size. The file system can be expanded to the full storage space size through the expansion script, Open a terminal and enter the following command
cd /usr/lib/nvidia/resizefs/
sudo chmod 777 nvresizefs.sh
sudo ./nvresizefs.sh
sudo reboot
Basic motion
- Access jetbot by going to http://<jetbot_ip_address>:8888, navigate to ~/Notebooks/basic_motion/
- Open basic_motion.ipynb file and following the notebook.
【Note】You can click icon ▶ to run codes, or select Run -> Run Select Cells. Make sure the JetBot has enough space to run.
Teleoperations
- Access JetBot by going to https://<jetbot_ip_address>:8888, navigate to ~/Notebooks/teleoperation/.
- Open teleoperation.ipynb file and following notebook.
- Connect USB adapter to PC.
- Go to https://html5gamepad.com, check the INDEX of Gamepad.
- Before you run the example, let's learn how the gamepad work.
- The gamepad included supports two working modes. One is PC/PS3/Andorid mode and another is Xbox 360 mode.
- The gamepad is set to PC/PS3/Andorid mode by default, in this mode, the gamepad has two sub-modes. You can press the HOME button to switch it. In Mode 1, the front panel lights on only one LED, the right joystick is mapped to buttons 0,1,2 and 3, and you can get only 0 or -1/1 value from the joysticks. In Mode 2, the front panel lights on two LEDs, the right joystick is mapped to axes[2] and axes[5]. In this mode, you can get No intermediate values from joysticks.
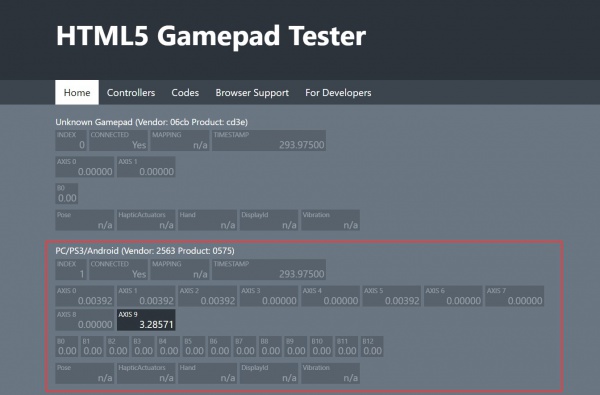
- To switch between PC/PS3/Andorid mode and the Xbox 360 mode, you can long-press the HOME button for about 7s. In Xbox mode, the left joystick is mapped to axes[0] and axes[1], right joystick is mapped to axes[2] and axes[3]. This mode is exactly what the NVIDIA examples use. We recommend you to set your gamepad to this mode when you use it. Otherwise, you need to modify the codes.


- Modify the index. Run and test Gamepad.

- Modify axes values if required, here we use axes[0] and axes[1]

- At this point, the window will display the picture captured by the current camera.

- "Heartbeat" check, the car will stop automatically when the car is disconnected from the network.

- Control the car to take pictures by pressing the button. You can choose different buttons by changing the button. Here, buttons[0] is selected for the convenience of control.

- After running the program, you can control Jetbot through the remote control handle. Asex[0] controls the left wheel, Asex[1] controls the right wheel, button[0] controls the camera, the left image shows the real-time camera image, the right is the captured image, and the image is saved in the snapshots file.
Collision_avoidance
In this example, we'll collect an image classification dataset that will be used to help keep JetBot safe! We'll teach JetBot to detect two scenarios free and blocked. We'll use this AI classifier to prevent JetBot from entering dangerous territory.
- Step 1. Collect data on JetBot
- Access JetBot by going to https://<jetbot_ip_address>:8888, navigate to ~/Notebooks/collision_avoidance/.
- Open data_collection.ipynb file and following notebook.
- This model was trained on a limited dataset using the IMX219-160 Camera with wide-angle attachment.
- You need to put the JetBot to different spaces for collecting data as more as possible.

- The more scene data the car collects, the better the obstacle avoidance effect will be. Therefore, it is very important to obtain as much different data as possible for the obstacle avoidance effect. Generally, at least 100 pictures are required for each situation.
- Finally, run the program to package the pictures. After packaging, a dataset.zip compressed file will appear in the current directory.

- Step 2. Train neural network

- Access JetBot by going to https://<jetbot_ip_address>:8888, navigate to ~/Notebooks/collision_avoidance/
- Open and follow the tain_model.ipynb notebook.
- If you already have the dataset.zip file you just compressed, you do not need to run this statement to decompress it, otherwise you will be prompted to overwrite the existing file.

- When the program runs here, the alexnet model will be downloaded, and the download time is a bit long. After downloading the program, an alexnet-owt-4df8aa71.pth file will appear in the /home/hetbot/.torch/models directory.

- Finally, run the program to train the neural network, and the running time is relatively long. After the training is completed, a best_mode.pth file will appear in the current directory.

- Step 3. Automatic Obstacle Avoiding

- Access JetBot by going to https://<jetbot_ip_address>:8888, navigate to ~/Notebooks/collision_avoidance/
- Open and follow the live_demo.ipynb notebook.
- After running the program, the camera live image and a slider are displayed. Intermodulation represents the probability of encountering an obstacle, 0.00 means that there is no obstacle ahead, and 1.00 means that the obstacle ahead needs to be turned to avoid.

- Here, adjust the speed a little to avoid hitting the obstacles too fast. If obstacle avoidance cannot be achieved in some places, it is recommended to collect more data.

- [Note] Some statements may take a long time to run. There is a program running promptly in the upper right corner of JupyterLab. When the small dot is black, it means the program is running, and white means it is idle.

Object-detection
In this chapter we demonstrate how to use jetbot to track objects, we use a pre-trained coco dataset neural network that can detect 90 different objects. Including people (index 0), cups (index 47), apples (index 54) and other objects. For specific objects that can be detected, you can refer to data list
- Enter http://<jetbot_ip_address>:8888 in the browser to connect to the car, open Notebook/object_following/ on the left side and the live_demo.ipynb file.
- Before running the program, you need to download the pre-trained ssd_mobilenet_v2_coco.engine model, decompress it, and copy it to the current folder directory.
- It should be noted that the program in this chapter needs to use the module established in the previous chapter for autonomous obstacle avoidance, and the car needs to be performed in the same environment.
- Before running this code, you need to put the detection object in front of the camera. The detected coco objects are output after running the program. Empty data [[ ]] is output if no object is detected. The output information can be seen through the table lookup that an apple has been detected, and the apple's ID is 53. If multiple objects are detected at the same time, multiple messages are output.

After running the program, the output is as shown in the figure, a blue box is drawn around the detected object, and the target object (jetbot follows the target) will display a green frame.

- You can adjust the speed and turn gain appropriately to avoid the jetbot running too fast.
- When jetbot detects the target, it will turn to the target, if blocked by an obstacle, jetbot will turn left.
Line tracking
This chapter we will use data collect, link tracking and auto-detecting to realize robot auto line-tracking function.
- Step 1. Collect data by JetBot
- Access JetBot by going to https://<jetbot_ip_address>:8888, navigate to ~/Notebooks/road_following/
- Open data-collection.ipynb file.

- Running the codes and a video is played, you can follow it.

- On the image captured by camera, there are a green point and a blue line. The point and line is the expected road which Robot run.
- The content below is similar to [#3. Teleoperation], modify the index and axes values.
【Note】The axes keys here must be analogized by Wie, that is, decimals can be output. If you use the gamepad we configured, you need to press the HOME button to switch the mode. Make the indicator light in the state of two lights.

- Modify button value for capturing. (you can also keep default setting).

- Collecting data. Set JetBot to different place of the lines, use Gamepad to move green point to the black line. Blueline is the way Jetbot expected to run in. You can press the capture button to capture a picture. You should collect pictures as soon as possible, count shows the amount of the pictures captured.
【Note】If Gamepad is inconvenient for you, you can set the position of green point by dragging steering and throttle sliders.
- Save pictures

- Step 2. Training model

- Access Jetbo by going to https://<jetbot_ip_address>:8888, navigate to ~/Notebooks/road_following/
- Open train_model.ipynb file.
- If you use the data collected above, you needn't to unzip files next.
- If you use external data, you need to modify the name road_following.zip to the corresponding file name.


- Download Model

- Train model, it will generate best_steerin_mdel_xy.pth file.
- Step 3. Road following
- Access Jetbo by going to https://<jetbot_ip_address>:8888, navigate to ~/Notebooks/road_following/.
- Open live_demo.ipynb file.
- Load model and open camera for living video.
- You can drag the sliders to modify parameters.

- x, y are forecast values. Speed is VSL of jetbot, steering is steering speed of jetbot.

- Move Jetbot by change the speed gain.
- 【Note】 You cannot set the speed gain too high, otherwise, JetBot may run fast and go off the rail. You can also set the steering smaller to make the motion of jetbot much more smooth.

- 7. ROS

Resources
- JetBot AI Kit Assemble Manual
- JetBot AI Kit: ROS
- Schematic of JetBot expansion board
- JetBot 3D Drawing
- SSD-Mobilenet-v2_coco
- SSD-Mobilenet-v2_coco(new)
- File:ped-100.tar.gz
- GoogleNet
- Facenet
Development Resource
FAQ
BTW, Power of JetBot is down when the voltage of the whole system is similar to 9V (it is not accurate), we recommend you to charge batteries if the voltage displayed is lower than 10V.
We recommend you to use high-quality batteries like Sanyo or Panasonic.

{{{5}}}
{{{5}}}
{{{5}}}
{{{5}}}
{{{5}}}
{{{5}}}
{{{5}}}
{{{5}}}