
Difference between revisions of "JetBot AI Kit"
From Waveshare Wiki
| Line 36: | Line 36: | ||
*Turn Power switch of Jetbot into On | *Turn Power switch of Jetbot into On | ||
*After booting, IP address of OLED can be displayed on OLED | *After booting, IP address of OLED can be displayed on OLED | ||
| − | *Navigate to http://<jetbot_ip_address>:8888 from your desktop's web browser | + | *Navigate to <font style="background-color:#EEEEEE" color=#B94A48><nowiki>http://<jetbot_ip_address>:8888</nowiki></font> from your desktop's web browser |
| + | ;Step 5. Install latest software (optional) | ||
| + | The JetBot GitHub repository may contain software that is newer than that pre-installed on the SD card image. To install the latest software: | ||
| + | *Access Jetbot by going to <font style="background-color:#EEEEEE" color=#B94A48><nowiki>http://<jetbot_ip_address>:8888</nowiki></font> | ||
| + | *Launch a new terminal. Default user name and password are both '''jetbot''' | ||
| + | :[[File:JetBot_AI_Kit_Manual_2.jpg|600px]] | ||
| + | :Get and install the latest JetBot repository from GitHub.The repository provided here is modified by Waveshare, supports displaying current voltage of batteries. If you want to install original codes, please following NVIDIA jetbot GitHub. | ||
| + | <pre> | ||
| + | git clone https://github.com/waveshare/jetbot | ||
| + | cd jetbot | ||
| + | sudo python3 setup.py install | ||
| + | </pre> | ||
| + | ;Step 6. Configure power mode | ||
==Supports== | ==Supports== | ||
{{Service00}} | {{Service00}} | ||
Revision as of 02:33, 19 July 2019
| ||

Instruction
This is a AI Robot kit based on Jetson Nano Developer Kit. Supports facial recognition, object tracking, auto line following or collision advancing and so on.
User Guides
1. Install Image
【Note】 The software part of this guide mostly based on NVIDIA jetbot wiki , you can also directly refer to it
- Step 1. Write JetBot image to SD card
- You need to prepare a SD card which should be at least 64G
- Download JetBot image which is provided by NVIDIA and unzip it. Click here to download it
- Connect the SD card to PC via card reader
- User Etcher software to write image (unzip above) to SD card.Click here to download Etcher software

- After writting, eject the SD card
- Step 2. Start up Jetson Nano Developer Kit
- Insert SD card to SD card slot of Jetson nano (slot is under Jetson Nano board)
- Connect HDMI display (if you don't have HDMI or DP display and want to buy one, recommend our HDMI display), keyboard and Mouse to Jetson Nano Developer Kit
【Note】You had better test the Jetson Nano Developer Kit before you assemble JetBot
- Step 3. Connect Jetbot to WIFI
All the examples use WIFI, we need to connect JetBot to WIFI firstly.
- Start Jetson nano Developer Kit, default user name and password of Jetbot are both jetbot
- Click Network icon on top-right of Desktop and connect WIFI
- Power off. Then assemble Jetbot
- Start Jetson nano again. After booting, Ubuntu will auto-connect WIFI, IP address is also displayed on OLED
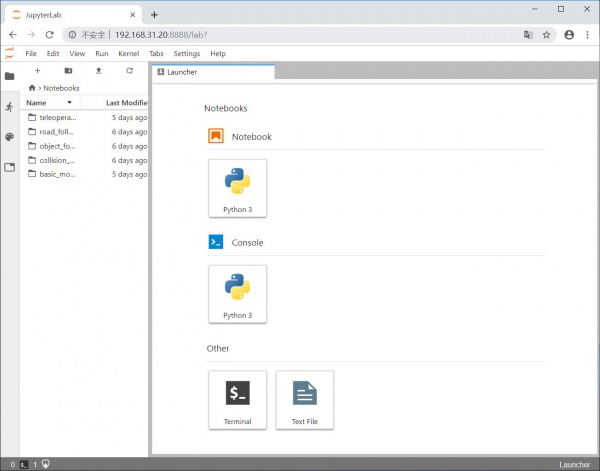
- Step 4. Access JetBot via Web
- After networking. You can remove peripherals and power adapter.
- Turn Power switch of Jetbot into On
- After booting, IP address of OLED can be displayed on OLED
- Navigate to http://<jetbot_ip_address>:8888 from your desktop's web browser
- Step 5. Install latest software (optional)
The JetBot GitHub repository may contain software that is newer than that pre-installed on the SD card image. To install the latest software:
- Access Jetbot by going to http://<jetbot_ip_address>:8888
- Launch a new terminal. Default user name and password are both jetbot
- Get and install the latest JetBot repository from GitHub.The repository provided here is modified by Waveshare, supports displaying current voltage of batteries. If you want to install original codes, please following NVIDIA jetbot GitHub.

git clone https://github.com/waveshare/jetbot
cd jetbot
sudo python3 setup.py install
- Step 6. Configure power mode
Supports
Support
If you require technical support, please go to the Support page and open a ticket.