
Difference between revisions of "JETSON-ORIN-NX-16G-DEV-KIT"
| Line 44: | Line 44: | ||
*Connect the micro USB port of the Jetson board to the Ubuntu host with a USB cable (note that it is a data cable). | *Connect the micro USB port of the Jetson board to the Ubuntu host with a USB cable (note that it is a data cable). | ||
| − | + | ===System Programming=== | |
| − | + | *Open the terminal of the Ubuntu computer and run SDK manager to open the software. | |
| − | + | *Log in. | |
| − | + | *If Jetson Nano is identified normally, the SDK manager will detect and prompt for options. | |
| − | + | [[File:JETSON-XAVIER-NX-DEV-KIT006.png]]<br/> | |
| − | + | *Select the JetsonTX2 NX option for the development board type, and in the JetPack option, select the latest supported system, uncheck Host PC, and then click Continue). | |
| − | + | [[File:JETSON-XAVIER-NX-DEV-KIT116.png]]<br/> | |
| − | + | *Select Jetson OS, and <font color="#FF0000">remove the option of Jetson SDK Components</font>. Check the first agreement at the bottom. | |
| − | + | [[File:JETSON-XAVIER-NX-DEV-KIT07.png]]<br/> | |
| − | </ | + | *Finally, click "Continue" and wait for the programming to finish. |
| − | + | **Starting from JetPack 4.6.1, the "preconfig" window will pop up when using SDK Manager to program the system. | |
| − | < | + | *#Here, the development board type is selected by default. Be careful not to make a mistake when selecting the type of development board earlier. |
| − | + | *#Here select Manual Setup-Jetson... (Different motherboard suffix prompts are different.) | |
| − | + | *#Here you can choose runtime or preconfig. If you choose runtime, you need to manually configure the system (username, password, language, etc.) later. If you choose preconfig, you can fill in the username and password (you can define it yourself), and nano will be automatically configured during the startup process. | |
| − | </ | + | [[File:JETSON-XAVIER-NX-DEV-KIT118.png]]<br/> |
| − | + | *After the programming is finished, remove the jumper cap of the carrier board, connect to the monitor, power on again, and follow the prompts to configure the boot (if it is pre-config set, it will directly enter the system after power on). | |
| − | |||
| − | |||
| − | |||
| − | |||
| − | |||
| − | |||
| − | </ | ||
| − | |||
| − | |||
| − | |||
| − | |||
| − | |||
| − | |||
| − | |||
| − | |||
==SDK Installation== | ==SDK Installation== | ||
Revision as of 08:54, 20 July 2023
| ||
| ||
| ||
| ||


Resource
Introduction
Module
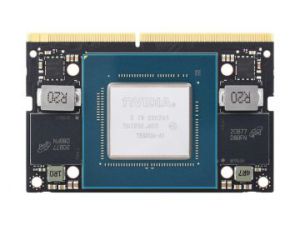
NVIDIA® Jetson Orin™ NX module delivers up to 100 TOPS and 5x the performance of the last generation for multiple concurrent AI inference pipelines, with high-speed interface support for multiple sensors, it is an ideal solution for a new age of robotics. Jetson Orin NX module delivers up to 100 TOPS of AI performance in a compact and small form factor, with power configurable between 10W and 25W, up to 3x the performance of Jetson AGX Xavier and 5x the performance of Jetson Xavier NX. There are currently 8GB and 16GB versions for users to choose from, and their parameters are slightly different, so please pay attention to the parameters before purchasing.
Basic Kit
Based on Jetson Orin NX Module, with JETSON-IO-BASE-B carrier board, Jetson Orin NX 8GB/16GB DEV KIT provides rich peripheral interfaces such as M.2, HDMI, USB, etc., which is more convenient for users to realize the product performance.
This kit includes the Orin NX Module with 16GB memory, no built-in storage module, and provides up to 100 TOPS AI performance. Comes with a free 128 GB NVMe solid state drive, high-speed reading/writing, and meets the needs of large AI project development.
JETSON-ORIN-NX-16G-DEV-KIT-A
On the basis of the JETSON-ORIN-NX-16G-DEV-KIT, it is equipped with an 8MP (3280 x 2464) high-definition camera, suitable for AI intelligent applications such as face recognition, road sign recognition, and license plate recognition.
JETSON-ORIN-NX-16G-DEV-KIT-B
On basis of Kit A, it is equipped 13.3-inch Capacitive Touch Screen LCD (with case), 1920 × 1080 resolution, up to 10-point touch, built-in ferrite Hi-Fi speaker. It can display the images taken by the camera in real-time, to achieve more human-computer interaction in artificial intelligence operations.
User Guide
- Ubuntu 18.04 host or virtual machine is required to burn the system.
Preparation
- Jetson Orin NX board
- Ubuntu18.04 virtual machine (or computer host)
- Power adapter
- Jumper caps (or jumper wires)
- USB cable (Micro USB interface for data transmission)
Hardware Configuration (Enter Recovery Mode)

- Short the FC REC and GND pins with jump caps or Dupont wires, positioned as shown above, located under the module.
- Connect the DC power supply to the round power port, wait a moment.
- Connect the micro USB port of the Jetson board to the Ubuntu host with a USB cable (note that it is a data cable).
System Programming
- Open the terminal of the Ubuntu computer and run SDK manager to open the software.
- Log in.
- If Jetson Nano is identified normally, the SDK manager will detect and prompt for options.

- Select the JetsonTX2 NX option for the development board type, and in the JetPack option, select the latest supported system, uncheck Host PC, and then click Continue).

- Select Jetson OS, and remove the option of Jetson SDK Components. Check the first agreement at the bottom.

- Finally, click "Continue" and wait for the programming to finish.
- Starting from JetPack 4.6.1, the "preconfig" window will pop up when using SDK Manager to program the system.
- Here, the development board type is selected by default. Be careful not to make a mistake when selecting the type of development board earlier.
- Here select Manual Setup-Jetson... (Different motherboard suffix prompts are different.)
- Here you can choose runtime or preconfig. If you choose runtime, you need to manually configure the system (username, password, language, etc.) later. If you choose preconfig, you can fill in the username and password (you can define it yourself), and nano will be automatically configured during the startup process.

- After the programming is finished, remove the jumper cap of the carrier board, connect to the monitor, power on again, and follow the prompts to configure the boot (if it is pre-config set, it will directly enter the system after power on).
SDK Installation
Jetpack mainly includes system images, libraries, APIs, developer tools, examples, and some documentation.
The SDK includes TensorRT, cuDNN, CUDA, Multimedia API, Computer Vision, and Developer Tools.
- TensorRT : High-performance deep learning inference runs for image classification, segmentation, and object detection neural networks, which speeds up deep learning inference and reduces the runtime memory footprint of convolutional and deconvolutional neural networks.
- cuDNN: The CUDA deep neural network library provides high-performance primitives for deep learning frameworks, including support for convolution, activation functions, and tensor transforms.
- CUDA : The CUDA Toolkit provides a comprehensive development environment for C and C++ developers building GPU-accelerated applications. The toolkit includes a compiler for NVIDIA GPUs, math libraries, and tools for debugging and optimizing application performance.
- Multimedia API: The Jetson Multimedia API provides a low-level API for flexible application development.
- Computer Vision: VPI (Vision Programming Interface) is a software library that provides computer vision/image processing algorithms implemented on PVA1 (Programmable Vision Accelerator), GPUs, and CPUs, where OpenCV, the leading open source library for computer vision, image processing, and machine learning, now features GPU acceleration for real-time operation, where VisionWorks2 is a software development kit for computer vision (CV) and image processing.
- Developer Tools: Developer Tools CUDA Toolkit provides a comprehensive development environment for C and C++ developers building GPU-accelerated applications. The toolkit includes a compiler for NVIDIA GPUs, math libraries, and tools for debugging and optimizing application performance.
These are some of the features of the SDK.
Install SDK with Commands
sudo apt update
sudo apt install nvidia-jetpack
NVIDIA Official Resources
- Jetson Development User Guide
- Jetson Download Center
- Resources Download Link
- SDK Manager Download Link
Support
If you require technical support, please go to the Support page and open a ticket.