
Difference between revisions of "JETSON-NANO-DEV-KIT"
| Line 111: | Line 111: | ||
*After programming, please remove the jumper cap of the baseboard, connect to the monitor, power on again, and follow the prompts to power up and config(if pre-config is set, it will directly enter the system after power on).<br/> | *After programming, please remove the jumper cap of the baseboard, connect to the monitor, power on again, and follow the prompts to power up and config(if pre-config is set, it will directly enter the system after power on).<br/> | ||
| + | <!-- | ||
==SD Card Expansion (optional)== | ==SD Card Expansion (optional)== | ||
We mentioned that the Jetson Nano core board is booted from the default eMMC, instead of booting from the SD card like the previous NVIDIA official kit. At present, the Jetson Nano eMMC is only 16G. For most users who need to install CUDA, tensorflow and other resources, the content of 16G is still too small. Here are the setup instructions for the SD card expansion.<br/> | We mentioned that the Jetson Nano core board is booted from the default eMMC, instead of booting from the SD card like the previous NVIDIA official kit. At present, the Jetson Nano eMMC is only 16G. For most users who need to install CUDA, tensorflow and other resources, the content of 16G is still too small. Here are the setup instructions for the SD card expansion.<br/> | ||
| Line 143: | Line 144: | ||
**After restarting, run df -h to view the device, and you can see that the root directory is replaced with the mmcblk1p1 device (SD card), and the mmcblk0p1 device (emmc) is linked to /media<br/> | **After restarting, run df -h to view the device, and you can see that the root directory is replaced with the mmcblk1p1 device (SD card), and the mmcblk0p1 device (emmc) is linked to /media<br/> | ||
[[File:jetson-df-h.png]]<br/> | [[File:jetson-df-h.png]]<br/> | ||
| + | --> | ||
==Camera== | ==Camera== | ||
Revision as of 07:11, 2 June 2022
| ||
| ||

Overview
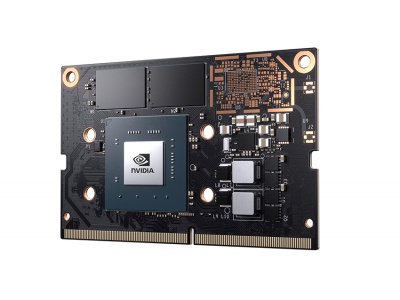
JETSON NANO DEV KIT made by Waveshare, based on AI computers Jetson Nano and Jetson Xavier NX, providing almost the same IOs, size and thickness as the Jetson Nano Developer Kit (B01), more convenient for upgrading the core module. By utilizing the power of the core module, it is qualified for fields like image classification, object detection, segmentation, speech processing, etc., and can be used in sorts of AI projects.
Jetson Nano Module Parameter
| GPU | NVIDIA Maxwell™ architecture with 128 NVIDIA CUDA® cores and 0.5 TFLOPS (FP16) |
|---|---|
| CPU | Quad-core ARM® Cortex®-A57 MPCore processor |
| Memory | 4 GB 64-bit LPDDR4 1600 MHz – 25.6 GB/s |
| Storage | 16 GB eMMC 5.1 Flash |
| Video Encode | 250 MP/s 1x 4K @ 30 (HEVC) |
| Video Decode | 500 MP/s 1x 4K @ 60 (HEVC) |
| Camera | 12 lanes(3x4 or 4x2)MIPI CSI-2 D-PHY 1.1 (18 Gbps) |
| Connectivity | Wi-Fi requires external chip 10/100/1000 BASE-T Ethernet |
| Display | eDP 1.4 | DSI (1 x2) 2 simultaneous |
| UPHY | 1 x1/2/4 PCIE、1 xUSB 3.0、3 xUSB 2.0 |
| I/O | 1x SDIO / 2x SPI / 4x I2C / 2x I2S / GPIOs -> I2C, I2S |
Onboard Resources

- Core module socket
- M.2 Key E connector
- PoE pins: PoE module is not included
- 40PIN GPIO header
- Micro USB port: for 5V power input or for USB data transmission
- Gigabit Ethernet port: 10/100/1000Base-T auto-negotiation, supports PoE if external PoE module is connected
- 4x USB 3.0 port
- HDMI output port
- DisplayPort connector
- DC jack: for 5V power input
- 2x MIPI CSI camera connector
Dimension

Write OS
The JETSON-NANO-DEV-KIT uses the production Jetson Nano version, which has 16 EMMC for OS instead of the SD card slot.
In this case, to write the Jetson nano, you need to use a Ubuntu 18.04 PC and the SDK Manager tools.
Setup software
- Environment: Ubuntu18.04 PC (virtual machine is OK)
- For download resources, you need to leave 100G memory for the ubuntu18.04 PC
- SDK Manager download link
- For downloading resources and logging in to the SDK Manager, please create an account of the NVIDIA DEVELOPER website first.
- Download the deb file to the Ubuntu PC, and copy the file to the user directory.
- Open a terminal and run the following command to install the SDK manager
sudo apt install ./sdkmanager_[version]-[build#]_amd64.deb
Note: you need to modify the [version]-[build#] to the actual file name.
Configure Hardware

- Connect FC REC and GND pins by jumper or cable, the pins are located under the Jetson Nano module board
- Connect power to the DC port of the Jetson Nano to power on.
- Connect an USB cable (data available) to the Micro USB port and connect it to Ubuntu PC.
Write OS
- Open a terminal in ubuntu PC, run command sdkmanager to oepn the tool
- Log in SDK Manager
- If the Jetson Nano is recognized normally, it will prompt the options

- Choose the Jetson Nano
- In the JetPack options, please choose the newest JetPack and then Continue. Do not choose other SDK
- Check Jetson OS option and remove Jetson SDK Components, check the first protocol

- Continue and wait for flashing.
- Starting from JetPack 4.6.1, the preconfig window will pop up when using SDK Manager to burn the system.
- Starting from JetPack 4.6.1, the preconfig window will pop up when using SDK Manager to burn the system.
1. The type of the development board is selected by default. Be careful not to make a mistake when selecting the type of development board earlier.
2. Select Manual Setup-Jetson Nano
3. You can choose runtime or preconfig. If you choose runtime, you need to configure the system by yourself (username, password, language, etc.) later. If you choose preconfig, you can fill in the username and password (you can define it yourself), and nano will be automatically configured during the startup process.

- After programming, please remove the jumper cap of the baseboard, connect to the monitor, power on again, and follow the prompts to power up and config(if pre-config is set, it will directly enter the system after power on).
Camera
View the first connected camera screen:
nvgstcapture-1.0
View the picture of the second camera connected:
nvgstcapture-1.0 --sensor-id=1
The default camera model is IMX219. If you need to change the camera of other models, execute
sudo /opt/nvidia/jetson-io/jetson-io.py
Select Configure Jetson Nano CSI Connector -->> Configure for compatible hardware
Select the corresponding camera model
| Camera IMX219 Dual |
| Je Camera IMX477 Dual or: |
| Camera IMX477-A and IMX219-B |
|ConfigurCamera IMX219 Dualardware |
After selecting Save pin changes -->> Save and reboot to reconfigure pins
Just wait for restart
FAN
Fan speed adjustment requires 4 wires
sudo sh -c 'echo 255 > /sys/devices/pwm-fan/target_pwm'
#Where 255 is the maximum speed, 0 is stop, modify the value can change the speed
cat /sys/class/thermal/thermal_zone0/temp
#Get the CPU temperature, you can intelligently control the fan through the program
#The system comes with a temperature control system, and manual control is not required in unnecessary situations
WIFI
There is no WIFI function in the module, it need to connect wifi Module.
Just connect to the M.2 E KEY socket at the bottom
Resources
Software
Jetson Official Resources
- Jetson Nano Developer Kit User Guide
- Jetson Nano Get Start
- Jetson Nano 3D Drawing
- Jetson Nano Deverloper Kit 3D Drawing
- Jetson Download Center
- Jetson Nano Forum
- Jetson Github
- NVIDA futher stufy
- NVIDIA Multimedia Description
Courses
FAQ
{{{5}}}
{{{5}}}
2.The Jetson Nano Developer Kit (B01) version can only use the image of JetPack 4.3 or later. It may be that the image version you are using is too old. You need to go to NVIDIA's Jetson download center, download the latest Jetson nano image, and re-burn the image.
{{{5}}}
{{{5}}}