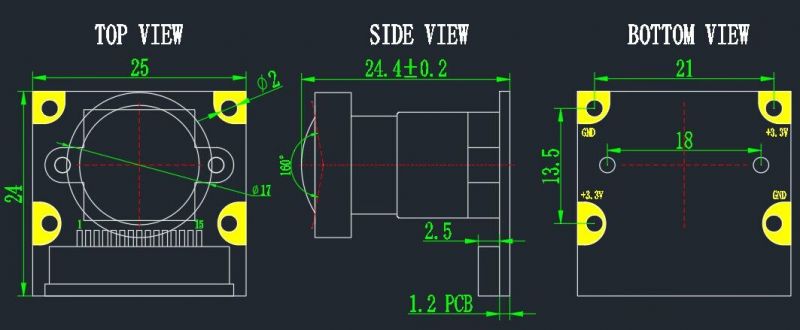
IMX477-160 12.3MP Camera
| ||
Introduction
Parameters
- Sensor
- IMX477R
- 12.3 million pixels: 4056(H) x 3040(V)
- CMOS diagonal length: 7.9mm
- Single pixel size: 1.55μm(H) x 1.55μm (V)
- Output format: RAW12/10/8, COMP8
- lens standard
- M12
- IR Filter: Integrated
Note
IMX477 12.3MP Camera is currently only available for Raspberry Pi Compute Module series boards, not for Raspberry Pi boards.
The IMX477 12.3MP Camera can be used on Jetson Nano, and the driver needs to be installed on Jetson Nano. After installing the driver, it will interfere with the use of the original IMX219 camera. It is recommended to back up the system before installing the driver.
Jetson Nano User Guides
- Jetpack version 4.6 and above with IMX477 camera model:
Input the following content on the terminal:
sudo /opt/nvidia/jetson-io/jetson-io.py
Select Configure Jetson Nano CSI Connector -> Configure for compatible hardware -> The setting you need.
Camera IMX219 Dual    #Set two camera interfaces as IMX219
Camera IMX477 Dual    #Set two camera interfaces as IMX477
Camera IMX477-A and IMX219-B  #Set one camera interface as IMX477, the other one as IMX219
- Jetpack version 4.6 or below (not including Jetpack 4.6):
An additional driver is required. After installing the driver, it will affect the use of the original IMX219 camera. So it is recommended to back up your system before installing the driver. Please refer to Jetson Nano Driver Tutorial
- Hardware connection
- Insert the camera cable, with the metal side facing the heat sink, into the camera port on the Jetson Nano development kit.
- Start Jetson Nano.
- Test cameras
- Open the terminal (Press the keyboard shortcut Ctrl+ALT+T to open the terminal), enter the following command to test the camera:
DISPLAY=:0.0 gst-launch-1.0 nvarguscamerasrc ! 'video/x-raw(memory:NVMM), width=1920, height=1080, format=(string)NV12, framerate=(fraction)20/1' ! nvoverlaysink -e
- Test dual cameras
- If you need to test dual cameras, you can add sensor-id=x to select the camera. x can be 0 or 1.
#Test video0
DISPLAY=:0.0 gst-launch-1.0 nvarguscamerasrc sensor-id=0 ! 'video/x-raw(memory:NVMM), width=1920, height=1080, format=(string)NV12, framerate=(fraction)20/1' ! nvoverlaysink -e
#Test video1
DISPLAY=:0.0 gst-launch-1.0 nvarguscamerasrc sensor-id=1 ! 'video/x-raw(memory:NVMM), width=1920, height=1080, format=(string)NV12, framerate=(fraction)20/1' ! nvoverlaysink -e
【Notice】
- 12 of NV12 is a number, not a letter.
- The test screen is output to the HDMI or DP screen, so the screen must be connected to the Jetson Nano when testing.
User Guides for Compute Module
Due to the encryption problem of the Raspberry Pi motherboard, the IMX219 series cameras cannot be used on the Raspberry Pi motherboard, and can only be used with the carrier board on the computing module. The use of IMX219 series cameras is the same as that of other Raspberry Pi cameras.
- Connect the camera to the computing module carrier board (such as Compute Module 4 PoE Board), pay attention to the direction of the connection.
- Open the Raspberry Pi terminal and open the camera interface.
sudo raspi-config
Select Interfacing Options -> Camera -> Yes
- Restart Raspberry Pi
- Test the camera
sudo raspistill -t 0
- For more user guides about the Raspberry Pi cameras, you can refer to Raspberry Pi Documentation
FAQ
The following OpenCV adjustment code is for reference only. (The code is shared by RPi Camera (G) users)
import picamera
import picamera.array
import cv2
from time import sleep
import numpy as np

def test_gcamera():
    cv2.namedWindow("img",0)
    with picamera.PiCamera() as camera:
        camera.resolution = (1920, 1080)
        camera.awb_mode = 'off'
        rg, bg = (1.8, 1.4)
        camera.awb_gains = (rg, bg)
        with picamera.array.PiRGBArray(camera) as output:
            for foo in camera.capture_continuous(output, 'rgb', use_video_port=True):
                img = cv2.cvtColor(output.array, cv2.COLOR_RGB2BGR)
                cv2.imshow("img", img)
                cv2.waitKey(1)
                cv2.imwrite("test.jpg",img)
                r, g, b = (np.mean(output.array[..., i]) for i in range(3))
                if abs(r - g) > 2:
                    if r > g:
                        rg -= 0.1
                    else:
                        rg += 0.1
                if abs(b - g) > 1:
                    if b > g:
                        bg -= 0.1
                    else:
                        bg += 0.1
                camera.awb_gains = (rg, bg)
                output.seek(0)
                output.truncate(0)
if __name__=="__main__":
    test_gcamera()
{{{5}}}
Resources
- User manual
- Camera Guide
- Raspberry Pi High Quality Camera Getting Started
- HQ Camera Drawing
- C-Mount Lens Guide
- CS-Mount Lens Guide
- FCC
- CE

