
Difference between revisions of "ESP32-S3-Tiny"
(→Note) |
(→FAQ) |
||
| (25 intermediate revisions by the same user not shown) | |||
| Line 14: | Line 14: | ||
* | * | ||
==Function Blocks== | ==Function Blocks== | ||
| − | ==What' | + | ==What's Onboard== |
| + | |||
==Pinout== | ==Pinout== | ||
==Dimensions== | ==Dimensions== | ||
| Line 31: | Line 32: | ||
* ''' When installing the cable, it is important to pay attention to its proper connection in the center and ensure that it is inserted fully into the socket. Incorrect installation may result in connection issues or even short circuits.''' | * ''' When installing the cable, it is important to pay attention to its proper connection in the center and ensure that it is inserted fully into the socket. Incorrect installation may result in connection issues or even short circuits.''' | ||
</font> | </font> | ||
| − | =ESP-S3 | + | <div class="toccolours mw-collapsible"> |
| − | =Arduino | + | =Working with ESP-IDF= |
| + | <div class="mw-collapsible-content"> | ||
| + | *It is recommended to develop with the VSC plug-in. | ||
| + | ===Develop with VSCode=== | ||
| + | ====Install VSCode==== | ||
| + | : 1. Open the [https://code.visualstudio.com/download download page] of the official VSCode website, and select the corresponding system and system bit to download. | ||
| + | :[[File: ESP32-S3-Pico 05.jpg]]<br/> | ||
| + | : 2. After running the installation package, the rest can be installed by default, but here for the subsequent experience, it is recommended to check boxes 1, 2, and 3. | ||
| + | :*After the first two items are enabled, you can open VSCode directly by right-clicking files or directories, which can improve the subsequent user experience. | ||
| + | :*After the third item is enabled, you can select VSCode directly when you choose how to open it. | ||
| + | :[[File: ESP32-S3-Pico 06.jpg]]<br/> | ||
| + | |||
| + | ===Install Espressif IDF Plug-in=== | ||
| + | *''' Note: Currently the latest version of the plugin is V1.6.4, users can choose the same version as us for a consistent experience!''' | ||
| + | *Open VSCode, use '''Shift+Ctrl+X''' to enter the plug-in manager. | ||
| + | [[File:ESP32-C6-DEV-KIT-N8-03.png]] | ||
| + | *In the search bar, enter '''Espressif IDF''' to select the corresponding plug-in and click "Install". | ||
| + | [[File:ESP32-C6-DEV-KIT-N8-04.png]]<br/> | ||
| + | [[File:ESP32-C6-DEV-KIT-N8-05.png]] | ||
| + | *Press '''F1''' to input: | ||
| + | <pre>esp-idf: configure esp-idf extension</pre> | ||
| + | [[File:ESP32-C6-DEV-KIT-N8-06.png]] | ||
| + | *Select express (this guide is for users who install it for the first time). | ||
| + | [[File:ESP32-C6-DEV-KIT-N8-07.png]] | ||
| + | *Select download sever. | ||
| + | [[File:ESP32-C6-DEV-KIT-N8-08.png]] | ||
| + | *Select the version of ESP-IDF you want to use now, we choose the latest V5.1.1 (note that only after V5.1 did ESP-IDF start to support ESP32-C6). | ||
| + | [[File:ESP32-C6-DEV-KIT-N8-09.png]] | ||
| + | *The following two are the installation paths respectively for the ESP-IDF container directory and the ESP-IDF Tools directory. | ||
| + | [[File:ESP32-C6-DEV-KIT-N8-10.png]] | ||
| + | *''' Note: If you have installed ESP-IDF before, or failed to do so, please be sure to delete the file completely or create a new path without Chinese.''' | ||
| + | *After configuring, click "Install" to download: | ||
| + | [[File:ESP32-C6-DEV-KIT-N8-19.png]] | ||
| + | *Enter the download interface, and then it will automatically install the corresponding tools and environment, just wait for a second. | ||
| + | [[File:ESP32-C6-DEV-KIT-N8-11.png]] | ||
| + | *After the installation is complete, you will enter the following interface, indicating that the installation is finished. | ||
| + | [[File:ESP32-C6-DEV-KIT-N8-12.png]] | ||
| + | ===Official Demo Usage GUIDE=== | ||
| + | ===='''Create Demo''' ([https://www.waveshare.com/wiki/ESP32-C6-DEV-KIT-N8#Hello_World Demo Example])==== | ||
| + | *Press '''F1''' to enter: | ||
| + | esp-idf:show examples projects | ||
| + | [[File:ESP32-C6-DEV-KIT-N8-13.png]] | ||
| + | *Select the corresponding IDF version: | ||
| + | [[File:ESP32-C6-DEV-KIT-N8-14.png]] | ||
| + | *Take the Hello World demo as an example: | ||
| + | **①Select the corresponding demo. | ||
| + | **②Its readme will state what chip the demo applies to (how the demo is used with the file structure is described below, omitted here). | ||
| + | **③Click to create the demo. | ||
| + | [[File:ESP32-C6-DEV-KIT-N8-15.png]]<br/> | ||
| + | Select the path to place the demo, and the folder name should be aligned with the demo name.<br/> | ||
| + | [[File:ESP32-C6-DEV-KIT-N8-16.png]] | ||
| + | |||
| + | ====Modify COM Port==== | ||
| + | *The corresponding COM ports are shown here, click to modify them. | ||
| + | *Please select the COM ports according to your device. (You can view it from the device manager.) | ||
| + | *In case of a download failure, please press the reset button for more than 1 second and wait for the PC to recognize the device again before downloading once more. | ||
| + | [[File:ESP32-C6-DEV-KIT-N8-17.png]] | ||
| + | *Select the project or demo to use: | ||
| + | [[File:ESP32-C6-DEV-KIT-N8-18.png]] | ||
| + | *Then we finish the modification of the COM ports. | ||
| + | |||
| + | ====Modify the Driver Object==== | ||
| + | *The driver object is displayed here, and you can modify it by clicking on it. | ||
| + | *Select the project or demo to use. | ||
| + | [[File:ESP32-C6-DEV-KIT-N8-20.png]] | ||
| + | *Wait for a minute after clicking. | ||
| + | [[File:ESP32-C6-DEV-KIT-N8-21.png]] | ||
| + | *Select the object we need to drive, which is our main chip ESP32S3. | ||
| + | [[File:ESP32-S3-DEV-KIT-22.png]] | ||
| + | *Choose the path to openocd, it doesn't affect us here, so let's just choose one at random. | ||
| + | [[File:ESP32-S3-DEV-KIT-23.png]] | ||
| + | ====The Rest of the Status Bar==== | ||
| + | *①SDK configuration editor, supports modifying most functions of ESP-IDF. | ||
| + | *②All cleanup, and clear all compiled files.<br/> | ||
| + | *③Compile. | ||
| + | *④Current download mode, default is UART. | ||
| + | *⑤Flash the current firmware, please do it after compiling. | ||
| + | *⑥Open the serial port monitor, used to view the serial port information. | ||
| + | *⑦All-in-one button, compile, burn, open the serial monitor (most commonly used for debugging). | ||
| + | :[[File:ESP32-C6-DEV-KIT-N8-24.png]] | ||
| + | ====Compile, Program, Serial Port Monitoring==== | ||
| + | *Click on the all-in-one button we described before to compile, program, and open the serial port monitor. | ||
| + | :[[File:ESP32-C6-DEV-KIT-N8-25.png]] | ||
| + | *It may take a long time to compile especially for the first time. | ||
| + | :[[File:ESP32-C6-DEV-KIT-N8-26.png]] | ||
| + | *''' During this process, the ESP-IDF may take up a lot of CPU resources, so it may cause the system to lag.''' | ||
| + | *If it is the first time to burn the program for a new project, you will need to select the download method, and select '''UART'''. | ||
| + | :[[File:ESP32-C6-DEV-KIT-N8-27.png]] | ||
| + | *This can also be changed later in the '''Download Methods''' section (click on it to bring up the options). | ||
| + | :[[File:ESP32-C6-DEV-KIT-N8-28.png]] | ||
| + | *As it comes with the onboard automatic download circuit, there is no need for manual operation to download automatically. | ||
| + | :[[File:ESP32-C6-DEV-KIT-N8-29.png]] | ||
| + | *After successful download, automatically enter the serial monitor, you can see the chip output the corresponding information and be prompted to restart after 10S. | ||
| + | :[[File:ESP32-C6-DEV-KIT-N8-30.png]] | ||
| + | ===Erase Device Flash=== | ||
| + | *Unpack the software resource package ([https://files.waveshare.com/wiki/ESP32-C6-DEV-KIT-N8/Flash_download_tool_3.9.5_0.zip Flash debugging software]). | ||
| + | *Open '''flash_download_tool_3.9.5.exe''' software, select ESP32-S3 and USB. | ||
| + | [[File: ESP32-S3-Relay-6CH TO MicroPython Firmware 1.png]] | ||
| + | *Select the UART port number, and click '''Start''' (not select any bin file). | ||
| + | [[File:ESP32-S3-DEV-KIT-N8-84.png]] | ||
| + | *After programming, click on "ERASE". | ||
| + | [[File:ESP32-S3-DEV-KIT-N8-85.png]] | ||
| + | *Waiting for Erase to Finish. | ||
| + | [[File:ESP32-S3-DEV-KIT-N8-86.png]] | ||
| + | </div></div> | ||
| + | <div class="toccolours mw-collapsible mw-collapsed"> | ||
| + | |||
| + | =Working with Arduino= | ||
| + | <div class="mw-collapsible-content"> | ||
| + | ==Environment Set-up== | ||
| + | *Install [https://www.arduino.cc/en/software/ Arduino IDE]. | ||
| + | [[File: ESP32-C6-DEV-KIT-N8-Arduino01.png]] | ||
| + | *Enter Arduino IDE after installation. | ||
| + | [[File: ESP32-C6-DEV-KIT-N8-Arduino02.png]] | ||
| + | *Go to the board manager, search for esp32, select the latest version of esp32 by Espressif Systems at the bottom and click install (if it doesn't install correctly, you can try using a phone hotspot). | ||
| + | [[File: ESP32-S3-DEV-KIT-N8-Arduino07.png]]<br/> | ||
| + | *Restart the Arduino IDE after installation, and then you can use it. | ||
| + | [[File: ESP32-S3-DEV-KIT-N8-Arduino09.png]] | ||
| + | ===If the installation fails=== | ||
| + | *Failed to install 2.0.11 version: | ||
| + | [[File:ESP32-S3-DEV-KIT-N8-install.png]] | ||
| + | *Download [https://drive.google.com/file/d/1OXKOOoK64lnamFyfmmy09Vt20PU4fCTy/view?usp=sharing the resource file]: | ||
| + | [[File:ESP32-S3-DEV-KIT-N8-install02.png]] | ||
| + | *Click on the path "c:\Users\Waveshare\AppData\Local\Arduino15\packages" (where Waveshare is the user name of the computer, and you need to turn on Show Hidden Files). | ||
| + | [[File:ESP32-S3-DEV-KIT-N8-install03.png]] | ||
| + | *Unzop the downloaded files to the packages file folder: | ||
| + | [[File:ESP32-S3-DEV-KIT-N8-install04.png]] | ||
| + | *Install it again: | ||
| + | [[File: ESP32-S3-DEV-KIT-N8-Arduino07.png]] | ||
| + | *Restart the Arduino IDE after installation and you're ready to go! | ||
| + | [[File: ESP32-S3-DEV-KIT-N8-Arduino09.png]] | ||
| + | |||
| + | ==Run Example== | ||
| + | ===Create Example=== | ||
| + | *Above, change the project folder to '''c:\Users\Waveshare\AppData\Local\Arduino15\packages (where Waveshare is the computer username)'''. | ||
| + | [[File:ESP32-S3-Tiny-09.png]]<br> | ||
| + | [[File:ESP32-S3-Tiny-10.png]]<br> | ||
| + | *Restart Arduino IDE. | ||
| + | *Demos can be created from the examples in the Project folder under Files. | ||
| + | [[File: ESP32-C6-DEV-KIT-N8-Arduino10.png]] | ||
| + | *The following is the RGB flashing example (File -> Sketchbook -> esp32 -> hardware -> esp32 -> 2.0.11 -> libraries -> ESP32 -> examples -> BlinkRGB under GPIO). | ||
| + | [[File: ESP32-S3-DEV-KIT-N8-Arduino11.png]] | ||
| + | ===Upload Demo=== | ||
| + | *Select the development board and port. | ||
| + | [[File: ESP32-C6-DEV-KIT-N8-Arduino12.png]] | ||
| + | *Search esp32c6, select ESP32S3 Dev Module, and the ports to download. | ||
| + | [[File: ESP32-S3-DEV-KIT-N8-Arduino13.png]] | ||
| + | *After selecting, click to upload and Arduino IDE will start to compile and program the demo. | ||
| + | [[File: ESP32-S3-DEV-KIT-N8-Arduino14.png]] | ||
| + | *After uploading, you can see the effect on the development board. | ||
| + | [[File: ESP32-S3-DEV-KIT-N8-Arduino15.png]] | ||
| + | </div></div> | ||
=Resource= | =Resource= | ||
| + | ==Software== | ||
| + | ===Compile=== | ||
| + | *[https://code.visualstudio.com/download VScode] | ||
| + | *[https://www.arduino.cc/en/software Arduino IDE] | ||
| + | ===UART=== | ||
| + | *[https://files.waveshare.com/upload/b/b3/Sscom5.13.1.zip SSCOM Serial Assistant] | ||
| + | ===Flash=== | ||
| + | *[https://files.waveshare.com/wiki/ESP32-C6-DEV-KIT-N8/Flash_download_tool_3.9.5_0.zip Flash_download_tool_3.9.5_0] | ||
| + | *[https://files.waveshare.com/wiki/ESP32-H2-DEV-KIT-N4/ESP32-H2_TO_BLEAssist.ZIP Bluetooth Debug Assistant] | ||
| + | ==Schematic== | ||
| + | *[https://files.waveshare.com/wiki/ESP32-S3-Tiny/ESP32-S3-Tiny.pdf Schematic] | ||
| + | |||
| + | ==Datasheet== | ||
| + | ===ESP32-S3=== | ||
| + | *[https://files.waveshare.com/upload/9/9e/Esp32-s3_technical_reference_manual_en_%281%29.pdf ESP32-S3 Technical Reference Datasheet] | ||
| + | *[https://files.waveshare.com/upload/f/f7/Esp32-s3_datasheet_en_%281%29.pdf ESP32-S3 Datasheet] | ||
| + | ==Official Documentation== | ||
| + | ===Official ESP32 Document=== | ||
| + | *[https://docs.espressif.com/projects/esp-idf/en/latest/esp32s3/get-started/index.html ESP-IDF Official Document] | ||
| + | =FAQ= | ||
| + | {{FAQ|Compile failed, can't find the specified file? | ||
| + | | | ||
| + | Please select the driver object again and compile it again.<br> | ||
| + | [[File: ESP32-C6-DEV-KIT-N8-20.png]]<br> | ||
| + | [[File: ESP32-S3-DEV-KIT-22.png]]<br> | ||
| + | ||}} | ||
| + | {{FAQ|After the module downloads the demo and re-downloads it, sometimes it fails to connect to the serial port, or the burn fails? | ||
| + | | | ||
| + | Method 1: Press the reset button for more than 1 second, wait for the PC to recognize the device again, and then proceed with the download.<br/> | ||
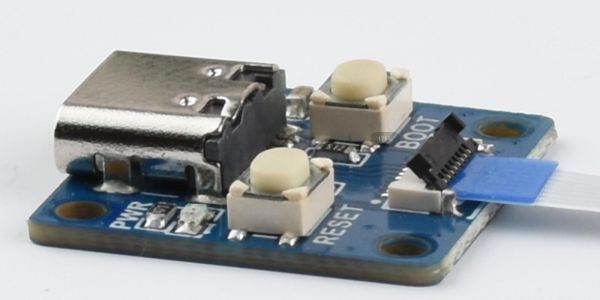
| + | Method 2: You can long-press the BOOT button, simultaneously press the RESET button, then release the RESET button, and finally release the BOOT button. This will put the module into download mode and can resolve most download issues. | ||
| + | ||}} | ||
| + | {{FAQ|No ESP option below when setting up an environment or building a project? | ||
| + | | | ||
| + | In VSCode, click the shortcut '''F1''', and search for '''Espressif IDF''', you will find that it is designated as an untrusted extension, set it as trusted. | ||
| + | ||}} | ||
| + | {{FAQ|Switch to the same ESP model and encounter issues with program burning and program execution? | ||
| + | | | ||
| + | Please select the COM port and driver object again after switching ESP, then compile and burn. | ||
| + | ||}} | ||
| + | {{FAQ|After powering up the module, the recognized serial devices and USB ports keep resetting and restarting? | ||
| + | | | ||
| + | Check whether the power supply voltage for the USB port is less than 5V, in general, if it is 4.9V or more, the module's two USB ports can be used normally. If it is lower than 4.9V, the power supply may be insufficient and the USB port may disconnect. In this case, you should replace it with a USB port with sufficient voltage. | ||
| + | ||}} | ||
| + | {{FAQ|Initialization failure when running official Zigbee example? | ||
| + | | | ||
| + | This may be because this device has residual information about other networks. You can erase the device information ([[#Erase Device Flash]]) and then reorganize the network. | ||
| + | ||}} | ||
| + | {{FAQ|When debugging the Zigbee example, the HA_on_off_light example device keeps failing to connect? | ||
| + | | | ||
| + | Please select the COM port corresponding to UART on both boards and then burn the program. | ||
| + | ||}} | ||
| + | {{FAQ| I can't get to the debug page on JTAG debugging? | ||
| + | | | ||
| + | Close OpenOCD below and reopen OpenOCD. | ||
| + | ||}} | ||
| + | |||
| + | =Support= | ||
| + | {{Servicebox1}} | ||
Revision as of 03:21, 9 April 2024
| ||

Overview
Introduction
Features
Function Blocks
What's Onboard
Pinout
Dimensions
Cable Connection
- Please read this section and the precautions before connection, otherwise the device may be damaged or short-circuited!
- FPC connector update in V1.1 version and above can bring you a better experience, which can be identified by the back of the Rev*. * for version differentiation.
- Open the flip cover of the cable connector.

- Please make sure to install the cable in the center.
- Close the flip cover. Normally, the flip cover should be closed completely.

- If the cable is not properly installed, it may prevent the flip cover from closing correctly. Please adjust the position of the cable and try to close the flip cover again.


Note
- Please do not unplug the cable with electricity, otherwise it may lead to a short circuit.
- When installing the cable, it is important to pay attention to its proper connection in the center and ensure that it is inserted fully into the socket. Incorrect installation may result in connection issues or even short circuits.
Working with ESP-IDF
- It is recommended to develop with the VSC plug-in.
Develop with VSCode
Install VSCode
- 1. Open the download page of the official VSCode website, and select the corresponding system and system bit to download.

- 2. After running the installation package, the rest can be installed by default, but here for the subsequent experience, it is recommended to check boxes 1, 2, and 3.
- After the first two items are enabled, you can open VSCode directly by right-clicking files or directories, which can improve the subsequent user experience.
- After the third item is enabled, you can select VSCode directly when you choose how to open it.


Install Espressif IDF Plug-in
- Note: Currently the latest version of the plugin is V1.6.4, users can choose the same version as us for a consistent experience!
- Open VSCode, use Shift+Ctrl+X to enter the plug-in manager.

- In the search bar, enter Espressif IDF to select the corresponding plug-in and click "Install".


- Press F1 to input:
esp-idf: configure esp-idf extension

- Select express (this guide is for users who install it for the first time).

- Select download sever.

- Select the version of ESP-IDF you want to use now, we choose the latest V5.1.1 (note that only after V5.1 did ESP-IDF start to support ESP32-C6).

- The following two are the installation paths respectively for the ESP-IDF container directory and the ESP-IDF Tools directory.

- Note: If you have installed ESP-IDF before, or failed to do so, please be sure to delete the file completely or create a new path without Chinese.
- After configuring, click "Install" to download:

- Enter the download interface, and then it will automatically install the corresponding tools and environment, just wait for a second.

- After the installation is complete, you will enter the following interface, indicating that the installation is finished.

Official Demo Usage GUIDE
Create Demo (Demo Example)
- Press F1 to enter:
esp-idf:show examples projects

- Select the corresponding IDF version:

- Take the Hello World demo as an example:
- ①Select the corresponding demo.
- ②Its readme will state what chip the demo applies to (how the demo is used with the file structure is described below, omitted here).
- ③Click to create the demo.

Select the path to place the demo, and the folder name should be aligned with the demo name.

Modify COM Port
- The corresponding COM ports are shown here, click to modify them.
- Please select the COM ports according to your device. (You can view it from the device manager.)
- In case of a download failure, please press the reset button for more than 1 second and wait for the PC to recognize the device again before downloading once more.

- Select the project or demo to use:

- Then we finish the modification of the COM ports.
Modify the Driver Object
- The driver object is displayed here, and you can modify it by clicking on it.
- Select the project or demo to use.

- Wait for a minute after clicking.

- Select the object we need to drive, which is our main chip ESP32S3.

- Choose the path to openocd, it doesn't affect us here, so let's just choose one at random.

The Rest of the Status Bar
- ①SDK configuration editor, supports modifying most functions of ESP-IDF.
- ②All cleanup, and clear all compiled files.
- ③Compile.
- ④Current download mode, default is UART.
- ⑤Flash the current firmware, please do it after compiling.
- ⑥Open the serial port monitor, used to view the serial port information.
- ⑦All-in-one button, compile, burn, open the serial monitor (most commonly used for debugging).

Compile, Program, Serial Port Monitoring
- Click on the all-in-one button we described before to compile, program, and open the serial port monitor.

- It may take a long time to compile especially for the first time.

- During this process, the ESP-IDF may take up a lot of CPU resources, so it may cause the system to lag.
- If it is the first time to burn the program for a new project, you will need to select the download method, and select UART.

- This can also be changed later in the Download Methods section (click on it to bring up the options).

- As it comes with the onboard automatic download circuit, there is no need for manual operation to download automatically.

- After successful download, automatically enter the serial monitor, you can see the chip output the corresponding information and be prompted to restart after 10S.

Erase Device Flash
- Unpack the software resource package (Flash debugging software).
- Open flash_download_tool_3.9.5.exe software, select ESP32-S3 and USB.

- Select the UART port number, and click Start (not select any bin file).

- After programming, click on "ERASE".

- Waiting for Erase to Finish.

Working with Arduino
Environment Set-up
- Install Arduino IDE.

- Enter Arduino IDE after installation.

- Go to the board manager, search for esp32, select the latest version of esp32 by Espressif Systems at the bottom and click install (if it doesn't install correctly, you can try using a phone hotspot).

- Restart the Arduino IDE after installation, and then you can use it.

If the installation fails
- Failed to install 2.0.11 version:

- Download the resource file:

- Click on the path "c:\Users\Waveshare\AppData\Local\Arduino15\packages" (where Waveshare is the user name of the computer, and you need to turn on Show Hidden Files).

- Unzop the downloaded files to the packages file folder:

- Install it again:
- Restart the Arduino IDE after installation and you're ready to go!
Run Example
Create Example
- Above, change the project folder to c:\Users\Waveshare\AppData\Local\Arduino15\packages (where Waveshare is the computer username).


- Restart Arduino IDE.
- Demos can be created from the examples in the Project folder under Files.

- The following is the RGB flashing example (File -> Sketchbook -> esp32 -> hardware -> esp32 -> 2.0.11 -> libraries -> ESP32 -> examples -> BlinkRGB under GPIO).

Upload Demo
- Select the development board and port.

- Search esp32c6, select ESP32S3 Dev Module, and the ports to download.

- After selecting, click to upload and Arduino IDE will start to compile and program the demo.

- After uploading, you can see the effect on the development board.

Resource
Software
Compile
UART
Flash
Schematic
Datasheet
ESP32-S3
Official Documentation
Official ESP32 Document
FAQ
Please select the driver object again and compile it again.
{{{5}}}
Method 1: Press the reset button for more than 1 second, wait for the PC to recognize the device again, and then proceed with the download.
Method 2: You can long-press the BOOT button, simultaneously press the RESET button, then release the RESET button, and finally release the BOOT button. This will put the module into download mode and can resolve most download issues.
{{{5}}}
In VSCode, click the shortcut F1, and search for Espressif IDF, you will find that it is designated as an untrusted extension, set it as trusted.
{{{5}}}
Please select the COM port and driver object again after switching ESP, then compile and burn.
{{{5}}}
Check whether the power supply voltage for the USB port is less than 5V, in general, if it is 4.9V or more, the module's two USB ports can be used normally. If it is lower than 4.9V, the power supply may be insufficient and the USB port may disconnect. In this case, you should replace it with a USB port with sufficient voltage.
{{{5}}}
This may be because this device has residual information about other networks. You can erase the device information (#Erase Device Flash) and then reorganize the network.
{{{5}}}
Please select the COM port corresponding to UART on both boards and then burn the program.
{{{5}}}
Close OpenOCD below and reopen OpenOCD.
{{{5}}}
Support
Technical Support
If you need technical support or have any feedback/review, please click the Submit Now button to submit a ticket, Our support team will check and reply to you within 1 to 2 working days. Please be patient as we make every effort to help you to resolve the issue.
Working Time: 9 AM - 6 PM GMT+8 (Monday to Friday)