
Difference between revisions of "EMW3162 (B)"
From Waveshare Wiki
m (Text replacement - "Service00" to "Servicebox1") |
|||
| (13 intermediate revisions by 3 users not shown) | |||
| Line 1: | Line 1: | ||
[[Category:Modules]][[Category:WiFi]] | [[Category:Modules]][[Category:WiFi]] | ||
| − | {{Infobox item | + | {{Infobox item|colorscheme=blue |
| − | |name=EMW3162 | + | |name=EMW3162 (B) |
|brief=Serial WiFi Module | |brief=Serial WiFi Module | ||
| − | |img=[[File: | + | |img=[[File:EMW3162-B-1.jpg|300px|link=http://www.waveshare.com/EMW3162-B.htm]] |
|caption=EMW3162, Serial WiFi Module | |caption=EMW3162, Serial WiFi Module | ||
|platform=WiFi Module | |platform=WiFi Module | ||
|category=[[:Category:Modules|Modules]], [[:Category:WiFi|WiFi]] | |category=[[:Category:Modules|Modules]], [[:Category:WiFi|WiFi]] | ||
| − | | | + | |brand=MXCHIP |
| + | |{{#ifeq: {{#urlget:amazon|0}}|{{#urlget:Amazon|0}}| default|}}=display | ||
|website_cn=[http://www.mxchip.com/ MXCHIP官网] | |website_cn=[http://www.mxchip.com/ MXCHIP官网] | ||
|website_en=[http://en.mxchip.com/ MXCHIP Website] | |website_en=[http://en.mxchip.com/ MXCHIP Website] | ||
| + | |interface1=UART | ||
| + | |interface2=WiFi | ||
| + | |related= | ||
| + | * [[EMW3162 WIFI Shield]] | ||
}} | }} | ||
| − | |||
== Introduction == | == Introduction == | ||
| − | EMW3162, Serial WiFi Module | + | EMW3162 (B), Serial WiFi Module, External Antenna |
| − | [http://www.waveshare.com/EMW3162.htm More] | + | {{Amazon|{{#ifeq: {{#urlget:amazon|0}}|{{#urlget:Amazon|0}}| default|}}=display |
| − | + | |More = [http://www.waveshare.com/EMW3162-B.htm More]}} | |
| − | {{EMW3162 | + | {{EMW3162 Resources}} |
| − | |||
| − | |||
| − | |||
| − | |||
===Kits related=== | ===Kits related=== | ||
*[[EMW3162 WIFI Shield]] | *[[EMW3162 WIFI Shield]] | ||
| − | + | ||
| − | + | ||
| − | {{ | + | |
| + | {{Servicebox1}} | ||
Latest revision as of 11:52, 15 August 2023
| ||

Introduction
EMW3162 (B), Serial WiFi Module, External Antenna
| More |
EMW3162 Uart-Wifi App Guide
Preparations
- Properly connect the EMW3162 module to the WIFI Shield.
- Connect the USB TO UART port to a PC, of which Wi-Fi function is needed.
Test the default configuration
- Open the Wi-Fi connection, and choose the connection of which prefix is MXCHIP.
- Run the software File:TCP232.7z
- Set the COMSettings area as: PortNum: Choose the COM Port listed in the Device Manager; BaudR: 115200; DPaity: NONE; DataB: 8 bit; StopB: 1 bit. Then click Open.
- Set the NetSettings area as: Protocol: TCP Client; Server IP: 192.168.1.1; Server Port: 8080. Then click Connect.
- Now it implements the Transparent transmission between the UART and the Wi-Fi:

Set to AP mode
- Note: when the module is tested using the PC software, the USB to UART module should feature FT232 or FT230XS!
- The EMW3162 module is configured by UART commands. Please first connect the pin 30 to Low for entering command mode. When using the module with the WIFI Shield, you can switch BOOT to H and switch STATUS to L, instead of connecting the pin 30 to Low.
- Run the software EMW ToolBox(PC).
- Click the Refresh button to refresh the present COM port, and then choose the corresponding COM port, of which properties are set by default as:
- Default -> Baud Rate: 115200; Data Bits: 8; Parity: None; Stop bits: 1. Click Start button to use the COM port.

- Click "Load Paras from module".
- Set the Wi-Fi mode to Soft AP Mode, set the SSID, i.e. the name of the Wi-Fi connection (for example, here the SSID is Waveshare).
- Choose the Wireless Encryption and set the Wi-Fi KEY (for example, here the key is 123456789).

- Click the Local IP tab and set the IP address of the module (for example, here is 192.168.1.100)
- Click the TCP/UDP Connection tab and set the Protocol as TCP Server; Port, e.g. 8899.
- When setup complete, click "Save Paras To Module" to save the parameters.
- Connect the pin 30 to High to reboot the module which will run with the configured parameters. When using the module with the WIFI Shield, you can switch STATUS to H, instead of connecting the pin 30 to High. Now you can connect the PC to the corresponding Wi-Fi connection:
- Run the software File:TCP232.7z.
- Set the COMSettings area as: PortNum: Choose the COM Port listed in the Device Manager; BaudR: 115200; DPaity: NONE; DataB: 8 bit; StopB: 1 bit. Then click Open.
- Set the NetSettings area as: Protocol: TCP Client; Server IP: 192.168.1.100; Server Port: 8899. Then click Connect.
- Now it implements the Transparent transmission between the UART and the Wi-Fi:


Set to STA mode
- Note: when the module is tested using the PC software, the USB to UART module should feature FT232 or FT230XS!
- The EMW3162 module is configured by UART commands. Please first connect the pin 30 to Low for entering command mode. When using the module with the WIFI Shield, you can switch BOOT to H and switch STATUS to L, instead of connecting the pin 30 to Low.
- Run the software EMW ToolBox(PC).
- Click the Refresh button to refresh the present COM port, and then choose the corresponding COM port, of which properties are set by default as:
- Default -> Baud Rate: 115200; Data Bits: 8; Parity: None; Stop bits: 1. Click Start button to use the COM port.
- Click "Load Paras from module".
- Set the Wi-Fi mode to Station Mode, and then input the SSID of a router to be connected.
- Choose the Wireless Encryption of the router and input the KEY.
- Click the Local IP tab and set the IP address of the module. Here we choose "Get IP address automatically". However, if you choose "Use the following IP address", make sure the IP address is not conflict with another system on the network.
- The expected result is that, the module can access server through router, here the server is emulated by the software File:TCP232.7z.
- Set the NetSettings area as: Protocol: TCP Server; Local host IP: 192.168.1.121; Local host Port: 8899. Then click Listening.
- For emulating the communication between the module and the server, set the module for connecting the server.
- Click the TCP/UDP Connection tab and set the Protocol as TCP Client; Port: 8899; Server IP mode: IP address; IP Address:192.168.1.121 (according to the server).

- When setup complete, click "Save Paras To Module" to save the parameters.
- Connect the pin 30 to High to reboot the module which will communicate with the router and server automatically. When using the module with the WIFI Shield, you can switch STATUS to H, instead of connecting the pin 30 to High.
- Set the COMSettings area as: PortNum: Choose the COM Port listed in the Device Manager; BaudR: 115200; DPaity: NONE; DataB: 8 bit; StopB: 1 bit. Then click Open.
- Now it implements the Transparent transmission between the UART and the Wi-Fi:


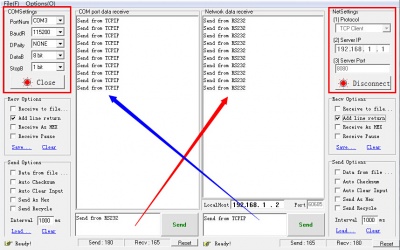
STA Mode with Dual Sockets
- Set another socket on the basis of the configuration of STA mode before. Set the Protocol of Connection 2 as TCP Server; Port: 8080.
- Run the software File:TCP232.7z
- Set the COMSettings area as: PortNum: Choose the COM Port listed in the Device Manager; BaudR: 115200; DPaity: NONE; DataB: 8 bit; StopB: 1 bit. Then click Open.
- Set the NetSettings area as: Protocol: TCP Server; Local host IP: 192.168.1.121; Local host Port: 8899. Then click Listening.
- Reboot the module and it will connect to the corresponding router and server.
- Open another window of TCP232 and set as:
- Set the NetSettings area as: Protocol: TCP Client; Server IP: 192.168.1.169 (this IP is assigned from the module automatically); Server Port: 8080. Then click Connect.
- Now both of the Socket can receive the messages from the UART, while the module can receive the messages from both of the Socket individually:


EMW3162 Firmware Update Guide
- To update the firmware of the EMW3162, please connect the pin 16 (BOOT) to Low and the pin 30 (STATUS) to High. Then connect the pin 22 (USART_TX) and pin 23 (USART_RX) to a USB TO UART board. When using the module with the WIFI Shield, you can switch BOOT to L and switch STATUS to H, then connect the on-board UART to a PC.
- Run the software File:SecureCRT.7z.
- Create a Serial Connection as shown in the figure. (Choose the COM Port listed in the Device Manager, although here is COM2.) Do not check the RTS/CTS.
- Power up. If it was set up correctly, the serial will response the message as shown in the figure else please check the Baud or other settings.
- Input 1 and press the Enter button, then click Transfer->Send Ymodem... to choose the firmware for update:
- Download the firmware for UART <> Wi-Fi - implements Wi-Fi Transparent transmission using UART
- Note: after the firmware downloaded, please first extract the .bin file then Transfer.

- Once update complete, the serial will response the message as shown in the figure:
- Connect the pin 16 (BOOT) to High (for WIFI Shield user, just switch BOOT to H), then the board will restart to working status.


Resources
MxchipWNet-DTU firmware for Transparent transmission
- Reference Manual for UART <> Wi-Fi Firmware
- Firmware update log
- Software - EMW ToolBox(PC), for setting the firmware of mxchipWNet-DTU Transparent transmission
- Advanced setting guide for the firmware of mxchipWNet-DTU UART Transparent transmission
- Software - BonjourSetup(PC), the Discovery Service for Bonjour Device
Firmware update
- EMW316x Firmware Update Steps
- Firmware for Cloud Service - implements Cloud Service using UART
- Firmware for UART <> Wi-Fi - implements Wi-Fi Transparent transmission using UART
- Firmware for EMW316x BOOT
- Firmware for EMW316x RF
Easy Link Apps
Related documentation
mxchipWNet library for secondary development of the module firmware
- Basic library of EMW316x, based on the RF driver, of which revision: 5.90.230.1
- MICO library, the pro. edition of the EMW316x library, which is based on the MICO Real time operation system and the RF driver, of which revision: 5.90.230.1
- Development guide for the basic version of mxchipWNet library
Technical Support
If you need technical support or have any feedback/review, please click the Submit Now button to submit a ticket, Our support team will check and reply to you within 1 to 2 working days. Please be patient as we make every effort to help you to resolve the issue.
Working Time: 9 AM - 6 AM GMT+8 (Monday to Friday)