E-Paper ESP32 Driver Board
| ||
Introduction
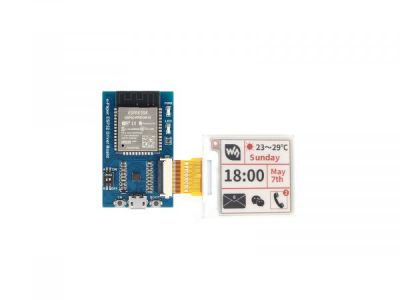
Universal e-Paper Driver HAT, Onboard ESP32, supports various Waveshare SPI interface e-Paper raw panels. Supports refreshing image to e-paper via WIFI or Bluetooth. It also supports Arduino.
| More |
Parameter
- WiFi Standard: 802.11b/g/n
- Communication Interface: SPI
- Bluetooth Standard: 4.2, BR/EDR and BLE included
- Communication Interface: 3-Wire SPI, 4-wire SPI (default)
- Working voltage: 5V
- Working Current: 50mA-150mA
- Outline dimension: 29.46mm x 48.25mm
Pin
| Pin | ESP32 | Description |
|---|---|---|
| VCC | 3.3V | Power input |
| GND | GND | Power ground |
| SCK | P13 | SPI CLK, Clock Signal Input |
| DIN | P14 | SPI MOSI, Data Input |
| CS | P15 | Chip Select, active-low |
| BUSY | P25 | Busy Output Pin (means busy) |
| RST | P26 | Reset, active-low |
| DC | P27 | Reset, Data/Demand, low level means to demand, high level means data |
PS: The above is the board fixed connection, no additional operation by the user
Feature
- Onboard ESP32, support Arduino development
- Provide Android mobile APP program, which can update the display content through Bluetooth EDR, easy to use
- Provide HTML host computer program, which can remotely update the display content through the web page, which is convenient to integrate into various network applications
- Supports Floyd-Steinberg dithering algorithm for more color combinations and better shadow of the original image
- Supports many common image formats (BMP, JPEG, GIF, PNG, etc.)
- Factory built-in e-ink screen driver (open source)
- 5V pin supports 3.6V to 5.5V voltage input, can be powered by lithium battery
- Provide complete supporting information manual
Application
This product cooperates with the ink screen and is suitable for the application scenario of wireless brushing.
- Supermarket electronic price tag
- Electronic name card
- Serial information display board, etc.
Preparation
Hardware Connection
This product is shipped with an ESP32 network driver board, an adapter board, and an FFC extension cable.
When using it, you can directly connect the screen to the driver board, or connect it through extension cables and adapter boards.
Direct access to the driver board:

Access via extension cord:

- Set the mode switch: Set the No. 1 switch according to the model of the EPD used. There are many screens. If it is not listed, please use 'A' to try. If the display effect is poor or cannot be driven, please try switching the switch.
Bluetooth Examples
Bluetooth Demo
Download example
- Go to the Loader_esp32bt directory, double click the Loader_esp32bt.ino file to open the example.
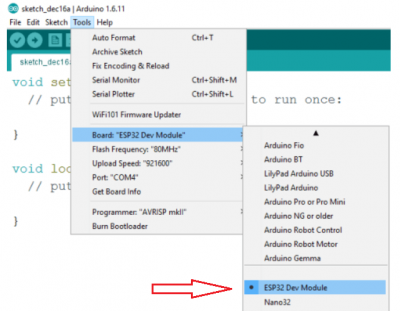
- Choose Tools -> Boards -> ESP32 Dev Module and select the correct Port according to Device Manager: Tools -> Port.
- Click the Upload icon to build the project and upload it to the ESP32 driver board.
- Install the APP to the Android board and open it:
- APP has five buttons on the main page:
- BLUETOOTH CONNECTION: This button is used to connect the ESP32 device via Bluetooth.
- SELECT DISPLAY TYPE: This button is used to select the type of display according to what you buy.
- LOAD IMAGE FILE: Click it and choose a picture to open. It is only available after choosing the display type.
- SELECT IMAGE FILTER: This button is used to choose the image process method.
- UPLOAD IMAGE: Upload the processed image to the ESP32 driver board and update to e-Paper display.
- BLUETOOTH CONNECTION: This button is used to connect the ESP32 device via Bluetooth.
- Please first open the Bluetooth function of your phone. Click the BLUETOOTH CONNECTION button -> Click the SCAN icon on the top-right to scan the Bluetooth device.
- Find the ESP32 device and connect. If your phone is the first time to connect this device, it requires pairing, complete the pairing process according to the prompt. (Note: The APP cannot work with pairing.)
- Click "SELECT DISPLAY TYPE" to choose the display type.
- Click "LOAD IMAGE FILE" To choose a picture from your phone and cut it.
- Click " SELECT IMAGE FILTER" to choose a process algorithm and confirm.
- "LEVEL: MONO": This option will process the picture to a monochrome image.
- "LEVEL" COLOR": This option will process the picture to the tricolor image according to the display colors of the display (only valid for colorful displays).
- "DITHERING: MONO": This option will process the picture to a monochrome image.
- "DITHERING: COLOR": This option will process the picture to the tricolor image according to the display colors of the display (only valid for colorful displays).
- Click "UPLOAD IMAGE" to upload the image to the ESP32 device and display it.
WiFi Examples
WiFi Demo
Provide WiFi demos with an HTML host computer.
Note: The module only supports the 2.4G network band.
How to Use
- Go to the Loader_esp32wf directory, double click Loader_esp32wf.ino file to open the project.
- Choose Tools -> Boards -> ESP32 Dev Module in the IDE menu, and select the correct COM port: Tools -> Port.
- Open the srvr.h file and change the ssid and password to the actual WiFi username and password used.
- Modify the WiFi username and password here to match the WiFi username and password of your router or mobile hotspot. In this program, the ESP32 acts as a slave, not a host, so it will not transmit the WiFi hotspot message outward.
- Press win + R and type CMD to open the command line and get the IP of your computer.
- Open the srvr.h file, modify the network segment in the location shown in the picture to the corresponding network segment.
- Note: the IP address of ESP32 (that is, the fourth bit) should not be the same as the address of the computer, and the rest should be the same as the IP address of the computer.
- Then click upload to compile and download the demo to the ESP8266 driver board.
- Open the serial monitor and set the baud rate to 115200, you can see the serial port print out the IP address of the ESP32 driver board as follows:
- Open the browser on your computer or cell phone (note that the network you are accessing needs to be on the same network segment as the wifi connected to the ESP8266), enter the IP address of the ESP8266 in the URL input field, and open it, you can see the operation interface as follows.
- The entire operation interface is divided into five areas:
- Image Operation Area:
Select Image file: Click to choose an image from your computer or phone
Level: mono: Black and white image processing algorithm
Level: color: Multi-color image processing algorithm (only effective for multi-color screens)
Dithering: mono: Black dithering image processing algorithm
Dithering: color: Multi-color dithering image processing algorithm (only effective for multi-color screens)
Update image: Upload image - IP information display area: This displays the IP address information of the module you are currently connected to
- Image size setting area: Here, x and y can be set to specify the starting position of the display, which is relative to the image file you have selected. For example, if you choose an 800x480 image but the e-Paper screen you are connected to is 2.9 inches, the screen will not be able to display the entire image. In this case, the processing algorithm will automatically crop the image from the upper left corner and send a portion of it to the e-ink screen for display. You can set x and y to customize the starting position of the cropping. W and h represent the resolution of the current e-ink screen. Note: If you modify the x and y coordinates, you need to click on the processing algorithm again to generate a new image.
- Model selection area: Here, you can choose the e-ink screen model you are connected to.
- Image display area: Here, the selected image and the processed image will be displayed.
- PS: During image upload, the upload progress will be displayed at the bottom.
- Image Operation Area:
- Area ①: Click "Select Image file" to choose an image, or drag and drop the image directly into the "Original image" area.
- Area ④: Choose the corresponding e-Paper model, for example, 1.54b.
- Area ①: Click on an image processing algorithm, for example, "Dithering: color".
- Area ①: Click "Upload image" to upload the image to the e-ink screen display.
Offline Examples
Offline Demo
Provides offline ESP32-based demos without WiFi, Bluetooth, and other devices.
Demo Usage
- Open Arduino IDE to view the project file folder location (please do not modify it).
- Go to the E-Paper_ESP32_Driver_Board_Code\examples directory and copy the entire esp32-waveshare-epd folder to the libraries directory in the project folder.
- Close all Arduino IDE windows, reopen the Arduino IDE, and select the corresponding example demo as shown:
- Choose the corresponding board and COM port.
Resources
Documentation
Demo Code
Related Resources
This is a post in Arduino Form about our SPI e-Paper thanks to ZinggJM, maybe you want to refer to.
FAQ
- Set the model: Set the No. 1 switch according to the E-Paper model you are using. There are many models of the E-Paper. If the model you used is not listed, please use ‘A’ first to try.
- Turn on the serial port module: Turn the No. 2 switches to "ON", this switch controls the power supply of the CP2102 (USB to UART module). When you don’t need to use it, you can manually turn off the module to save power (if the No. 2 switch is in the OFF state, the device cannot upload the program)
{{{5}}}
Support
Support
If you require technical support, please go to the Support page and open a ticket.


