
Difference between revisions of "9inch 2560x1600 Monitor"
| Line 20: | Line 20: | ||
}} | }} | ||
== '''Introduction'''== | == '''Introduction'''== | ||
| − | 9inch Capacitive Touch Monitor, Mini HDMI Port, | + | 9inch Capacitive Touch Monitor, Mini HDMI Port, 2560 × 1600 2K Resolution, IPS Screen, Fully Tempered Toughened Glass Panel, Various Systems & Devices Support Including Raspberry Pi, Jetson Nano, PC... |
{{Amazon|{{#ifeq: {{#urlget:amazon|0}}|{{#urlget:Amazon|0}}| default|}}=display | {{Amazon|{{#ifeq: {{#urlget:amazon|0}}|{{#urlget:Amazon|0}}| default|}}=display | ||
Revision as of 08:17, 29 July 2022
| ||

Introduction
9inch Capacitive Touch Monitor, Mini HDMI Port, 2560 × 1600 2K Resolution, IPS Screen, Fully Tempered Toughened Glass Panel, Various Systems & Devices Support Including Raspberry Pi, Jetson Nano, PC...
| More |
Features
- 9inch IPS screen, 2560 x 1600 resolution
- 10-points capacitive touch control, toughened glass panel, 6H hardness.
- It uses full lamination and AF anti-fingerprint touch technology, and the use effect becomes better.
- When used with Raspberry Pi, supports Raspberry Pi OS / Ubuntu / Kali and Retropie
- When used as a computer monitor, support Windows11/10/8.1/8/7
- Embedded ferrite Hi-Fi speaker, HDMI audio input, 3.5mm headphone/speaker jack.
- Full metal CNC alloy shell.
Working with PC
This LCD supports Windows 7/8/8.1/10/11 when working with PC via HDMI interface.:
1. Connect the TOUCH interface of LCD to the USB interface of PC. Waiting for a moment, The touch will be recognized by Windows automatically.
2. Connect the HDMI interface of LCD to the HDMI port of PC. About 10s later, you can see that the LCD display properly. If you need to output sound, you can connect to 3.5mm headphones through HP audio output port.
Note:
1) When the computer is connected to several different displays at the same time, only this LCD can be used to control the cursor on the main display, so we recommended to set this LCD as the main display.
2) Some of PC cannot support HDMI screen Hot Plug. In this case, restart the PC can solve.
3) Sometimes LCD will flicker because of undersupplying from USB cable of PC. You need to connect an external power supply (5V/2A) to Power port.
Working with Raspberry Pi
Support Raspberry Pi OS / Ubuntu / Kali and Retropie systems for Raspberry Pi.
When working with Raspberry Pi, you should set the resolution of the LCD by yourself, or else the LCD screen will not work. For more detail information, please read the following section.
Please download the latest version of the image on the Raspberry Pi official website.
- 1) Download the compressed file to the PC, and unzip it to get the .img file.
- 2) Connect the TF card to the PC, use SDFormatter software to format the TF card.
- 3) Open the Win32DiskImager software, select the system image downloaded in step 1, and click‘Write’ to write the system image.
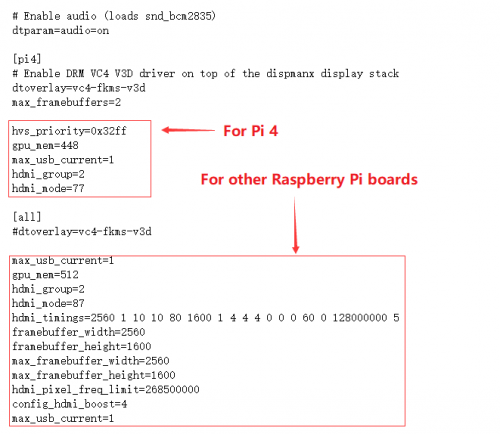
- 4) After the image has finished writing, open the config.txt file in the root directory of the TF card, add the following code at the end of config.txt, then save and quit the TF card safely.
- For Pi 4
[pi4]

hvs_priority=0x32ff
gpu_mem=448
max_usb_current=1
hdmi_group=2
hdmi_mode=77
- For others Raspberry Pi
[all]

max_usb_current=1
gpu_mem=512     #If you are using Pi Zero, please change to gpu_mem=256
hdmi_group=2
hdmi_mode=87
hdmi_timings=2560 1 10 10 80 1600 1 4 4 4 0 0 0 60 0 128000000 5
framebuffer_width=2560
framebuffer_height=1600
max_framebuffer_width=2560
max_framebuffer_height=1600
hdmi_pixel_freq_limit=268500000
config_hdmi_boost=4
max_usb_current=1
- The config.txt file should be modified as this
- 5) Insert the TF card into the Raspberry Pi
- 6) Connect the Touch interface of the LCD to the USB port of Raspberry Pi.
- 7) Connect the HDMI interface of the LCD to the HDMI port of Raspberry Pi and then power on the Raspberry Pi, it can display normally after waiting for about a few seconds.

Further setting
Because this 9inch HDMI monitor has higher resolution, for better touching effect, we recommend you to set the icon and text bigger. We take Raspberry Pi OS (Raspbian) as an example. Note that this setting doesn't be supported by all the OS.
- Choose Menu -> Preferences -> Appearance Settings -> Defualts -> For large screens:Defaults -> OK


- Set the font of system

- Right-click taskbar -> Panel Settings -> Set the size of Geometry


Disable power saving
If you want to keep the display turning on all the time, you can disable the power-saving function.
Modify file lightdm.conf
sudo nano /etc/lightdm/lightdm.conf
Find the [SeatDefaults] option and uncomment the line"xserver-command", modify it as below:
#xserver-command=X
Modify this code to
xserver-command=X -s 0 -dpms
- -s # –Disable the display protecting.
- dpms Disable power saving.
Reboot
sudo reboot
Turn on/ off display
You can turn on/off display by the follow commands
vcgencmd display_power 0
vcgencmd display_power 1
Keys Introduction
- On/OFF: Turn on/off the backlight.
disable_splash=1
Replace the custom image with the image in this directory /usr/share/plymouth/themes/pix/splash.png
{{{5}}}
Anti-Piracy
Since the first-generation Raspberry Pi released, Waveshare has been working on designing, developing, and producing various fantastic touch LCDs for the Pi. Unfortunately, there are quite a few pirated/knock-off products in the market. They're usually some poor copies of our early hardware revisions, and comes with none support service.
To avoid becoming a victim of pirated products, please pay attention to the following features when purchasing:

Beware of knock-offs
Please note that we've found some poor copies of this item in the market. They are usually made of inferior materials and shipped without any testing.
You might be wondering if the one you're watching or you've purchased in other non-official stores is original, feel free to contact us.