
Difference between revisions of "9.7inch e-Paper HAT"
(→FAQ) |
|||
| Line 52: | Line 52: | ||
This product is an E-paper device adopting the image display technology of Microencapsulated Electrophoretic Display, MED. The initial approach is to create tiny spheres, in which the charged color pigments are suspending in the transparent oil and would move depending on the electronic charge. The E-paper screen display patterns by reflecting the ambient light, so it has no background light requirement.Under ambient light, the E-paper screen still has high visibility with a wide viewing angle of 180 degrees. It is the ideal choice for E-reading.(Note that the e-Paper cannot support updating directly under sunlight) | This product is an E-paper device adopting the image display technology of Microencapsulated Electrophoretic Display, MED. The initial approach is to create tiny spheres, in which the charged color pigments are suspending in the transparent oil and would move depending on the electronic charge. The E-paper screen display patterns by reflecting the ambient light, so it has no background light requirement.Under ambient light, the E-paper screen still has high visibility with a wide viewing angle of 180 degrees. It is the ideal choice for E-reading.(Note that the e-Paper cannot support updating directly under sunlight) | ||
| − | + | = How to use = | |
| + | |||
=Working with Windows PC= | =Working with Windows PC= | ||
*Connect 9.7inch e-paper to IT8951 driver board as below | *Connect 9.7inch e-paper to IT8951 driver board as below | ||
Revision as of 07:20, 18 May 2022
| ||
| ||

Introduction
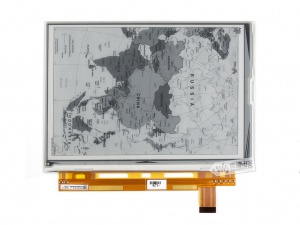
- 9.7inch EPD (Electronic Paper Display) HAT for Raspberry Pi, 1200×825 resolution, 16 gray scale, USB/SPI/I80/I2C interface
- It has the advantages of low power consumption, wide viewing angle, and clear display under direct sunlight, and is often used in display applications such as shelf labels and industrial instruments.
| More |
Features
- No backlight, keeps displaying last content for a long time even when power down
- Low power consumption, basically power is only required for refreshing
- Compatible with Raspberry Pi Zero/Zero W/Zero WH/2B/3B/3B+
- USB/SPI/I80/I2C interface, for connecting with host boards like Raspberry Pi/Nucleo, etc.
- Comes with development resources and manual (examples for Raspberry Pi/STM32)
Specifications
- Operating voltage: 5V
- Interface: USB/SPI/I80/I2C
- Outline dimension: 218.8mm × 156.425mm × 1.15mm
- Display size: 202.8mm × 139.425mm
- Dot pitch: 0.169 × 0.169
- Resolution: 1200 × 825
- Display color: black, white
- Gray scale: 2-16 (1-4 bit)
- Full refresh time: <1s
- Total refresh power: 0.6W(typ.)
- Total standby power: 0.3W(typ.)
- Viewing angle: >170°

Working principle
This product is an E-paper device adopting the image display technology of Microencapsulated Electrophoretic Display, MED. The initial approach is to create tiny spheres, in which the charged color pigments are suspending in the transparent oil and would move depending on the electronic charge. The E-paper screen display patterns by reflecting the ambient light, so it has no background light requirement.Under ambient light, the E-paper screen still has high visibility with a wide viewing angle of 180 degrees. It is the ideal choice for E-reading.(Note that the e-Paper cannot support updating directly under sunlight)
How to use
Working with Windows PC
- Connect 9.7inch e-paper to IT8951 driver board as below

- Connect driver board to PC by USB cable
- Download and open test software E-LINK-TCON-DEMO
- Click connect as below

- Check option "AutoSet", then click "Open File" to open one picture for display. Browse diagram will be opened, and you should click "OK"

- Click "display" to refresh the picture

Working with Raspberry Pi
- Hardware connection

- You can also connecting by wires
| IT8951 Driver HAT | Raspberry Pi (BCM) | Description' |
| 5V | 5V | 5V power input |
| GND | GND | Ground |
| MISO | P9 | MISO Pin of SPI |
| MOSI | P10 | MOSI Pin of SPI |
| SCK | P11 | SCK Pin of SPI |
| CS | P8 | Chip selection of SPI (Low active) |
| RST | P17 | Reset pin (Low active) |
| HRDY | P24 | Busy stats pin (Low when busy) |
- Make sure you have switched the sail switch to SPI mode

- Install BCM2835 libraries to your Raspberry Pi, you can download the newest bcm2835 library from its official website http://www.airspayce.com/mikem/bcm2835/
Copy the library you download to Raspberry Pi and install it withe commands below. You can also following the instruction on its website above
tar zxvf bcm2835-1.xx.tar.gz
cd bcm2835-1.xx
./configure
make
sudo make check
sudo make install
- Download Demo code and copy to your Raspberry Pi. Extract and run it with the commands below in your Raspberry Pi
git clone https://github.com/waveshare/IT8951-ePaper.git
cd IT8951-ePaper/Raspberry
sudo make clean
sudo make -j4
heck the VCOM value on the FPC

Add the VCOM value as paramter and test the e-Paper, and this model is mode 0.
sudo ./epd -2.51 0
- Demo execution phenomenon:
1) First, the r-paper will refresh the 16 gray bars partially in sequence.
2) Then demonstrate the demo of drawing lines, circles, rectangles, characters, and numbers
3) Then respectively demonstrate the demo of displaying bmp pictures in 1bp, 2bp, and 4bp modes
4) Next, demonstrate the effect of fast refresh in A2 mode
5) Then display a gif animation
6) Then demonstrate a Demo that counts the frame rate
7) Finally, the e-paper is whitened in Init mode for long-term storage.
Working with STM32
Because IT8951 will cost big size of RAM, some of STM32 cannot support without external SDRAM device. So we here use Open429I as test board, Open429I integrates IS42S16400J (64-MBIT) SDRAM,has full memory to drive the 9.7inch e-paper.
Working with STM32, you can use SPI, I80 or I2C interface. SPI is simple and need a few of GPIO, its speed can also meet the requirement of most applications. I80 is also simple and fast, however, it need to use lots of GPIO. I2C is every slow, which we don't recommend.
SPI
1) Hardware connection
| IT8951 | STM32 | Description |
|---|---|---|
| 5V | 5V | 5V Power input |
| GND | GND | Ground |
| MISO | PE13 | Data output |
| MOSI | PE14 | Data input |
| SCK | PE12 | Clock input |
| CS | PE11 | Chip select (Low active) |
| RST | PC5 | Reset (Low for reset) |
| HRDY | PA7 | BUSY state output (Low for busy) |
2) Set the switch to SPI mode
3) Download demo code to refresh picture
You can download the demo code here
Open the project with keil :Open429I-C-IT8951-Demo\Project\9.7-IT8951\MDK-ARM\Project.uvproj
Compile it, then open IT8951.h, check if SPI mode is enabled. Compile it again and download to your board. After downloading, the

The information will be printed as below (115200, 8N1)

I80
1) Hardware connection
| IT8951 | STM32 | Description |
|---|---|---|
| Vcc | 5V | 5V Power input |
| GND | GND | Ground |
| DBUS0~DBUS15 | PB0~PB15 | Data pins |
| HWE | PC1 | Write enable (Low active) |
| D/C | PC7 | Data/Command (Low for command) |
| CSEL | PC6 | Chip select (Low active) |
| HRD | PC3 | Read eenable (Low for active) |
| RST | PC0 | Reset (Low for reset) |
| BUSY | PA7 | Busy state output (Low for busy) |
2) Set the switch to I80 mode

3) Display with demo code
You can download the demo code here
Open project and change set the interface to I80.

Display pictures
For easy porting our demo code, we display picture with data matrix instead of file system.
We should first convert BMP picture to data matrix (arrays), and use it in demo code.
1) Prepare a BMP image, resize the picture to 1200*825 (the resolution of this e-Paper)
2) Open BMP convert software, Click File->Open..-> to open the picture as below:

3) Click Image -> Convert to ->Gray256(8 BPP)

4) Click File ->Save As... ->Choose "C" bitmap file (*.c) -> input file name and click Save.
5) Choose 8 bit per pixel, click OK. A C file will be saved to your PC

6) Add the C file to keil project, detect unusable information
/*********************************************************************
*                SEGGER Microcontroller GmbH & Co. KG                *
*        Solutions for real time microcontroller applications        *
*                           www.segger.com                           *
**********************************************************************
*                                                                    *
* C-file generated by                                                *
*                                                                    *
*        Bitmap Converter for emWin V5.22.                           *
*        Compiled Jul  4 2013, 12:18:24                              *
*        (c) 1998 - 2013 Segger Microcontroller GmbH && Co. KG       *
*                                                                    *
**********************************************************************
*                                                                    *
* Source file: zoo                                                   *
* Dimensions:  1200 * 825                                            *
* NumColors:   256                                                   *
*                                                                    *
**********************************************************************
*/

#include <stdlib.h>

#include "GUI.h"

#ifndef GUI_CONST_STORAGE
  #define GUI_CONST_STORAGE const
#endif

extern GUI_CONST_STORAGE GUI_BITMAP bmzoo;

/*********************************************************************
*
*       Palette
*
*  Description
*    The following are the entries of the palette table.
*    The entries are stored as a 32-bit values of which 24 bits are
*    actually used according to the following bit mask: 0xBBGGRR
*
*    The lower   8 bits represent the Red   component.
*    The middle  8 bits represent the Green component.
*    The highest 8 bits represent the Blue  component.
*/
static GUI_CONST_STORAGE GUI_COLOR _Colorszoo[] = {
  0x000000, 0x010101, 0x020202, 0x030303,
  0x040404, 0x050505, 0x060606, 0x070707,
  0x080808, 0x090909, 0x0A0A0A, 0x0B0B0B,
  0x0C0C0C, 0x0D0D0D, 0x0E0E0E, 0x0F0F0F,
  0x101010, 0x111111, 0x121212, 0x131313,
  0x141414, 0x151515, 0x161616, 0x171717,
  0x181818, 0x191919, 0x1A1A1A, 0x1B1B1B,
  0x1C1C1C, 0x1D1D1D, 0x1E1E1E, 0x1F1F1F,
  0x202020, 0x212121, 0x222222, 0x232323,
  0x242424, 0x252525, 0x262626, 0x272727,
  0x282828, 0x292929, 0x2A2A2A, 0x2B2B2B,
  0x2C2C2C, 0x2D2D2D, 0x2E2E2E, 0x2F2F2F,
  0x303030, 0x313131, 0x323232, 0x333333,
  0x343434, 0x353535, 0x363636, 0x373737,
  0x383838, 0x393939, 0x3A3A3A, 0x3B3B3B,
  0x3C3C3C, 0x3D3D3D, 0x3E3E3E, 0x3F3F3F,
  0x404040, 0x414141, 0x424242, 0x434343,
  0x444444, 0x454545, 0x464646, 0x474747,
  0x484848, 0x494949, 0x4A4A4A, 0x4B4B4B,
  0x4C4C4C, 0x4D4D4D, 0x4E4E4E, 0x4F4F4F,
  0x505050, 0x515151, 0x525252, 0x535353,
  0x545454, 0x555555, 0x565656, 0x575757,
  0x585858, 0x595959, 0x5A5A5A, 0x5B5B5B,
  0x5C5C5C, 0x5D5D5D, 0x5E5E5E, 0x5F5F5F,
  0x606060, 0x616161, 0x626262, 0x636363,
  0x646464, 0x656565, 0x666666, 0x676767,
  0x686868, 0x696969, 0x6A6A6A, 0x6B6B6B,
  0x6C6C6C, 0x6D6D6D, 0x6E6E6E, 0x6F6F6F,
  0x707070, 0x717171, 0x727272, 0x737373,
  0x747474, 0x757575, 0x767676, 0x777777,
  0x787878, 0x797979, 0x7A7A7A, 0x7B7B7B,
  0x7C7C7C, 0x7D7D7D, 0x7E7E7E, 0x7F7F7F,
  0x808080, 0x818181, 0x828282, 0x838383,
  0x848484, 0x858585, 0x868686, 0x878787,
  0x888888, 0x898989, 0x8A8A8A, 0x8B8B8B,
  0x8C8C8C, 0x8D8D8D, 0x8E8E8E, 0x8F8F8F,
  0x909090, 0x919191, 0x929292, 0x939393,
  0x949494, 0x959595, 0x969696, 0x979797,
  0x989898, 0x999999, 0x9A9A9A, 0x9B9B9B,
  0x9C9C9C, 0x9D9D9D, 0x9E9E9E, 0x9F9F9F,
  0xA0A0A0, 0xA1A1A1, 0xA2A2A2, 0xA3A3A3,
  0xA4A4A4, 0xA5A5A5, 0xA6A6A6, 0xA7A7A7,
  0xA8A8A8, 0xA9A9A9, 0xAAAAAA, 0xABABAB,
  0xACACAC, 0xADADAD, 0xAEAEAE, 0xAFAFAF,
  0xB0B0B0, 0xB1B1B1, 0xB2B2B2, 0xB3B3B3,
  0xB4B4B4, 0xB5B5B5, 0xB6B6B6, 0xB7B7B7,
  0xB8B8B8, 0xB9B9B9, 0xBABABA, 0xBBBBBB,
  0xBCBCBC, 0xBDBDBD, 0xBEBEBE, 0xBFBFBF,
  0xC0C0C0, 0xC1C1C1, 0xC2C2C2, 0xC3C3C3,
  0xC4C4C4, 0xC5C5C5, 0xC6C6C6, 0xC7C7C7,
  0xC8C8C8, 0xC9C9C9, 0xCACACA, 0xCBCBCB,
  0xCCCCCC, 0xCDCDCD, 0xCECECE, 0xCFCFCF,
  0xD0D0D0, 0xD1D1D1, 0xD2D2D2, 0xD3D3D3,
  0xD4D4D4, 0xD5D5D5, 0xD6D6D6, 0xD7D7D7,
  0xD8D8D8, 0xD9D9D9, 0xDADADA, 0xDBDBDB,
  0xDCDCDC, 0xDDDDDD, 0xDEDEDE, 0xDFDFDF,
  0xE0E0E0, 0xE1E1E1, 0xE2E2E2, 0xE3E3E3,
  0xE4E4E4, 0xE5E5E5, 0xE6E6E6, 0xE7E7E7,
  0xE8E8E8, 0xE9E9E9, 0xEAEAEA, 0xEBEBEB,
  0xECECEC, 0xEDEDED, 0xEEEEEE, 0xEFEFEF,
  0xF0F0F0, 0xF1F1F1, 0xF2F2F2, 0xF3F3F3,
  0xF4F4F4, 0xF5F5F5, 0xF6F6F6, 0xF7F7F7,
  0xF8F8F8, 0xF9F9F9, 0xFAFAFA, 0xFBFBFB,
  0xFCFCFC, 0xFDFDFD, 0xFEFEFE, 0xFFFFFF
};

static GUI_CONST_STORAGE GUI_LOGPALETTE _Palzoo = {
  256,  // Number of entries
  0,    // No transparency
  &_Colorszoo[0]
};

GUI_CONST_STORAGE GUI_BITMAP bmzoo = {
  1200, // xSize
  825, // ySize
  1200, // BytesPerLine
  8, // BitsPerPixel
  _aczoo,  // Pointer to picture data (indices)
  &_Palzoo   // Pointer to palette
};
7) Modify the codes
static GUI_CONST_STORAGE unsigned char _aczoo[] = {
to this one. (You can change the name of the array to every one you like)
const unsigned char zoo_1200_825[] = {
8) Modify related codes in IT8951.C as below
extern const unsigned char zoo_1200_825[];
void IT8951DisplayExample3()
{
	IT8951LdImgInfo stLdImgInfo;
	IT8951AreaImgInfo stAreaImgInfo;
	TWord width = gstI80DevInfo.usPanelW;
	TWord high = gstI80DevInfo.usPanelH;
	TDWord i;

	for (i = 0;i < width*high;i++)
	{
		gpFrameBuf[i] = zoo_1200_825[i];
	}

	IT8951WaitForDisplayReady();

	//Setting Load image information
	stLdImgInfo.ulStartFBAddr    = (TDWord)gpFrameBuf;
	stLdImgInfo.usEndianType     = IT8951_LDIMG_L_ENDIAN;
	stLdImgInfo.usPixelFormat    = IT8951_8BPP;
	stLdImgInfo.usRotate         = IT8951_ROTATE_0;
	stLdImgInfo.ulImgBufBaseAddr = gulImgBufAddr;
	//Set Load Area
	stAreaImgInfo.usX      = 0;
	stAreaImgInfo.usY      = 0;
	stAreaImgInfo.usWidth  = width;
	stAreaImgInfo.usHeight = high;

	IT8951HostAreaPackedPixelWrite(&stLdImgInfo, &stAreaImgInfo);//Display function 2
	IT8951DisplayArea(0,0, gstI80DevInfo.usPanelW, gstI80DevInfo.usPanelH, 2);
}
Resources
Schematic
Demo code
Datasheet
Software
Related Resources
Notice:
The projects listed are all made and shared by the project owners, Waveshare isn't responsible for project either the update.
- This is a post in Arduino Form about our SPI e-Paper thanks to ZinggJM, maybe you want to refer to.
- This is the Inkycal project for reference.
FAQ

{{{5}}}
2. Try changing the USB interface. It is recommended to use the USB interface on the back of the PC. Relatively speaking, the power supply current will be larger.
3. Turn the DIP switch to the end. During shipping, the DIP switches may be loosened, and the floating configuration pins cannot put the IT8951 into USB mode.
{{{5}}}

If you fail to refresh, check whether the hard link is normal, use the USB port on the back of the PC (most of the USB ports on the front of the PC have weak power supply capability), and replace the e-paper test.
Note: Do not plug and unplug the e-paper with power on, otherwise the driver board and e-paper may be damaged.
{{{5}}}
Supports
Support
If you require technical support, please go to the Support page and open a ticket.