
Difference between revisions of "7inch LCD for Pi"
From Waveshare Wiki
| Line 65: | Line 65: | ||
== Support == | == Support == | ||
{{Service00}} | {{Service00}} | ||
| + | |||
| + | [[Category:OLEDs / LCDs|OLEDs / LCDs]] [[Category:LCD|LCD]] [[Category:Raspberry Pi|Raspberry Pi]] [[Category:Raspberry Pi LCD|Raspberry Pi LCD]] | ||
Revision as of 09:01, 28 September 2017
| ||

Introduction
1024x600, 7inch IPS Display for Raspberry Pi, DPI interface, no Touch
| More |
Features
- 1024x600 high resolution
- Compatible with Raspberry Pi 2B/3B/Zero/Zero W
- The TFT LCD is directly driven by Raspberry Pi DPI interface, refresh rate up to 60Hz
- Supports Raspbian, Ubuntu, OSMC, etc.
- Back light control to lower power consumption
- Compact size, suit for various projects
How to use
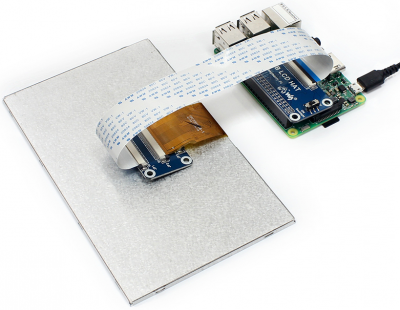
Hardware connection
- 1. Connect the RGB LCD HAT to the JP1 socket on RGB 50P TO 40/50P adapter with an FFC cable (white).
- 2. Connect the FPC cable (golden) on LCD to the JP2 socket on RGB 50P TO 40/50P adapter.
- Note: please first unlock the ZIF connector then gently remove/insert the cable. As shown below


Software settings
- 1. Write the Raspbian, Ubuntu Mate, or OSMC system image to your micro SD card. You can download the images from Raspberry Pi web site https://www.raspberrypi.org/downloads/
- 2. Edit the /boot/config.txt file in the SD card and append the following lines:
dtoverlay=dpi24
enable_dpi_lcd=1
display_default_lcd=1
dpi_group=2
dpi_mode=87
dpi_output_format=0x6f005
hdmi_cvt 1024 600 60 6 0 0 0
- Note:
- You must make sure that there are no spaces on either side of the equal sign.
- If your system is installed from NOOBS, you have to connect your Pi to another monitor and hold down the shift key while system booting to edit the config file.
- 3. Save the file and insert the SD card into your Pi.
- 4. Turn on the backlight switch.
- 5. Power up and the LCD will display in most cases.
- Note: RGB LCD HAT is designed for many LCD types, and the VCOM voltage can be changed by fine tuning the VCOM adjustable resistor to get a proper image. Each LCD may have a slightly different VCOM voltage, in some cases, you have to adjust it to get a better image. Working outside of the range of VCOM voltage for a long time may lead to LCD damage. So please don't make the LCD work in an abnormal status more than 10 secs while adjusting the resistor.

Resources
Documentation
Software
General Tutorial Series
Support
Support
If you require technical support, please go to the Support page and open a ticket.