
Difference between revisions of "7inch LCD for Pi"
From Waveshare Wiki
| (8 intermediate revisions by the same user not shown) | |||
| Line 6: | Line 6: | ||
|brand=Waveshare | |brand=Waveshare | ||
|{{#urlget:amazon|default}}=display | |{{#urlget:amazon|default}}=display | ||
| − | |website_cn=[ | + | |website_cn=[https://www.waveshare.com/7inch-lcd-for-pi.htm 7inch DPI LCD] |
| − | |website_en=[ | + | |website_en=[https://www.waveshare.net/shop/7inch-LCD-for-Pi.htm 7inch DPI LCD] |
|interface1=RPi I/Os | |interface1=RPi I/Os | ||
|interface2=DPI | |interface2=DPI | ||
| Line 13: | Line 13: | ||
{{Product List|Mini PC/Raspberry Pi/Displays}} | {{Product List|Mini PC/Raspberry Pi/Displays}} | ||
}} | }} | ||
| − | == Introduction == | + | == '''Introduction''' == |
| − | 1024x600, 7inch IPS Display for Raspberry Pi, DPI interface, no Touch | + | 1024x600, 7inch IPS Display for Raspberry Pi, DPI interface, no Touch. |
{{Amazon|{{#urlget:amazon|default}}=display | {{Amazon|{{#urlget:amazon|default}}=display | ||
|More = [http://www.waveshare.com/7inch-lcd-for-pi.htm More]}} | |More = [http://www.waveshare.com/7inch-lcd-for-pi.htm More]}} | ||
| − | == Features == | + | |
| − | * 1024x600 high resolution | + | == '''Features'''== |
| − | * Compatible with Raspberry Pi 2B/3B/Zero/Zero W | + | * 1024x600 high resolution. |
| − | * The TFT LCD is directly driven by Raspberry Pi DPI interface, refresh rate up to 60Hz | + | * Compatible with Raspberry Pi 2B/3B/Zero/Zero W. |
| + | * The TFT LCD is directly driven by Raspberry Pi DPI interface, refresh rate up to 60Hz. | ||
* Supports Raspbian, Ubuntu, OSMC, etc. | * Supports Raspbian, Ubuntu, OSMC, etc. | ||
| − | * | + | * Backlight control to lower power consumption. |
| − | * Compact size, suit for various projects | + | * Compact size, suit for various projects. |
| − | == | + | |
| + | == '''Working with Raspberry Pi''' == | ||
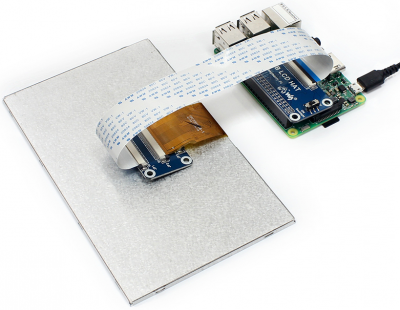
=== Hardware connection === | === Hardware connection === | ||
* 1. Connect the RGB LCD HAT to the JP1 socket on RGB 50P TO 40/50P adapter with an FFC cable (white). | * 1. Connect the RGB LCD HAT to the JP1 socket on RGB 50P TO 40/50P adapter with an FFC cable (white). | ||
| Line 74: | Line 76: | ||
: [[File:7inch-lcd-for-pi-manual02.png]] | : [[File:7inch-lcd-for-pi-manual02.png]] | ||
| − | == Resources == | + | == '''Resources''' == |
=== Documentation === | === Documentation === | ||
* [[:File:RGB-LCD-HAT-Schematic.pdf|RGB LCD HAT Schematic]] | * [[:File:RGB-LCD-HAT-Schematic.pdf|RGB LCD HAT Schematic]] | ||
| Line 86: | Line 88: | ||
=== General Tutorial Series === | === General Tutorial Series === | ||
* [[Raspberry Pi Tutorial Series]] | * [[Raspberry Pi Tutorial Series]] | ||
| − | == Support == | + | |
| − | {{ | + | == '''Support''' == |
| + | {{Service02}} | ||
[[Category:OLEDs / LCDs|OLEDs / LCDs]] [[Category:LCD|LCD]] [[Category:Raspberry Pi|Raspberry Pi]] [[Category:Raspberry Pi LCD|Raspberry Pi LCD]] | [[Category:OLEDs / LCDs|OLEDs / LCDs]] [[Category:LCD|LCD]] [[Category:Raspberry Pi|Raspberry Pi]] [[Category:Raspberry Pi LCD|Raspberry Pi LCD]] | ||
Revision as of 02:16, 28 July 2020
| ||

Introduction
1024x600, 7inch IPS Display for Raspberry Pi, DPI interface, no Touch.
| More |
Features
- 1024x600 high resolution.
- Compatible with Raspberry Pi 2B/3B/Zero/Zero W.
- The TFT LCD is directly driven by Raspberry Pi DPI interface, refresh rate up to 60Hz.
- Supports Raspbian, Ubuntu, OSMC, etc.
- Backlight control to lower power consumption.
- Compact size, suit for various projects.
Working with Raspberry Pi
Hardware connection
- 1. Connect the RGB LCD HAT to the JP1 socket on RGB 50P TO 40/50P adapter with an FFC cable (white).
- 2. Connect the FPC cable (golden) on LCD to the JP2 socket on RGB 50P TO 40/50P adapter.
- Note: please first unlock the ZIF connector then gently remove/insert the cable. As shown below


Software settings
- 1. Write the Raspbian, Ubuntu Mate, or OSMC system image to your micro SD card. You can download the images from Raspberry Pi web site https://www.raspberrypi.org/downloads/
- 2. Edit the /boot/config.txt file in the SD card and append the following lines:
- For Raspberry Pi 2B/3B/3B+/Zero/Zero W
dtoverlay=dpi24
enable_dpi_lcd=1
display_default_lcd=1
dpi_group=2
dpi_mode=87
dpi_output_format=0x6f005
hdmi_cvt 1024 600 60 6 0 0 0
- For Raspberry Pi 4 B, you need to add lines between [pi4] and [all], and remove line dtoverlay=vc4-fkms-V3D from config.txt file as below
[pi4]
# Enable DRM VC4 V3D driver on top of the dispmanx display stack
#dtoverlay=vc4-fkms-v3d
max_framebuffers=2
dpi_timings=1024 0 0 0 88 600 0 0 0 0 0 0 0 60 0 26000000 6

[all]
#dtoverlay=vc4-fkms-v3d
dtoverlay=dpi24
enable_dpi_lcd=1
display_default_lcd=1
dpi_group=2
dpi_mode=87
dpi_output_format=0x6f005
hdmi_cvt 1024 600 60 6 0 0 0
disable_overscan=1
- Note:
- You must make sure that there are no spaces on either side of the equal sign.
- If your system is installed from NOOBS, you have to connect your Pi to another monitor and hold down the shift key while system booting to edit the config file.
- 3. Save the file and insert the SD card into your Pi.
- 4. Turn on the backlight switch.
- 5. Power up and the LCD will display in most cases.
- Note: RGB LCD HAT is designed for many LCD types, and the VCOM voltage can be changed by fine tuning the VCOM adjustable resistor to get a proper image. Each LCD may have a slightly different VCOM voltage, in some cases, you have to adjust it to get a better image. Working outside of the range of VCOM voltage for a long time may lead to LCD damage. So please don't make the LCD work in an abnormal status more than 10 secs while adjusting the resistor.
