
Difference between revisions of "10.3inch e-Paper HAT"
| (77 intermediate revisions by 4 users not shown) | |||
| Line 1: | Line 1: | ||
| − | <div class=" | + | <div class="wiki-pages jet-green-color"> |
| − | |||
{{Infobox item | {{Infobox item | ||
| − | | | + | |name=10.3inch e-Paper |
| − | | | + | |name2=10.3inch e-Paper HAT |
| + | |name3=10.3inch e-Paper HAT (G) | ||
| + | |name4=10.3inch e-Paper (G) | ||
| + | |img=[[File:10.3inch-e-Paper-1.jpg|300px|{{Amazon_nolink|default={{#ifeq: {{#urlget:amazon|0}}|{{#urlget:Amazon|0}}| default|}}|url=link=https://www.waveshare.com/10.3inch-e-paper.htm}}]] | ||
| + | |img2=[[File:10.3inch-e-Paper-HAT-1.jpg|300px|{{Amazon_nolink|default={{#ifeq: {{#urlget:amazon|0}}|{{#urlget:Amazon|0}}| default|}}|url=link=https://www.waveshare.com/10.3inch-e-paper-hat.htm}}]] | ||
| + | |img3=[[File:10.3-E-Paper Display (G).jpg|300px|{{Amazon_nolink|default={{#ifeq: {{#urlget:amazon|0}}|{{#urlget:Amazon|0}}| default|}}|url=link=https://www.waveshare.com/10.3inch-e-paper-hat-g.htm?sku=26936}}]] | ||
| + | |img4=[[File:10.3inch e-Paper (G).jpg|300px|{{Amazon_nolink|default={{#ifeq: {{#urlget:amazon|0}}|{{#urlget:Amazon|0}}| default|}}|url=link=https://www.waveshare.com/10.3inch-e-paper-hat-g.htm?sku=26935}}]] | ||
| + | |caption4=10.3inch e-Paper Display, 1872 × 1404, Black / White, 16 Grey Scales | ||
|category=[[:Category:OLEDs / LCDs|OLEDs / LCDs]], [[:Category:LCD|LCD]], [[:Category:Display|e-Paper]] | |category=[[:Category:OLEDs / LCDs|OLEDs / LCDs]], [[:Category:LCD|LCD]], [[:Category:Display|e-Paper]] | ||
|brand=Waveshare | |brand=Waveshare | ||
| Line 15: | Line 21: | ||
{{Product List|OLEDs / LCDs/e-Paper}} | {{Product List|OLEDs / LCDs/e-Paper}} | ||
}} | }} | ||
| − | + | =Introduction= | |
| − | |||
| − | |||
| − | |||
| − | |||
| − | |||
| − | |||
*10.3inch EPD (Electronic Paper Display) HAT for Raspberry Pi, 1872 x 1404 resolution, 16 gray scale, USB/SPI/I80/I2C interface | *10.3inch EPD (Electronic Paper Display) HAT for Raspberry Pi, 1872 x 1404 resolution, 16 gray scale, USB/SPI/I80/I2C interface | ||
| − | |||
*It has the advantages of low power consumption, wide viewing angle, and clear display under direct sunlight, and is often used in display applications such as shelf labels and industrial instruments. | *It has the advantages of low power consumption, wide viewing angle, and clear display under direct sunlight, and is often used in display applications such as shelf labels and industrial instruments. | ||
| − | + | *<font color=#FF0000>''' Note: As the screen of the 10.3-inch e-Paper is large, the glass panel and FPC are fragile. Hence, please be careful when using it for development. It is recommended to reinforce the FPC with scotch tape when developing. Please connect all the cables before powering the device, the device cannot support a hot plug.'''</font><br/> | |
| + | *There are two versions: raw panel and HAT. Driver board (IT8951) is required for the raw panel, if you are the first time buying this product, we recommend you choose the HAT version which comes with the driver board. | ||
{{Amazon|{{#ifeq: {{#urlget:amazon|0}}|{{#urlget:Amazon|0}}| default|}}=display | {{Amazon|{{#ifeq: {{#urlget:amazon|0}}|{{#urlget:Amazon|0}}| default|}}=display | ||
| − | |More = [http://www.waveshare.com/7.8inch-e-paper-hat.htm More]}} | + | |More = [http://www.waveshare.com/7.8inch-e-paper-hat.htm?amazon More]}} |
| − | + | ==Features== | |
| − | + | *No backlight, keeps displaying the latest content for a long time even when power is down. | |
| − | *No backlight, keeps displaying | + | *Low power consumption, basically power is only required for refreshing. |
| − | *Low power consumption, basically power is only required for refreshing | + | *Compatible with Raspberry Pi Zero/Zero W/Zero WH/2B/3B/3B+. |
| − | *Compatible with Raspberry Pi Zero/Zero W/Zero WH/2B/3B/3B+ | ||
*USB/SPI/I80/I2C interface, for connecting with host boards like Raspberry Pi/Nucleo, etc. | *USB/SPI/I80/I2C interface, for connecting with host boards like Raspberry Pi/Nucleo, etc. | ||
| − | *Comes with development resources and manual (examples for Raspberry Pi/STM32) | + | *Comes with online development resources and manual (examples for Raspberry Pi/STM32). |
==Specifications== | ==Specifications== | ||
*Operating voltage: 5V | *Operating voltage: 5V | ||
| − | *Interface: USB/SPI/I80 | + | *Interface: USB/SPI/I80 |
*Outline dimension: 216.70 × 174.40 × 0.78mm | *Outline dimension: 216.70 × 174.40 × 0.78mm | ||
*Display size: 209.66 × 157.25mm | *Display size: 209.66 × 157.25mm | ||
| Line 44: | Line 43: | ||
*Resolution: 1872 × 1404 | *Resolution: 1872 × 1404 | ||
*Display color: black, white | *Display color: black, white | ||
| − | * | + | *Grayscale: 2-16 (1-4 bit) |
| − | *Full refresh time: | + | *Full refresh time: <1s |
*Total refresh power: 1.2W(typ.) | *Total refresh power: 1.2W(typ.) | ||
*Total standby power: 0.1W(typ.) | *Total standby power: 0.1W(typ.) | ||
*Viewing angle: >170° | *Viewing angle: >170° | ||
| + | *Operation Temperature: 0 ~ 50 ℃ | ||
| + | *Storage Temperature: -25 ~ 70 ℃ | ||
| + | 【Note】:<br> | ||
| + | Refresh Time: The refresh time is based on experimental test data, and actual refresh time may vary. Actual performance should be considered. During the global refresh process, there may be flickering, which is a normal phenomenon.<br> | ||
| + | Refresh Power Consumption: Power consumption data is based on experimental test data. Actual power consumption may vary due to the presence of driver boards and different usage scenarios. Actual performance should be considered.<br> | ||
| + | Refreshing in low-temperature environments may result in color deviation. It is recommended to stabilize at 25℃ for 6 hours before refreshing. | ||
| + | |||
| + | ==Working principle== | ||
| + | This product is an E-paper device adopting the image display technology of Microencapsulated Electrophoretic Display, MED. The initial approach is to create tiny spheres, in which the charged color pigments are suspended in the transparent oil and would move depending on the electronic charge. The E-paper screen displays patterns by reflecting the ambient light, so it has no background light requirement. Under ambient light, the E-paper screen still has high visibility with a wide viewing angle of 180 degrees. It is the ideal choice for E-reading. ('''Note that the e-Paper cannot support updating directly under sunlight.''') | ||
| − | + | = How to use = | |
| − | + | ==Working with Windows PC== | |
| − | + | *Step 1: Connect the display to IT8951 driver board as below: | |
| − | |||
| − | |||
| − | |||
| − | *Connect display to IT8951 driver board as below | ||
[[File:10.3inch e-Paper 3.jpg|500px]] | [[File:10.3inch e-Paper 3.jpg|500px]] | ||
| − | *Connect USB interface of IT8951 driver board to PC | + | *Step 2: Connect the USB interface of the IT8951 driver board to the PC. |
| − | : | + | *Step 3: Download and open [[#Software|E-LINK-TCON-DEMO]] software. |
| − | + | *Step 4: Click Connect below: | |
| − | *Click | ||
[[File:10.3inch-e-Paper-HAT-D-Manual-02.jpg|500px]] | [[File:10.3inch-e-Paper-HAT-D-Manual-02.jpg|500px]] | ||
| − | *Check option "AutoSet", then click "Open File" to open one picture for display. | + | *Step 5.2: Check option "EnMirror", as shown below: |
| + | [[File:10.3inch-e-Paper-HAT-D-Manual21.jpg|500px]] | ||
| + | *Check option "AutoSet", then click "Open File" to open one picture for display. The browse diagram will be opened, and you should click "OK". | ||
[[File:10.3inch-e-Paper-HAT-D-Manual-03.jpg|500px]] | [[File:10.3inch-e-Paper-HAT-D-Manual-03.jpg|500px]] | ||
| − | *Click "display" to refresh the picture | + | *Click "display" to refresh the picture. |
| − | [[File:10.3inch-e-Paper-HAT-D-Manual-04.jpg|500px]] | + | [[File:10.3inch-e-Paper-HAT-D-Manual-04.jpg|500px]]<br/> |
| + | <font color="#FF0000"> | ||
| + | Note: If you want to use the USB interface to develop the e-Paper on Windows, you need to contact the Waveshare team and sign the NDA before you can get the E-LINK-TCON-DEMO source code.<br/></font> | ||
| + | <font color="#FF0000">Note: Currently not available for individual users.</font> | ||
| − | + | ==Working with Raspberry Pi== | |
| − | * | + | * Step 1: Insert IT8951 driver board to GPIO of Raspberry Pi, Connect e-Paper to the driver board. You can also connect by wires. |
| − | :Insert IT8951 driver board to GPIO of Raspberry Pi, Connect e-Paper to driver board | + | [[File:10.3inch e-Paper 4.jpg]]<br> |
| − | |||
| − | |||
{|border="1" width="700px" | {|border="1" width="700px" | ||
|+Connect to Raspberry Pi via SPI | |+Connect to Raspberry Pi via SPI | ||
|-align="center" style="background:green;color:white;" | |-align="center" style="background:green;color:white;" | ||
| − | |'''IT8951 Driver HAT'''|| '''Raspberry Pi (BCM)'''||'''Description | + | |'''IT8951 Driver HAT'''|| '''Raspberry Pi (BCM)'''||'''Description''' |
|-align="center" | |-align="center" | ||
|5V||5V||5V power input | |5V||5V||5V power input | ||
| Line 92: | Line 98: | ||
|RST||P17||Reset pin (Low active) | |RST||P17||Reset pin (Low active) | ||
|-align="center" | |-align="center" | ||
| − | |HRDY||P24||Busy | + | |HRDY||P24||Busy status pin (Low when busy) |
|} | |} | ||
| + | *Step 2: Make sure you have switched to SPI mode. | ||
| + | [[File:10.3inch e-Paper 5.jpg]] | ||
| − | * | + | *Step 3: Install the C function library, open the Raspberry Pi terminal, and execute the following codes: |
| − | + | 1. Install bcm2835 libraries (Recommended for Pi4 (faster)) | |
| − | |||
| − | : | ||
| − | |||
<pre> | <pre> | ||
wget http://www.airspayce.com/mikem/bcm2835/bcm2835-1.60.tar.gz | wget http://www.airspayce.com/mikem/bcm2835/bcm2835-1.60.tar.gz | ||
| − | tar zxvf bcm2835-1.60.tar.gz | + | tar zxvf bcm2835-1.60.tar.gz |
| − | cd bcm2835-1.60 | + | cd bcm2835-1.60 |
./configure | ./configure | ||
make | make | ||
sudo make check | sudo make check | ||
sudo make install | sudo make install | ||
| + | #For more details, you can refer to http://www.airspayce.com/mikem/bcm2835/ | ||
| + | </pre> | ||
| + | 2. Install lg library (Recommended for Pi5, BCM library currently does not support Pi5): | ||
| + | <pre> | ||
| + | #Open the Raspberry Pi terminal and run the following commands: | ||
| + | wget https://github.com/joan2937/lg/archive/master.zip | ||
| + | unzip master.zip | ||
| + | cd lg-master | ||
| + | make | ||
| + | sudo make install | ||
| + | # For more details, you can refer to: https://github.com/gpiozero/lg | ||
</pre> | </pre> | ||
| − | *Enable SPI | + | 3. Install gpiod library (optional): |
| − | + | <pre> | |
| + | #Open the Raspberry Pi terminal and run the following commands: | ||
| + | sudo apt-get update | ||
| + | sudo apt install gpiod libgpiod-dev | ||
| + | </pre> | ||
| + | *Step 4: Enable SPI interface | ||
| + | The Raspberry Pi adopts SPI driver IT8951 for driving the e-Paper, hence, you need to open the SPI first:<br> | ||
| + | Open the terminal command line and input: | ||
<pre> | <pre> | ||
sudo raspi-config | sudo raspi-config | ||
</pre> | </pre> | ||
| − | + | Choose Interfacing Options -> P4 -> SPI -> Yes.<br> | |
| − | + | [[File: 7.8inch e-Paper HAT RPI01.png]]<br> | |
| + | If you use lg or gpiod library, you need to execute the following commands: | ||
| + | <pre> | ||
| + | # Input the commands: | ||
| + | sudo nano /boot/config.txt | ||
| + | # Command out dtparam=spi=on and add | ||
| + | dtoverlay=spi0-0cs | ||
| + | </pre> | ||
| + | [[File: e-Paper lg.jpg]]<br> | ||
| + | Input " sudo reboot " to reboot the Raspberry Pi to activate the configuration. | ||
| + | *Step 5: Download demo codes and compile them. | ||
| + | Method 1: Download from our website. (Recommended) | ||
| + | <pre> | ||
| + | sudo apt-get install p7zip-full | ||
| + | sudo wget https://files.waveshare.com/upload/8/80/IT8951_20200319_Release.7z | ||
| + | 7z x IT8951_20200319_Release.7z -O./IT8951 | ||
| + | cd IT8951/ | ||
| + | sudo make clean | ||
| + | sudo make -j4 | ||
| + | # The BCM library is used by default, if you want to use other libraries, please change them in the Makefile or use the following commands: | ||
| + | make -j4 LIB=LGPIO # for using lg library | ||
| + | make -j4 LIB=GPIOD # for using gpiod library | ||
| + | </pre> | ||
| + | Method 2: Download from GitHub: | ||
<pre> | <pre> | ||
git clone https://github.com/waveshare/IT8951-ePaper.git | git clone https://github.com/waveshare/IT8951-ePaper.git | ||
| Line 121: | Line 167: | ||
sudo make clean | sudo make clean | ||
sudo make -j4 | sudo make -j4 | ||
| + | # The BCM library is used by default, if you want to use other libraries, please change them in the Makefile or use the following commands: | ||
| + | make -j4 LIB=LGPIO # for using lg library | ||
| + | make -j4 LIB=GPIOD # for using gpiod library | ||
</pre> | </pre> | ||
| − | *Check the VCOM value on the FPC | + | *Check the VCOM value on the FPC. |
:[[File:6inch-HD-e-Paper-HAT-Manual-06.png |500px]] | :[[File:6inch-HD-e-Paper-HAT-Manual-06.png |500px]] | ||
| − | + | Add the VCOM value as a parameter and test the e-Paper, and this model is mode 1. | |
<pre> | <pre> | ||
sudo ./epd -1.50 1 | sudo ./epd -1.50 1 | ||
</pre> | </pre> | ||
| − | + | * Demo execution phenomenon: | |
| − | + | 1) First, the e-paper will refresh the 16 gray bars partially in sequence. | |
| + | |||
| + | 2) Then demonstrate the demo of drawing lines, circles, rectangles, characters, and numbers. | ||
| + | |||
| + | 3) Then respectively demonstrate the demo of displaying BMP pictures in 1bp, 2bp, and 4bp modes. | ||
| + | |||
| + | 4) Next, demonstrate the effect of fast refresh in A2 mode. | ||
| + | |||
| + | 5) Then display a gif animation. | ||
| + | |||
| + | 6) Then demonstrate a Demo that counts the frame rate. | ||
| + | |||
| + | 7) Finally, the e-paper is whitened in Init mode for long-term storage. | ||
| + | |||
| − | Working with STM32, | + | =Working with STM32= |
| + | '''Driver interface selection''' | ||
| + | * Drive by SPI mode (recommended), the advantage is that it occupies fewer pins, the drive mode is simple, and the communication speed can meet the needs of most scenarios. | ||
| + | * Adopt 180 mode drive (I80 interface is only considered when the SPI interface communication speed does not meet the application requirements), the advantage is that the drive mode is relatively simple, and the communication speed is very fast, but it occupies a lot of pins. | ||
| + | * Adopt an I2C driver (not recommended, the communication speed is very slow). | ||
| − | + | ''' Driver board selection'''<br> | |
| − | ---- | + | Since IT8951 needs to occupy a relatively large RAM space, the general STM32 single-chip microcomputer can not directly satisfy it, and additional chips such as SDRAM are required for RAM expansion. For the test here, we use [https://www.waveshare.com/open429i-c-standard.htm Open429I] as the test board, and its onboard IS42S16400J (64-MBIT) SDRAM can fully meet the requirements of driving 10.3inch e- paper HAT. |
| + | ==SPI== | ||
1) Hardware connection | 1) Hardware connection | ||
{|border=1 width=500px | {|border=1 width=500px | ||
| Line 159: | Line 226: | ||
|HRDY||PA7||BUSY state output (Low for busy) | |HRDY||PA7||BUSY state output (Low for busy) | ||
|} | |} | ||
| − | + | [[File:10.3inch e-Paper 5.jpg|thumb|right]] | |
2) Set the DIP switch to SPI mode | 2) Set the DIP switch to SPI mode | ||
| − | |||
| − | |||
| − | |||
3) Download demo code and test | 3) Download demo code and test | ||
| − | You can download the [https:// | + | You can download the [https://files.waveshare.com/upload/d/da/Open429I-C-6-IT8951-Demo.7z Demo code] |
| − | Open the project with | + | Open the project with Keil: Open429I-C-6-IT8951-Demo\Project\6-IT8951\MDK-ARM\Project.uvproj |
| − | Compile it, then open IT8951.h, check if SPI mode is enabled. Compile it again and download to your board. | + | Compile it, then open IT8951.h, and check if SPI mode is enabled. Compile it again and download it to your board. |
[[File:9.7inch-e-Paper-HAT-Manual-15.jpg]] | [[File:9.7inch-e-Paper-HAT-Manual-15.jpg]] | ||
| Line 178: | Line 242: | ||
[[File:10.3inch-e-Paper-HAT-D-Manual-09.jpg|200px]] | [[File:10.3inch-e-Paper-HAT-D-Manual-09.jpg|200px]] | ||
| − | + | ==I80== | |
| − | |||
| − | 1) Hardware connection | + | 1) Hardware connection: |
{|border=1 width=500px | {|border=1 width=500px | ||
| Line 206: | Line 269: | ||
|BUSY||PA7||Busy state output (Low for busy) | |BUSY||PA7||Busy state output (Low for busy) | ||
|} | |} | ||
| + | [[File:10.3inch e-Paper 6.png|thumb|right]] | ||
| + | 2) Set the DIP switch to I80 mode. | ||
| − | + | 3) Display with demo code. | |
| − | [ | + | You can download the [https://files.waveshare.com/upload/d/da/Open429I-C-6-IT8951-Demo.7z Demo code]. |
| − | + | Open the project with Keil: Open429I-C-6-IT8951-Demo\Project\6-IT8951\MDK-ARM\Project.uvproj | |
| − | + | Compile it, then open IT8951.h, and check if I80 mode is enabled. Compile it again and download it to your board. | |
| − | |||
| − | |||
| − | |||
| − | Compile it, then open IT8951.h, check if I80 mode is enabled. Compile it again and download to your board. | ||
[[File:9.7inch-e-Paper-HAT-Manual-18.jpg]] | [[File:9.7inch-e-Paper-HAT-Manual-18.jpg]] | ||
| − | Information | + | Information is printed to the serial port as below (115200, 8N1). |
[[File:10.3inch-e-Paper-HAT-D-Manual-10.jpg|200px]] | [[File:10.3inch-e-Paper-HAT-D-Manual-10.jpg|200px]] | ||
| − | + | ==Display pictures== | |
| − | For | + | For porting the demo easily, we display pictures with a data matrix instead of the file system. |
| − | We should first convert BMP picture to data matrix (arrays), and use it in demo code. | + | We should first convert the BMP picture to a data matrix (arrays), and use it in the demo code. |
| − | 1) Prepare a BMP image, resize the picture to 800*600 | + | 1) Prepare a BMP image, and resize the picture to 800*600. |
| − | 2) Open [ | + | 2) Open [https://files.waveshare.com/upload/b/b3/BmpCvt.zip BMP convert software], Click File->Open..-> to open the picture as below: |
[[File:10.3inch-e-Paper-HAT-D-Manual-11.jpg|600px]] | [[File:10.3inch-e-Paper-HAT-D-Manual-11.jpg|600px]] | ||
| − | 3) Click Image -> Convert to ->Gray256(8 BPP) | + | 3) Click Image -> Convert to -> Gray256(8 BPP). |
[[File:10.3inch-e-Paper-HAT-D-Manual-12.jpg|600px]] | [[File:10.3inch-e-Paper-HAT-D-Manual-12.jpg|600px]] | ||
| − | 4) Click File ->Save As... ->Choose "C" bitmap file (*.c) -> input file name and click Save. | + | 4) Click File -> Save As... -> Choose "C" bitmap file (*.c) -> input file name and click Save. |
| − | 5) Choose 8 | + | 5) Choose 8 bits per pixel, and click OK. A-C file will be saved to your PC. |
[[File:9.7inch-e-Paper-HAT-Manual-21.jpg]] | [[File:9.7inch-e-Paper-HAT-Manual-21.jpg]] | ||
| − | 6) Add the C file to | + | 6) Add the C file to the Keil project, and select unusable information. |
<source lang="c"> | <source lang="c"> | ||
| Line 286: | Line 347: | ||
* Description | * Description | ||
* The following are the entries of the palette table. | * The following are the entries of the palette table. | ||
| − | * The entries are stored as a 32-bit | + | * The entries are stored as a 32-bit value of which 24 bits are |
* actually used according to the following bit mask: 0xBBGGRR | * actually used according to the following bit mask: 0xBBGGRR | ||
* | * | ||
| − | * The lower 8 bits represent the Red | + | * The lower 8 bits represent the Red component. |
* The middle 8 bits represent the Green component. | * The middle 8 bits represent the Green component. | ||
| − | * The highest 8 bits represent the Blue | + | * The highest 8 bits represent the Blue component. |
*/ | */ | ||
static GUI_CONST_STORAGE GUI_COLOR _Colorszoo_800_600[] = { | static GUI_CONST_STORAGE GUI_COLOR _Colorszoo_800_600[] = { | ||
| Line 382: | Line 443: | ||
</source> | </source> | ||
| − | to this one. (You can change the name of the array to | + | to this one. (You can change the name of the array to everyone you like) |
<source lang="c"> | <source lang="c"> | ||
| Line 424: | Line 485: | ||
</source> | </source> | ||
| − | <font color=red>【Note】Guides provided here are all about how to use the 10.3inch e-Paper HAT (D). If you have any | + | <font color=red>【Note】Guides provided here are all about how to use the 10.3inch e-Paper HAT (D). If you have any questions about how to modify and develop your codes, please refer to resources of IT8951 [[#Resources]].</font> |
| − | + | ||
| − | + | ||
{{ePaper Codes Descriptions-IT8951}} | {{ePaper Codes Descriptions-IT8951}} | ||
| − | |||
| − | |||
| − | |||
| − | |||
| − | |||
| − | |||
| − | ===Demo code | + | =Resources= |
| + | ==Schematic== | ||
| + | *[https://files.waveshare.com/upload/2/27/E-Paper-IT8951-Driver-HAT-B-Schematic.pdf.pdf Schematic of IT8951 Driver Board] | ||
| + | *[https://files.waveshare.com/upload/e/e1/7.8-10.3inch-e-Paper-Adapter-Schematic.pdf Schematic of 7.8inch e-Paper Adapter board] | ||
| + | |||
| + | ==Demo code== | ||
*[https://github.com/waveshare/IT8951-ePaper Demo code for Raspberry Pi(Github)] | *[https://github.com/waveshare/IT8951-ePaper Demo code for Raspberry Pi(Github)] | ||
| − | *[https:// | + | *[https://files.waveshare.com/upload/8/80/IT8951_20200319_Release.7z Demo Codes for the Pi (New)] |
| − | *[https:// | + | *[https://files.waveshare.com/upload/d/da/Open429I-IT8951-Demo.7z Demo code for STM32 (Open429I)] |
| + | |||
| + | ==Third Parties Examples== | ||
| + | *[https://github.com/aceisace/Inkycal Inkycal Project] | ||
| + | : This is the Inkycal project for reference. | ||
| − | + | ==Datasheet== | |
| − | *[https:// | + | *[https://files.waveshare.com/upload/1/1a/10.3inch_e-Paper_Specification.pdf 10.3inch e-Paper Specification] |
| − | *[https:// | + | *[https://files.waveshare.com/upload/1/18/IT8951_D_V0.2.4.3_20170728.pdf IT8951 Specifications] |
| − | + | ==Other documents== | |
| − | *[ | + | *[https://files.waveshare.com/upload/b/b0/IT8951_I80%2BProgrammingGuide_16bits_20170904_v2.7_common_CXDX.zip IT8951 I80/SPi/I2C Programming Guide] |
| − | *[ | + | *[https://files.waveshare.com/upload/c/c9/IT8951_USB_ProgrammingGuide_v.0.4_20161114.pdf IT851 USB Programming Guide] |
| − | *[ | + | *[https://files.waveshare.com/upload/c/c4/E-paper-mode-declaration.pdf Mode description] |
| − | + | ==Software== | |
| − | *[ | + | *[https://files.waveshare.com/upload/2/2d/E-LINK-TCON-DEMO.zip E-LINK-TCON-DEMO] |
| − | + | *[https://files.waveshare.com/upload/b/b3/BmpCvt.zip Image modulus] | |
| − | + | *[https://files.waveshare.com/upload/c/c6/Zimo221.7z Character modulus] | |
| − | = | + | {{IT8951 Epaper FAQ}} |
| − | {{ | + | {{FAQ|SPI connector type? |
| − | + | | | |
| + | The connector is PH 2.0mm SMT Header Horizontal Right Angle Side. | ||
| + | ||}} | ||
| + | =Support= | ||
| + | {{Servicebox1}} | ||
</div> | </div> | ||
Latest revision as of 09:36, 20 March 2024
| ||
| ||
| ||
| ||


Introduction
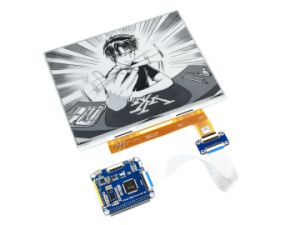
- 10.3inch EPD (Electronic Paper Display) HAT for Raspberry Pi, 1872 x 1404 resolution, 16 gray scale, USB/SPI/I80/I2C interface
- It has the advantages of low power consumption, wide viewing angle, and clear display under direct sunlight, and is often used in display applications such as shelf labels and industrial instruments.
- Note: As the screen of the 10.3-inch e-Paper is large, the glass panel and FPC are fragile. Hence, please be careful when using it for development. It is recommended to reinforce the FPC with scotch tape when developing. Please connect all the cables before powering the device, the device cannot support a hot plug.
- There are two versions: raw panel and HAT. Driver board (IT8951) is required for the raw panel, if you are the first time buying this product, we recommend you choose the HAT version which comes with the driver board.
| More |
Features
- No backlight, keeps displaying the latest content for a long time even when power is down.
- Low power consumption, basically power is only required for refreshing.
- Compatible with Raspberry Pi Zero/Zero W/Zero WH/2B/3B/3B+.
- USB/SPI/I80/I2C interface, for connecting with host boards like Raspberry Pi/Nucleo, etc.
- Comes with online development resources and manual (examples for Raspberry Pi/STM32).
Specifications
- Operating voltage: 5V
- Interface: USB/SPI/I80
- Outline dimension: 216.70 × 174.40 × 0.78mm
- Display size: 209.66 × 157.25mm
- Dot pitch: 0.112 × 0.112mm
- Resolution: 1872 × 1404
- Display color: black, white
- Grayscale: 2-16 (1-4 bit)
- Full refresh time: <1s
- Total refresh power: 1.2W(typ.)
- Total standby power: 0.1W(typ.)
- Viewing angle: >170°
- Operation Temperature: 0 ~ 50 ℃
- Storage Temperature: -25 ~ 70 ℃
【Note】:
Refresh Time: The refresh time is based on experimental test data, and actual refresh time may vary. Actual performance should be considered. During the global refresh process, there may be flickering, which is a normal phenomenon.
Refresh Power Consumption: Power consumption data is based on experimental test data. Actual power consumption may vary due to the presence of driver boards and different usage scenarios. Actual performance should be considered.
Refreshing in low-temperature environments may result in color deviation. It is recommended to stabilize at 25℃ for 6 hours before refreshing.
Working principle
This product is an E-paper device adopting the image display technology of Microencapsulated Electrophoretic Display, MED. The initial approach is to create tiny spheres, in which the charged color pigments are suspended in the transparent oil and would move depending on the electronic charge. The E-paper screen displays patterns by reflecting the ambient light, so it has no background light requirement. Under ambient light, the E-paper screen still has high visibility with a wide viewing angle of 180 degrees. It is the ideal choice for E-reading. (Note that the e-Paper cannot support updating directly under sunlight.)
How to use
Working with Windows PC
- Step 1: Connect the display to IT8951 driver board as below:

- Step 2: Connect the USB interface of the IT8951 driver board to the PC.
- Step 3: Download and open E-LINK-TCON-DEMO software.
- Step 4: Click Connect below:

- Step 5.2: Check option "EnMirror", as shown below:

- Check option "AutoSet", then click "Open File" to open one picture for display. The browse diagram will be opened, and you should click "OK".

- Click "display" to refresh the picture.

Note: If you want to use the USB interface to develop the e-Paper on Windows, you need to contact the Waveshare team and sign the NDA before you can get the E-LINK-TCON-DEMO source code.
Note: Currently not available for individual users.
Working with Raspberry Pi
- Step 1: Insert IT8951 driver board to GPIO of Raspberry Pi, Connect e-Paper to the driver board. You can also connect by wires.

| IT8951 Driver HAT | Raspberry Pi (BCM) | Description |
| 5V | 5V | 5V power input |
| GND | GND | Ground |
| MISO | P9 | MISO Pin of SPI |
| MOSI | P10 | MOSI Pin of SPI |
| SCK | P11 | SCK Pin of SPI |
| CS | P8 | Chip selection of SPI (Low active) |
| RST | P17 | Reset pin (Low active) |
| HRDY | P24 | Busy status pin (Low when busy) |
- Step 2: Make sure you have switched to SPI mode.

- Step 3: Install the C function library, open the Raspberry Pi terminal, and execute the following codes:
1. Install bcm2835 libraries (Recommended for Pi4 (faster))
wget http://www.airspayce.com/mikem/bcm2835/bcm2835-1.60.tar.gz
tar zxvf bcm2835-1.60.tar.gz
cd bcm2835-1.60
./configure
make
sudo make check
sudo make install
#For more details, you can refer to http://www.airspayce.com/mikem/bcm2835/
2. Install lg library (Recommended for Pi5, BCM library currently does not support Pi5):
#Open the Raspberry Pi terminal and run the following commands:
wget https://github.com/joan2937/lg/archive/master.zip
unzip master.zip
cd lg-master
make
sudo make install
# For more details, you can refer to: https://github.com/gpiozero/lg
3. Install gpiod library (optional):
#Open the Raspberry Pi terminal and run the following commands:
sudo apt-get update
sudo apt install gpiod libgpiod-dev
- Step 4: Enable SPI interface
The Raspberry Pi adopts SPI driver IT8951 for driving the e-Paper, hence, you need to open the SPI first:
Open the terminal command line and input:
sudo raspi-config
Choose Interfacing Options -> P4 -> SPI -> Yes.

If you use lg or gpiod library, you need to execute the following commands:
# Input the commands:
sudo nano /boot/config.txt
# Command out dtparam=spi=on and add
dtoverlay=spi0-0cs

Input " sudo reboot " to reboot the Raspberry Pi to activate the configuration.
- Step 5: Download demo codes and compile them.
Method 1: Download from our website. (Recommended)
sudo apt-get install p7zip-full
sudo wget  https://files.waveshare.com/upload/8/80/IT8951_20200319_Release.7z
7z x IT8951_20200319_Release.7z -O./IT8951
cd IT8951/
sudo make clean
sudo make -j4
# The BCM library is used by default, if you want to use other libraries, please change them in the Makefile or use the following commands:
make -j4 LIB=LGPIO     # for using lg library
make -j4 LIB=GPIOD     # for using gpiod library
Method 2: Download from GitHub:
git clone https://github.com/waveshare/IT8951-ePaper.git
cd IT8951-ePaper/Raspberry
sudo make clean
sudo make -j4
# The BCM library is used by default, if you want to use other libraries, please change them in the Makefile or use the following commands:
make -j4 LIB=LGPIO     # for using lg library
make -j4 LIB=GPIOD     # for using gpiod library
- Check the VCOM value on the FPC.

Add the VCOM value as a parameter and test the e-Paper, and this model is mode 1.
sudo ./epd -1.50 1
- Demo execution phenomenon:
1) First, the e-paper will refresh the 16 gray bars partially in sequence.
2) Then demonstrate the demo of drawing lines, circles, rectangles, characters, and numbers.
3) Then respectively demonstrate the demo of displaying BMP pictures in 1bp, 2bp, and 4bp modes.
4) Next, demonstrate the effect of fast refresh in A2 mode.
5) Then display a gif animation.
6) Then demonstrate a Demo that counts the frame rate.
7) Finally, the e-paper is whitened in Init mode for long-term storage.
Working with STM32
Driver interface selection
- Drive by SPI mode (recommended), the advantage is that it occupies fewer pins, the drive mode is simple, and the communication speed can meet the needs of most scenarios.
- Adopt 180 mode drive (I80 interface is only considered when the SPI interface communication speed does not meet the application requirements), the advantage is that the drive mode is relatively simple, and the communication speed is very fast, but it occupies a lot of pins.
- Adopt an I2C driver (not recommended, the communication speed is very slow).
Driver board selection
Since IT8951 needs to occupy a relatively large RAM space, the general STM32 single-chip microcomputer can not directly satisfy it, and additional chips such as SDRAM are required for RAM expansion. For the test here, we use Open429I as the test board, and its onboard IS42S16400J (64-MBIT) SDRAM can fully meet the requirements of driving 10.3inch e- paper HAT.
SPI
1) Hardware connection
| IT8951 | STM32 | Description |
| 5V | 5V | 5V Power input |
| GND | GND | Ground |
| MISO | PE13 | Data output |
| MOSI | PE14 | Data input |
| SCK | PE12 | Clock input |
| CS | PE11 | Chip select (Low active) |
| RST | PC5 | Reset (Low for reset) |
| HRDY | PA7 | BUSY state output (Low for busy) |
2) Set the DIP switch to SPI mode 3) Download demo code and test
You can download the Demo code
Open the project with Keil: Open429I-C-6-IT8951-Demo\Project\6-IT8951\MDK-ARM\Project.uvproj
Compile it, then open IT8951.h, and check if SPI mode is enabled. Compile it again and download it to your board.

After downloading, the information will be printed as below (115200, 8N1)

I80
1) Hardware connection:
| IT8951 | STM32 | Description |
| Vcc | 5V | 5V Power input |
| GND | GND | Ground |
| DBUS0~DBUS15 | PB0~PB15 | Data pins |
| HWE | PC1 | Write enable (Low active) |
| D/C | PC7 | Data/Command (Low for command) |
| CSEL | PC6 | Chip select (Low active) |
| HRD | PC3 | Read enable (Low for active) |
| RST | PC0 | Reset (Low for reset) |
| BUSY | PA7 | Busy state output (Low for busy) |

2) Set the DIP switch to I80 mode.
3) Display with demo code.
You can download the Demo code.
Open the project with Keil: Open429I-C-6-IT8951-Demo\Project\6-IT8951\MDK-ARM\Project.uvproj
Compile it, then open IT8951.h, and check if I80 mode is enabled. Compile it again and download it to your board.

Information is printed to the serial port as below (115200, 8N1).

Display pictures
For porting the demo easily, we display pictures with a data matrix instead of the file system.
We should first convert the BMP picture to a data matrix (arrays), and use it in the demo code.
1) Prepare a BMP image, and resize the picture to 800*600.
2) Open BMP convert software, Click File->Open..-> to open the picture as below:

3) Click Image -> Convert to -> Gray256(8 BPP).

4) Click File -> Save As... -> Choose "C" bitmap file (*.c) -> input file name and click Save.
5) Choose 8 bits per pixel, and click OK. A-C file will be saved to your PC.

6) Add the C file to the Keil project, and select unusable information.
*********************************************************************
*                SEGGER Microcontroller GmbH & Co. KG                *
*        Solutions for real time microcontroller applications        *
*                           www.segger.com                           *
**********************************************************************
*                                                                    *
* C-file generated by                                                *
*                                                                    *
*        Bitmap Converter for emWin V5.22.                           *
*        Compiled Jul  4 2013, 12:18:24                              *
*        (c) 1998 - 2013 Segger Microcontroller GmbH && Co. KG       *
*                                                                    *
**********************************************************************
*                                                                    *
* Source file: zoo_800_600                                           *
* Dimensions:  800 * 600                                             *
* NumColors:   256                                                   *
*                                                                    *
**********************************************************************
*/

#include <stdlib.h>

#include "GUI.h"

#ifndef GUI_CONST_STORAGE
  #define GUI_CONST_STORAGE const
#endif

extern GUI_CONST_STORAGE GUI_BITMAP bmzoo_800_600;

/*********************************************************************
*
*       Palette
*
*  Description
*    The following are the entries of the palette table.
*    The entries are stored as a 32-bit value of which 24 bits are
*    actually used according to the following bit mask: 0xBBGGRR
*
*    The lower   8 bits represent the Red component.
*    The middle  8 bits represent the Green component.
*    The highest 8 bits represent the Blue component.
*/
static GUI_CONST_STORAGE GUI_COLOR _Colorszoo_800_600[] = {
  0x000000, 0x010101, 0x020202, 0x030303,
  0x040404, 0x050505, 0x060606, 0x070707,
  0x080808, 0x090909, 0x0A0A0A, 0x0B0B0B,
  0x0C0C0C, 0x0D0D0D, 0x0E0E0E, 0x0F0F0F,
  0x101010, 0x111111, 0x121212, 0x131313,
  0x141414, 0x151515, 0x161616, 0x171717,
  0x181818, 0x191919, 0x1A1A1A, 0x1B1B1B,
  0x1C1C1C, 0x1D1D1D, 0x1E1E1E, 0x1F1F1F,
  0x202020, 0x212121, 0x222222, 0x232323,
  0x242424, 0x252525, 0x262626, 0x272727,
  0x282828, 0x292929, 0x2A2A2A, 0x2B2B2B,
  0x2C2C2C, 0x2D2D2D, 0x2E2E2E, 0x2F2F2F,
  0x303030, 0x313131, 0x323232, 0x333333,
  0x343434, 0x353535, 0x363636, 0x373737,
  0x383838, 0x393939, 0x3A3A3A, 0x3B3B3B,
  0x3C3C3C, 0x3D3D3D, 0x3E3E3E, 0x3F3F3F,
  0x404040, 0x414141, 0x424242, 0x434343,
  0x444444, 0x454545, 0x464646, 0x474747,
  0x484848, 0x494949, 0x4A4A4A, 0x4B4B4B,
  0x4C4C4C, 0x4D4D4D, 0x4E4E4E, 0x4F4F4F,
  0x505050, 0x515151, 0x525252, 0x535353,
  0x545454, 0x555555, 0x565656, 0x575757,
  0x585858, 0x595959, 0x5A5A5A, 0x5B5B5B,
  0x5C5C5C, 0x5D5D5D, 0x5E5E5E, 0x5F5F5F,
  0x606060, 0x616161, 0x626262, 0x636363,
  0x646464, 0x656565, 0x666666, 0x676767,
  0x686868, 0x696969, 0x6A6A6A, 0x6B6B6B,
  0x6C6C6C, 0x6D6D6D, 0x6E6E6E, 0x6F6F6F,
  0x707070, 0x717171, 0x727272, 0x737373,
  0x747474, 0x757575, 0x767676, 0x777777,
  0x787878, 0x797979, 0x7A7A7A, 0x7B7B7B,
  0x7C7C7C, 0x7D7D7D, 0x7E7E7E, 0x7F7F7F,
  0x808080, 0x818181, 0x828282, 0x838383,
  0x848484, 0x858585, 0x868686, 0x878787,
  0x888888, 0x898989, 0x8A8A8A, 0x8B8B8B,
  0x8C8C8C, 0x8D8D8D, 0x8E8E8E, 0x8F8F8F,
  0x909090, 0x919191, 0x929292, 0x939393,
  0x949494, 0x959595, 0x969696, 0x979797,
  0x989898, 0x999999, 0x9A9A9A, 0x9B9B9B,
  0x9C9C9C, 0x9D9D9D, 0x9E9E9E, 0x9F9F9F,
  0xA0A0A0, 0xA1A1A1, 0xA2A2A2, 0xA3A3A3,
  0xA4A4A4, 0xA5A5A5, 0xA6A6A6, 0xA7A7A7,
  0xA8A8A8, 0xA9A9A9, 0xAAAAAA, 0xABABAB,
  0xACACAC, 0xADADAD, 0xAEAEAE, 0xAFAFAF,
  0xB0B0B0, 0xB1B1B1, 0xB2B2B2, 0xB3B3B3,
  0xB4B4B4, 0xB5B5B5, 0xB6B6B6, 0xB7B7B7,
  0xB8B8B8, 0xB9B9B9, 0xBABABA, 0xBBBBBB,
  0xBCBCBC, 0xBDBDBD, 0xBEBEBE, 0xBFBFBF,
  0xC0C0C0, 0xC1C1C1, 0xC2C2C2, 0xC3C3C3,
  0xC4C4C4, 0xC5C5C5, 0xC6C6C6, 0xC7C7C7,
  0xC8C8C8, 0xC9C9C9, 0xCACACA, 0xCBCBCB,
  0xCCCCCC, 0xCDCDCD, 0xCECECE, 0xCFCFCF,
  0xD0D0D0, 0xD1D1D1, 0xD2D2D2, 0xD3D3D3,
  0xD4D4D4, 0xD5D5D5, 0xD6D6D6, 0xD7D7D7,
  0xD8D8D8, 0xD9D9D9, 0xDADADA, 0xDBDBDB,
  0xDCDCDC, 0xDDDDDD, 0xDEDEDE, 0xDFDFDF,
  0xE0E0E0, 0xE1E1E1, 0xE2E2E2, 0xE3E3E3,
  0xE4E4E4, 0xE5E5E5, 0xE6E6E6, 0xE7E7E7,
  0xE8E8E8, 0xE9E9E9, 0xEAEAEA, 0xEBEBEB,
  0xECECEC, 0xEDEDED, 0xEEEEEE, 0xEFEFEF,
  0xF0F0F0, 0xF1F1F1, 0xF2F2F2, 0xF3F3F3,
  0xF4F4F4, 0xF5F5F5, 0xF6F6F6, 0xF7F7F7,
  0xF8F8F8, 0xF9F9F9, 0xFAFAFA, 0xFBFBFB,
  0xFCFCFC, 0xFDFDFD, 0xFEFEFE, 0xFFFFFF
};

static GUI_CONST_STORAGE GUI_LOGPALETTE _Palzoo_800_600 = {
  256,  // Number of entries
  0,    // No transparency
  &_Colorszoo_800_600[0]
};

GUI_CONST_STORAGE GUI_BITMAP bmzoo_800_600 = {
  800, // xSize
  600, // ySize
  800, // BytesPerLine
  8, // BitsPerPixel
  _aczoo_800_600,  // Pointer to picture data (indices)
  &_Palzoo_800_600   // Pointer to palette
};
7) Modify the codes
static GUI_CONST_STORAGE unsigned char _aczoo_800_600[] = {
to this one. (You can change the name of the array to everyone you like)
const unsigned char zoo_800_600[] = {
8) Modify related codes in IT8951.C as below
extern const unsigned char zoo_800_600[];
void IT8951DisplayExample3()
{
	IT8951LdImgInfo stLdImgInfo;
	IT8951AreaImgInfo stAreaImgInfo;
	TWord width = gstI80DevInfo.usPanelW;
	TWord high = gstI80DevInfo.usPanelH;
	TDWord i;

	for (i = 0;i < width*high;i++)
	{
		gpFrameBuf[i] = zoo_800_600[i];
	}

	IT8951WaitForDisplayReady();

	//Setting Load image information
	stLdImgInfo.ulStartFBAddr    = (TDWord)gpFrameBuf;
	stLdImgInfo.usEndianType     = IT8951_LDIMG_L_ENDIAN;
	stLdImgInfo.usPixelFormat    = IT8951_8BPP;
	stLdImgInfo.usRotate         = IT8951_ROTATE_0;
	stLdImgInfo.ulImgBufBaseAddr = gulImgBufAddr;
	//Set Load Area
	stAreaImgInfo.usX      = 0;
	stAreaImgInfo.usY      = 0;
	stAreaImgInfo.usWidth  = width;
	stAreaImgInfo.usHeight = high;

	IT8951HostAreaPackedPixelWrite(&stLdImgInfo, &stAreaImgInfo);//Display function 2
	IT8951DisplayArea(0,0, gstI80DevInfo.usPanelW, gstI80DevInfo.usPanelH, 2);
}
【Note】Guides provided here are all about how to use the 10.3inch e-Paper HAT (D). If you have any questions about how to modify and develop your codes, please refer to resources of IT8951 #Resources.
Precaution
Hardware Connection
For different ink screen models, due to product upgrades and improvements, there may be certain differences between the hardware connection and the picture, and the specific FPC line pin label shall prevail:
Check example 1:

Check example 2:

DIP switch

I2C interface driver is not recommended at present, it is recommended to use a USB, I80, or SPI interface.
Whether it is driven by a USB interface, I80 interface, or SPI interface, it is necessary to turn the DIP switch circled in the red frame in the figure below to the ON position on the right, as shown in the figure below:
If the PC is connected by USB, and the E-LINK-TCON-DEMO cannot recognize the IT8951, please check whether both sides of the two DIP switches marked in the red frame are connected. Only the two DIP switches marked in the red frame are both connected. turn on to be recognized by the PC.

Choose SPI or I80 driver
If you use a USB drive, you don't need to pay attention to the DIP switch in the green frame shown in the figure below.
If you use SPI driver or I80 driver, you need to pay attention to the DIP switch in the green frame shown in the figure below. If it is dialed to the I80 terminal, it means that the I80 driver is used, and if it is dialed to the SPI terminal, it means that the SPI driver is used:
Codes Description
New Features
1. Update 16 grayscale images in 4bpp mode to reduce the data size while transmitting via SPI.
2. Double SPI transmitting speed. Note that this feature can only be valid in Raspberry Pi, it is invalid in Pi 4 because of the improvement of CPU.
3. Reduce the update time to 1/4. The last version of Demo codes cost 10s to update a picture on 10.3inch e-Paper (D) in GC16 Mode, with the new version, it is reduced to 3s.
4. Fix the bug that the memory leaks problem occurs after opening a BMP file.
5. Add 1bpp, 2bpp, 3bpp, and 4bpp modes support.
6. Add A2 Mode (only work for 1bpp mode).
7. Add GUI functions (Draw point, line, circle, rectangle, and string display). Supports changing gray.
8. Add 1bpp, 2bpp, 4bpp, and 8bpp refresh support for BMP pictures, if you choose 1bpp, it also supports A2 mode refresh.
9. Add a demo for displaying GIF pictures, which can write multiple pictures into the IT8951 cache, and directly swipe the data of different addresses in the cache into the ink screen for display, eliminating the data transmission process between RPi and IT8951, Refresh frame rate up to 7fps.
10. Add fps testing, it can be used to test the fps when updated with different windows sizes in different modes.
11. Enhance the driver, to fix the bug of blurred display in the partial area.
12. Support bytes alignment for 6inch ePaper HAT and 6inch HD ePaper HAT in 1bpp mode.
13. Add VCOM setting and clear ePaper function (running Demo codes directly) to protect ePaper from damage.
14. Improving the structure of driver codes for higher code readability.
Examples Description
Display 16 bars in grayscale order
- Function:Display ColorPalette Example
- This function is sued to display 16 bars in different grayscale. It uses 4bpp in GC16 mode.
Drawing
- Function: Display CharacterPattern Example
- This function is sued to draw points, lines, circles, and rectangles as well as display strings. It suppots 1bpp, 2bpp, 4bpp and 8bpp mode. If you use 1bpp, it can also support the A2 update mode.
Display BMP image
- Function:Display BMP Example
- This function is used to display a BMP image. It suppots 1bpp, 2bpp, 4bpp and 8bpp mode. If you use 1bpp, it can also support the A2 update mode.
Update ePaper in A2 mode
- Function:Dynamic Refresh Example
- This function is used to update ePaper in A2 Mode.
Display GIF image
- Function:Dynamic GIF Example
- This function is used to display GIF images. We divide a GIF file into seven BMP images and save them to a buffer of IT8951 with the continuous address. This demo features the fastest fps of the ePaper (about 7 fps).
FPS Testing
- Function:Check FrameRate Example
- This function is sued to test fps in different modes. The demo will auot-caculate the update time of 10 frames and the fps.
Related Description
Mode
The firmware in the IT8951 Driver board is different among different types of e-Paper. And the update mode may be different among these e-Paper. For more information about the update modes, you can refer to IT8951 Mode Description. There are three modes: INIT, GC16, and A2.
| Mode | Description | 6inch/6inch HD | 7.8inch/9.7inch/10.3inch |
|---|---|---|---|
| INIT | This mode is used for clearing the display. If you use A2 mode for updating, we recommend you use the INIT mode to clear display after updating several times. | Mode0 | Mode0 |
| GC16 | This mode is used for updating ePaper with 16 grayscale. GC16 mode can provide best dispaly effect. | Mode2 | Mode2 |
| A2 | A2 mode can only support 2 grayscale, however, the update speed is the fastest. | Mode4 | Mode6 |
//basic mode definition
UBYTE INIT_Mode = 0;
UBYTE GC16_Mode = 2;
//A2_Mode's value is not fixed, is decided by the firmware's LUT
UBYTE A2_Mode = 6;
if( strcmp(LUT_Version, "M641") == 0 ){
    //6inch e-Paper HAT(800,600), 6inch HD e-Paper HAT(1448,1072), 6inch HD touch e-Paper HAT(1448,1072)
    A2_Mode = 4;
    Four_Byte_Align = true;
}else if( strcmp(LUT_Version, "M841") == 0 ){
    //9.7inch e-Paper HAT(1200,825)
    A2_Mode = 6;
}else if( strcmp(LUT_Version, "M841_TFA2812") == 0 ){
    //7.8inch e-Paper HAT(1872,1404)
    A2_Mode = 6;
}else if( strcmp(LUT_Version, "M841_TFA5210") == 0 ){
    //10.3inch e-Paper HAT(1872,1404)
    A2_Mode = 6;
}else{
    //default set to 6 as A2 Mode
    A2_Mode = 6;
}
bpp
bpp(Bits Per Pixel), stands for the bits costed by every pixel. The current versions of ePaper support 1bpp, 2bpp, 4bpp, and 8bpp modes.

- 1bpp
- 1bit cost by every pixel
- It supports 2 grayscale displays. supports A2 mode
- Evey byte carries 8 pixels
- The pixel is saved in byte in Big-endian format:
- The data is saved in IT8951 with Little-endian format, you need to convert the data before saving.

- 2bpp
- 2bits cost by every pixel
- Supports 4 (2^2=4) grayscale
- Evey byte carries 4 pixels
- The pixel is saved in byte in Big-endian format:
- The data is saved in IT8951 with Little-endian format, you need to convert the data before saving.

- 4bpp
- 4 bits cost by every pixel.
- Supports 16(2^4=16) grayscale
- Every byte carries 2 pixels
- The pixel is saved in byte in Big-endian format:
- The data is saved in IT8951 with Little-endian format, you need to convert the data before saving.
- 4bpp mode is recommended for displaying 16 grayscale images. It reduces half of the data by comparing to 8bpp.

- 8bpp
- 8bits cost by every pixel
- Supports 256 (2^8=256) grayscale. However, IT8951 only uses the first four bits for 16 grayscale displays.
- Every byte carries one pixel
- The pixel is saved in byte in Big-endian format:
- The data is saved in IT8951 with Little-endian format, you need to convert the data before saving.
- When you convert an original image for a gray image, the data of every pixel cost one byte (8 bits). You can compress the data according to the actual data format. For example: if you want to convert data for 2bpp mode, you can just use the first 2bits from one byte (original gray image). The examples below also convert the data format from big-endian to little-endian.
UDOUBLE Addr = X * (Paint.BitsPerPixel) / 8 + Y * Paint.WidthByte;
switch( Paint.BitsPerPixel ){
    case 8:{
        Paint.Image[Addr] = Color & 0xF0;
        break;
    }
    case 4:{
        Paint.Image[Addr] &= ~( (0xF0) >> (7 - (X*4+3)%8 ) );
        Paint.Image[Addr] |= (Color & 0xF0) >> (7 - (X*4+3)%8 );
        break;
    }
    case 2:{
        Paint.Image[Addr] &= ~( (0xC0) >> (7 - (X*2+1)%8 ) );
        Paint.Image[Addr] |= (Color & 0xC0) >> (7 - (X*2+1)%8 );
        break;
    }
    case 1:{
        Paint.Image[Addr] &= ~( (0x80) >> (7 - X%8) );
        Paint.Image[Addr] |= (Color & 0x80) >> (7 - X%8);
        break;
    }
}
4-byte alignment description
In the actual test, we found that for those 3 products: 6inch e-Paper HAT, 6inch HD e-Paper HAT, and 6inch HD touch e-Paper HAT, when refreshing in 1bpp mode, we need to make the starting point of the refresh area X and the refresh width W to perform 4-byte (32bit) alignment, otherwise, the image in the refresh area will display abnormally. The specific operation is shown in the following demo:
if( strcmp(LUT_Version, "M641") == 0 ){
    //6inch e-Paper HAT(800,600), 6inch HD e-Paper HAT(1448,1072), 6inch HD touch e-Paper HAT(1448,1072)
    A2_Mode = 4;
    Four_Byte_Align = true;
}else if( strcmp(LUT_Version, "M841") == 0 ){
...
}
if(Four_Byte_Align == true){
    In_4bp_Refresh_Area_Width = Panel_Width - (Panel_Width % 32);
}else{
    In_4bp_Refresh_Area_Width = Panel_Width;
}
X_Start = Min_X < 32 ? 0 : Min_X - (Min_X % 32);
Debug("X_Start:%d\r\n",X_Start);
X_End = ( Max_X + (32 - (Max_X % 32)) ) > Touch_Pannel_Area_Width ? ( Max_X - (Max_X % 32) )  : ( Max_X + (32 - (Max_X % 32)) );
Debug("X_End:%d\r\n",X_End);
Y_Start = Min_Y;
Debug("Y_Start:%d\r\n",Y_Start);
Y_End = Max_Y;
Debug("Y_Start:%d\r\n",Y_End);
Width = X_End - X_Start;
if(Width<=0){
    Width = 32;
}
Debug("Width:%d\r\n",Width);
Height = Y_End-Y_Start;
if(Height<=0){
    Height = 32;
}
Debug("Height:%d\r\n",Height);
SPI transmission speed description
Due to the difference in CPU frequency between Raspberry Pi 3 and Raspberry Pi 4:
- Raspberry Pi 3 can still transmit normally when the frequency is divided by 16, but the frequency by 16 is the fastest speed for Pi3.
- When the frequency of the Raspberry Pi 4B uses a divide by 16, the SPI rate is too high and transmission errors will occur. Therefore, the SPI of the Raspberry Pi 4B can only use a divide by 32 at the fastest.
- In the BCM2835 library manual, for different Raspberry Pi versions and different clock divisions, the corresponding frequency description is shown in the following figure:

- If you need to obtain the most suitable SPI transmission speed, you need to select a different SPI clock divider according to your Raspberry Pi version, as shown in the following program and its notes:
bcm2835_spi_begin();//Start spi interface, set spi pin for the reuse function
bcm2835_spi_setBitOrder(BCM2835_SPI_BIT_ORDER_MSBFIRST);//High first transmission
bcm2835_spi_setDataMode(BCM2835_SPI_MODE0);//spi mode 0

//bcm2835_spi_setClockDivider(BCM2835_SPI_CLOCK_DIVIDER_16);//For RPi 3/3B/3B+
bcm2835_spi_setClockDivider(BCM2835_SPI_CLOCK_DIVIDER_32);//For RPi 4B

/* SPI clock reference link:*/
/*http://www.airspayce.com/mikem/bcm2835/group__constants.html#gaf2e0ca069b8caef24602a02e8a00884e*/
Enhance driving capability
In some cases, due to the long FPC cable and other reasons, the ink screen display will be partially blurred. In this case, you can try to increase the driving capability to effectively solve the problem of the screen display blur.
You can check the demo below:
#if(Enhance)
    Debug("Attention! Enhanced driving ability, only used when the screen is blurred\r\n");
    Enhance_Driving_Capability();
#endif
/******************************************************************************
function:  Enhanced driving capability
parameter:  Enhanced driving capability for IT8951, in case the blurred display effect
******************************************************************************/
void Enhance_Driving_Capability(void)
{
    UWORD RegValue = EPD_IT8951_ReadReg(0x0038);
    Debug("The reg value before writing is %x\r\n", RegValue);
    EPD_IT8951_WriteReg(0x0038, 0x0602);
    RegValue = EPD_IT8951_ReadReg(0x0038);
    Debug("The reg value after writing is %x\r\n", RegValue);
}
If you use the E-LINK-TCON-DEMO software on a PC (Windows) to refresh the ink screen through the USB interface, you can modify the register value in the following ways to enhance the drive capability:
- Step1: Read the data of register address 0 x 18000038.

If the read data of register address 0 x 18000038 is 0 x 02, it means that the drive capability has not been enhanced yet.
- Step2: Modify the data of register address 0 x 18000038

Modify the data of register address 0 x 18000038 to 602 to enhance the driving capability.
- Step3: Check the data of register address 0 x 18000038.

Check whether the data of the registered address 0 x 18000038 is modified successfully. If the data of this address is 0 x 602, it means that the drive capacity has been enhanced.
Use the correct VCOM value
The VCOM value of each model of the e-paper is marked on the FPC cable. Make sure that you have used the correct VCOM value when you running the demo. Otherwise, the e-paper will deteriorate by working for a long time under the wrong VCOM value.
Development Notes
The above content only introduces how to use 10.3inch e-Paper HAT (D)m and how to modify and secondary development, for more demo codes, users need to learn it by themselves. Please refer to IT8951-related resources.
Resources
Schematic
Demo code
Third Parties Examples
- This is the Inkycal project for reference.
Datasheet
Other documents
Software
FAQ
Questions About Software & Hardware

{{{5}}}
2. Try changing the USB interface. It is recommended to use the USB interface on the back of the PC. Relatively speaking, the power supply current will be larger.
3. Turn the DIP switch to the end. During shipping, the DIP switches may be loosened, and the floating configuration pins cannot put the IT8951 into USB mode.
{{{5}}}

If you fail to refresh, check whether the hard link is normal, use the USB port on the back of the PC (most of the USB ports on the front of the PC have weak power supply capability), and replace the e-paper test.
Note: Do not plug and unplug the e-paper with power on, otherwise the driver board and e-paper may be damaged.
{{{5}}}
Questions About Screen
- 【Operating condition】Temperature range: 0~50°C; Humidity range: 35%~65%RH
- 【Storage condition】Temperature range: below 30°C; Humidity range: below 55%RH; Maximum storage time: 6 months
- 【Transportation condition】Temperature range: -25~70°C; Maximum shipping time: 10 days
- 【After unpacking】Temperature range: 20°C±5°C; Humidity range: 50±5%RH; Maximum storage time: Assembled within 72 hours
{{{5}}}
- Refresh mode:
- Full refresh: The e-paper screen will flicker several times during refreshing (the flicking times depend on the refresh time), and the flicker is to remove the ghosting to achieve the best display effect.
- Partial refresh: The e-paper screen has no flickering effect during refreshing. Users who use partial flashing should pay attention to performing a full flashing operation to remove the ghosting after refreshing several times, otherwise, the ghosting problem will become more and more serious, or even damage the screen. (At present, only some black and white e-paper screens support local brushing, please refer to the product page for details).
- Refresh frequency:
- During use, it is recommended that customers set the refresh interval of the e-ink screen to at least 180 seconds. (Except for products that support the partial refreshing function)
- During the standby process (that is, after the refresh operation), it is recommended that the customer set the e-paper screen to sleep mode, or power off (the power supply part of the e-paper screen can be disconnected with an analog switch) to reduce power consumption and prolong the life of the e-paper screen. (If some e-paper screens are powered on for a long time, the screen will be damaged beyond repair.)
- During the use of the e-paper screen, it is recommended that customers update the display screen at least every 24 hours. (If the screen keeps the same picture for a long time, there will be a burn-in situation that is difficult to repair).
- Application scenarios:
- The e-paper screen is recommended for indoor use. If it is used outdoors, it is necessary to prevent the e-paper screen from being exposed to direct sunlight, and at the same time, it is necessary to take ultraviolet protection measures, because charged particles will dry out under strong light for a long time, resulting in loss of activity and failure to refresh. This situation is irreversible. When designing electronic ink screen products, customers should pay attention to determine whether the use environment meets the requirements of electronic ink screens.
{{{5}}}
{{{5}}}
{{{5}}}
{{{5}}}
{{{5}}}
The connector is PH 2.0mm SMT Header Horizontal Right Angle Side.
{{{5}}}
Support
Technical Support
If you need technical support or have any feedback/review, please click the Submit Now button to submit a ticket, Our support team will check and reply to you within 1 to 2 working days. Please be patient as we make every effort to help you to resolve the issue.
Working Time: 9 AM - 6 AM GMT+8 (Monday to Friday)