AlphaBot2-Pi
| ||
Introduction
AlphaBot2 robot building kit for Pi
| More |
What’s on board?
AlphaBot2-Pi robot kits include a chassis (AlphaBot2-Base chassis) and an adapter board AlphaBot2-Pi. The robot supports Raspberry Pi with an AlphaBot2-Pi adapter board.
Thanks to the highly integrated modular design, it is fairly easy to assemble by a snap, no soldering, no wiring. After a few minutes spent on hardware assembling, you're almost there, our open source demo codes is ready to help you get started fast.
Accessories may be different in different product package. This page describes the compatible accessories for Raspberry Pi board.
AlphaBot2-Base
- AlphaBot2 control interface: for connecting sorts of the controller adapter board
- Ultrasonic module interface
- Obstacle avoiding indicators
- Omni-direction wheel
- ST188: reflective infrared photoelectric sensor, for obstacle avoiding
- ITR20001/T: reflective infrared photoelectric sensor, for line tracking
- Potentiometer for adjusting obstacle avoiding range
- TB6612FNG dual H-bridge motor driver
- LM393 voltage comparator
- N20 micro gear motor reduction rate 1:30, 6V/600RPM
- Rubber wheels diameter 42mm, width 19mm
- Power switch
- Battery holder: supports 14500 batteries
- WS2812B: true-color RGB LEDs
- Battery charging indicator
- 5V USB battery charging port
- Power indicator
AlphaBot2-Pi
- AlphaBot2 control interface: for connecting AlphaBot2-Base
- Raspberry Pi interface: for connecting Raspberry Pi 3 Model B
- Servo interface
- USB TO UART: easy for controlling the Pi via UART
- LM2596: 5V voltage regulator
- TLC1543: 10-bit AD acquisition chip, allows the Pi to use analog sensors
- PCA9685: servo controller, make it more smoothly to rotate the pan head
- CP2102: USB TO UART converter
- Joystick
- IR receiver
- Buzzer
Setup
Hardware setup
Please make sure that you have assembled the Alphabot2 accroding to Assembly diagram
Software setup
- Connect WIFI
- 1. Connect an Display, keyboard and Mouse to Raspberry Pi, and power on Raspberry Pi.
- 2. Connect Raspberry Pi to WIFI by press the Network icon on the right-top of Raspbian
- 3. After connecting, Press Ctrl + ALT + T keys to open Terminal of Raspbian
- 4. Type ifconfig command to check the IP address of Raspbian
- Access Raspberry Pi remotelly
- 1. Download Putty software to your PC and Open it.
- Type the IP address which you have checked before, and open it.

- 2. Access Raspberry Pi with default user name (pi) and password (raspberry).

- 5. Now you can disconnect the display, keyboard and Mouse.
- Enable Interfaces
- 1. Type command to open raspi-config
sudo raspi-config


- 2. Choose Interfacing Options -> Camera -> Yes -> Yes -> OK

- 3. Choose Interfacing Options -> SPI -> Yes -> OK

- 4. Choose Interfacing Options -> I2C -> Yes -> OK

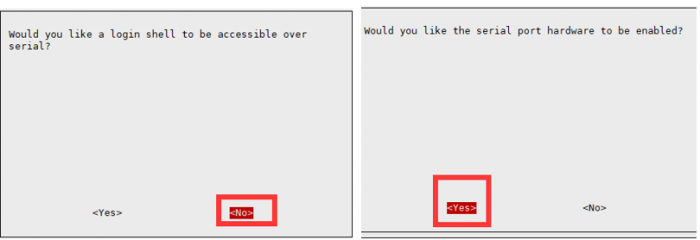
- 5. Choose Interfacing Options -> UART -> No -> Yes -> OK
- 6. Then select Finish to exit. It may ask you to reboot, please choose Yes. Or you can type command to reboot manually.
sudo reboot

- 7. The putty is disconnected when rebooting, just click OK and waiting for rebooting. After rebooting you can right-click Putty and choose Restart Session
- Type username and password of Raspberry Pi again to access.

- Install libraries
- Type commands below to install libraries
sudo apt-get update
sudo apt-get install ttf-wqy-zenhei
sudo apt-get install python-pip
sudo pip install RPi.GPIO
sudo pip install spidev
sudo apt-get install python-smbus
sudo apt-get install python-serial
sudo pip install rpi_ws281x
- Follow examples guides below to test
Examples
Download examples
Type commands to download example:
cd
wget https://files.waveshare.com/upload/7/74/AlphaBot2.tar.gz
tar zxvf AlphaBot2.tar.gz
Motor testing
Enter the Linux terminal, and input the following commands:
cd ~/AlphaBot2/python
sudo python AlphaBot2.py
The smart robot moves forward when the program runs and drives the motor to rotate.
We take the direction that camera toward is forward, If the Alphabot2 run toward the wrong direction , you can modify the motor wring or change the pin settings in examples. We recommend the second one.Modify AlphaBot2.py file
sudo nano AlphaBot2.py
If left wheels of the robot run in a wrong direction, you should exchange the settings of ain1 and ain2. For right wheels, exchange the settings of bin1 and bin2.
def __init__(self, ain1 = 12, ain2 = 13, ena = 6, bin1 = 20, bin2 = 21, enb = 26):
5-way joystick
Enter the Linux terminal, and input the following commands:
cd ~/AlphaBot2/python
sudo python Joystick.py
Once the joystick is pressed, the buzzer sounds and the motor rotates in the responding direction. If wheels run in the wrong direction, you should modify the settings of the corresponding pins. The directions you press are printed to terminal as well.
Infrared remote control
Enter the Linux terminal, and input the following commands:
cd ~/AlphaBot2/python
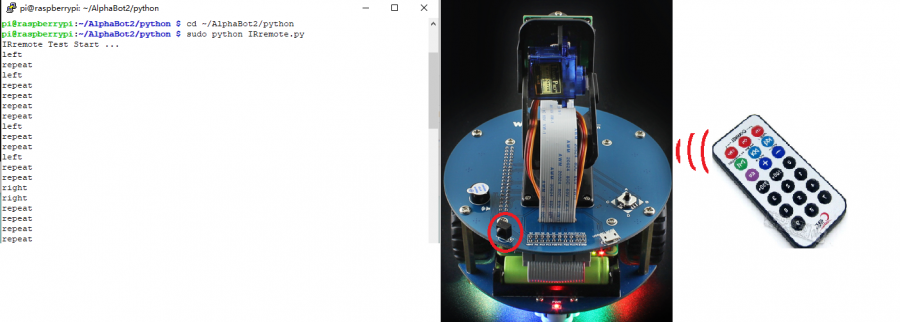
sudo python IRremote.py
You can control the smart robot by pressing down the numeric keys on the infrared remote controller,“2”is for go forwards, “8” for go backwards, “4” for turn left, “6” for turn right, and “5” for stop. Keys “-“ and “+” can adjust the speed of the robot, and “EQ” can restore the default setting of the speed.
(Note: The key encoding may change with different Infrared remote controller. You can modify the program as required.)
Infrared obstacle avoidance
Enter the Linux terminal, and input the following commands:
cd ~/AlphaBot2/python
sudo python Infrared_Obstacle_Avoidance.py
If there is no obstacle ahead of the robot, the green LED on the robot is off. If obstacles are detected, the green LED will light up. In case that the LED is always off or always on, you can try to adjusted the potentiometers on the bottom of the robot to make the LED work properly.
The robot goes straight when there is no obstacle detected by the sensor on the left, and turns right when obstacle is detected.
Ultrasonic distance measurement
Note: Because of limitation of space, Raspberry Pi 3B kit does not contain ultrasonic unit
Enter the Linux terminal, and input the following commands:
cd ~/AlphaBot2/python
sudo python Ultrasonic_Ranging.py
The terminal prints the current measured distance.
Ultrasonic distance measurement
Note: Because of limitation of space, Raspberry Pi 3B kit does not contain ultrasonic unit
Enter the Linux terminal, and input the following commands:
cd ~/AlphaBot2/python
sudo python Infrared_Obstacle_Avoidance.py
The robot goes straight when there is no obstacle detected, and turns right when obstacle is detected.
RGB LED
Download rpi_ws281x-master.zip to your Raspberry Pi, and run the following command to extract the file.
cd
wget https://files.waveshare.com/upload/c/c3/Rpi_ws281x-master.zip
unzip rpi_ws281x-master.zip
Install the depended-upon software.
sudo apt-get install build-essential python-dev scons swig -y
Compile the program.
cd ~/rpi_ws281x-master
sudo scons
Run the following command to perform the testing, you can see the RGB LED flickering.
sudo ./test
Press Ctrl + C to stop program
Enter the commands below to install the library python.
cd python
sudo python setup.py install
Run the library python for testing, you can see the RGB LED flickering.
cd examples
sudo python lowlevel.py
Press Ctrl + C to stop program
Enter the following commands:
cd ~/AlphaBot2/python
sudo python ws2812.py
The four RGB LEDs on the bottom of the smart robot will be in red, green, blue and yellow, respectively. Then turn off.
If they display the wrong color, you can find out the file /boot/config.txt and add the lines below into it. Restart the module to make the lines take effect. The RGB LED use DMA control, which can occupy the audio output DMA channels on the Raspberry Pi. So, adding these lines may cause the earphone interface to be unavailable.
hdmi_force_hotplug=1
hdmi_force_edid_audio=1
Tracker sensor testing
Enter the Linux terminal, and input the following commands:
cd ~/AlphaBot2/python
sudo python TRSensors.py
You can see five sets of are data printed on the terminal, they are corresponding to five sensors. When the smart robot is placed on the white KT board, the data value will be in the range of 800~900. When it is held in the air, the value can be in the range of 0~100. And, when it on the black line, the value can be in the range of 100~300.
Infrared line tracking
Enter the Linux terminal, and input the following commands:
cd ~/AlphaBot2/python
sudo python Line_Follow.py
While the program is running, the smart robot goes into the calibration mode, moving to left and then right. When the calibration finished, you can swing the smart robot side to side, and the terminal will display the current position of the black line and the values of five sensors. Place the smart robot on the black line, and press down the center key on the joystick. Now, you can see the smart robot run along with the black line, and the RGB LEDs on the bottom of the robot display different colors.
Servo
Enter the Linux terminal, and input the following commands:
cd ~/AlphaBot2/python
sudo python PCA9685.py
The servo will move to left and right, its rotational range can reach 180 degree.
mjpg-streamer software real-time monitoring
"MJPG-streamer" takes JPGE from the web camera, and streams them over an IP-based network to various types of viewers.
1、 For the camera with CSI interface, the system may be unable to find out the device under the directory of /dev/video0. In this case, you should add a line, bcm2835-v4l2, into the file /etc/modules.
sudo nano /etc/modules
Add the line: bcm2835-v4l2
2、 After reboot, the system will load the module name stored in this file, and find out the device video0 under the directory of /dev. (Please take a notice that the letter l in the command bcm2835-v4l2 is the lower case of L.)
if you still cannot find out the device video0 under the directory of /dev, and all the operations and commands are correct, you should run the command: rpi-update.
The software mjpg-streamer in the program has been compiled. You only need to run the following lines to start up the mjpg-streamer:
cd ~/AlphaBot2/mjpg-streamer/mjpg-streamer-experimental/
sudo ./start.sh
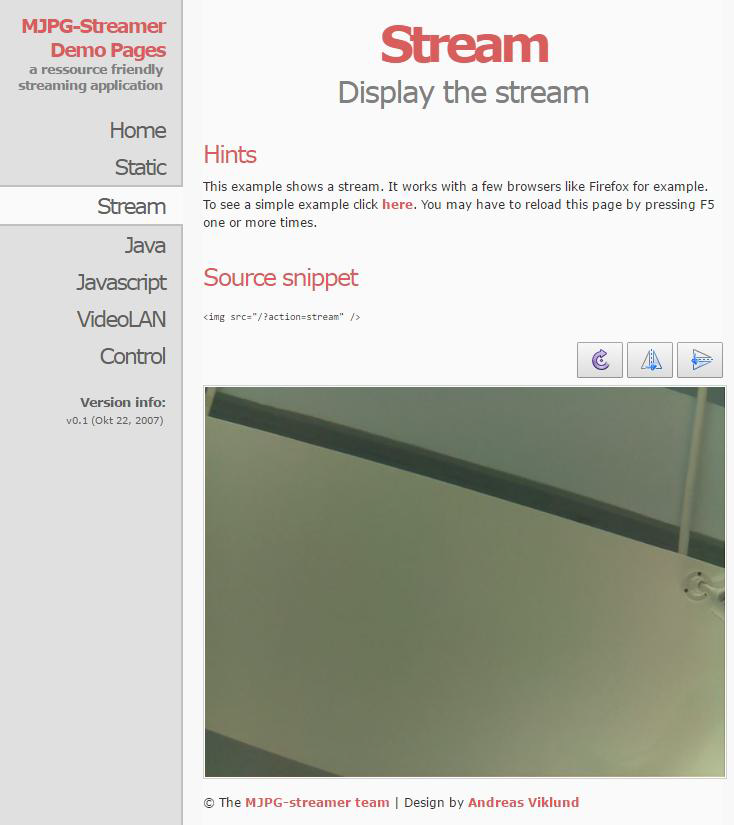
Then, open the browser, and enter the IP address of RPi and the port number: 8080 into the address bar. The website will show the information about the M-JPEG streamer. Click the option Stream, it will real-time display the image captured by the camera.
Under the terminal, pressing the keys Ctrl + C can end the program. However, we recommend you to keep the program running, since we still need it in the following operations.
Remote control by Bottle
Bottle is a micro python Web framework based on WSGI, simple but efficient. With Bottle, we can control Alphabot2 by Web.
- Install bottle
cd
sudo apt-get install python-bottle -y
- Test bottle
- Run commands below to test bottle
cd ~/AlphaBot2/Web-RGB/
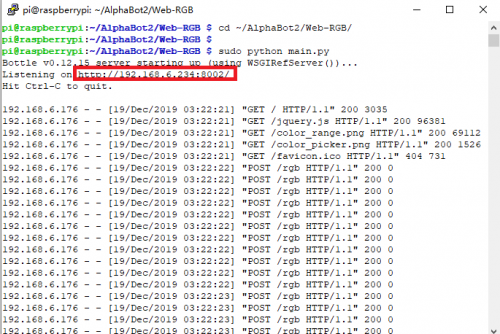
sudo python main.py
Open browser on your smartphone (unavailable in PC) and input IP address of Pi with subffix 8002. For example: 192.168.6.234:8002 (the address can be changeable according to your actual condition), then you can access the Web, just touch the color pad to control the LED's color.
- Control Alphabot2
Press Ctrl + C to stop the last program
Type commands below to run the web control program
cd ~/AlphaBot2/Web-Control/
sudo python main.py
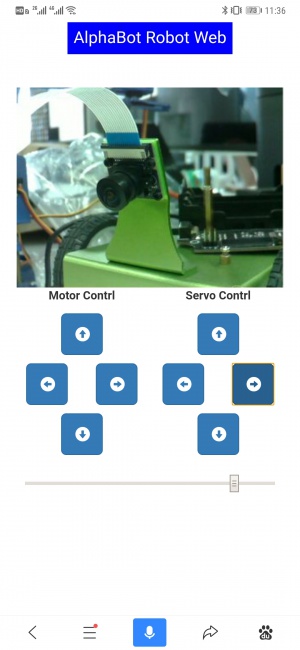
Open browser in your smartphone or PC (we recommend you to use Chrome browser), type IP address of Pi with subffix 8000. For example: 192.168.6.234:8000
Enter the control Web, then you can control motor and camera by virtual buttons.
You can set the program to be started up on boot. Open the file /etc/rc.local with your editor and add the following line into it.
sudo vi /etc/rc.local
Add the commands following the comments. Please make sure the line exit 0 is the last line. And then, save the modification and exit.
cd ~/AlphaBot2/mjpg-streamer/mjpg-streamer-experimental/
sudo ./start.sh &
cd ~/AlphaBot2/Web-Control
sudo python main.py &
Since the Raspberry Pi uses dynamic IP which may change each time the device restart, you can add the following lines under the directory of /etc/dhcpcd.comf to set the static IP:
interface wlan0
static ip_address = 192.168.6.234/24
static routers = 192.168.6.1
“192.168.6.1” is the router IP address, and “192.168.6.234” is the IP address to be set, following which the“/24” should not be removed.
Remote control via software
To implement video control the smart robot via the software on your mobile phone or PC, you should modify the IP address in the program firstly.
cd ~/AlphaBot2/App-Control
sudo python main.py
Open a new terminal to run the mjpg-streamer script.
Run the program AlphaBot.exe on your PC, and enter the IP address, the port numbers of mjpg-streamer (8080) and smart robot Soket sever (8000).
Click the button Viedeo Connet to connect to the video. When the connection is built up, the button will turn to green. Then, click the button Cmd Connect to connect to the smart robot sever. You will see the button turn to green, if the connection is successful. Now, you can control the action of the smart robot by pressing down the keys on the left, and control the camera and steer by the keys on the right.
Then, scan the QR code below with your mobile phone, and download the relative APP.
Enter the actual IP address of RPi, and click the button Connect. Then, you can see the images captured by the camera. Next, click the button Connect under the image. When the control port has been connected to the program, this button will change from green to blue. Now, you can control the actions of the smart robot and the steer by pressing down the corresponding keys. By dragging the slider, you can change the speed of the robot.
Open the file /etc/rc.local with your editor to add the following commands:
sudo nano /etc/rc.local
Add the commands following the comments. Please make sure the line exit 0 is the last line. And then, save the modification and exit.
cd /home/pi/AlphaBot/mjpg-streamer/mjpg-streamer-experimental/
sudo ./start.sh &
cd /home/pi/AlphaBot/App-Contrl
sudo python main.py &
You should connect the Raspberry Pi to the router at every restart. Of course, you can enable the AP function of the RPi wireless network adapter, taking the RPi as sever. For more information about the operation, please refer to the Raspberry Pi tutorial.
Remote control via RPi Bluetooth
1) Upgrade the relative packages of the Bluetooth, and install the depended-upon software.
sudo apt-get update
sudo apt-get upgrade -y
sudo apt-get dist-upgrade -y
sudo apt-get install pi-bluetooth bluez bluez-firmware blueman -y
2) Add the pi user to the Bluetooth group.
sudo usermod –G Bluetooth –a pi
3) Restart the Raspberry Pi.
sudo reboot
4) Start/Add the SPP, and turn on the Bluetooth device.
sudo nano /etc/systemd/system/dbus-org.bluez.service
Modify two lines in the following file:
After restarted the RPi, enter the command hciconfig (similar to the command ifconfig) to check the Bluetooth service.
If the Bluetooth has been working, you will see the device hci0 displayed on the screen. When the Bluetooth does not work, no Bluetooth device can be identified.
Note: If the line dtoverlay=pi3-miniuart-bt exists in the file /boot/config.txt, it should be commented out.
5) Connect to Bluetooth device Input the following command to enter the Bluetooth control interface (you can input the command help to check the command list after entered the interface).
sudo bluetoothctl
After entered the interface, input the following lines (you can input the command help to check the command list after entered the interface).
agent on
default-agent
Following the command scan on, you can see the physical address of the scanned Bluetooth device, similar to
- XX:XX:XX:XX:XX:XX.
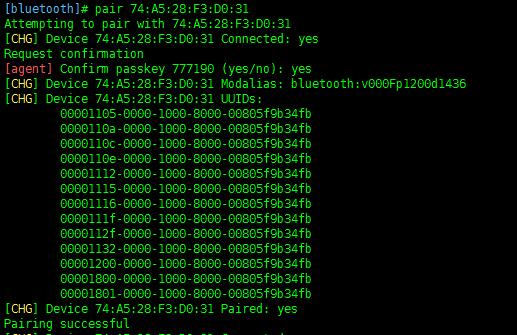
For Bluetooth pairing, use the following command (In here, XX:XX:XX:XX:XX:XX can be replaced to your device address. For Android mobile phone, you can check the Bluetooth address by Setting-> About phone-> Status information)
pair XX:XX:XX:XX:XX:XX
When pairing is successful, add the device to the trust list.
trust XX:XX:XX:XX:XX:XX
Next, connect to the device.
connect XX:XX:XX:XX:XX:XX
At last, enter the command quit to exit the interface. After the settings above, as the Bluetooth device is turned on, the Raspberry Pi will automatically connect to it.
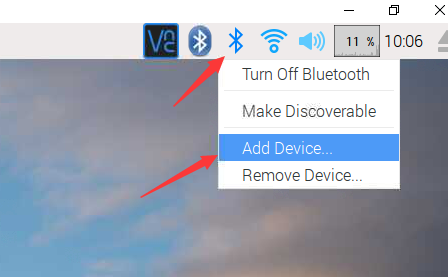
Note: If you are unable to build up the connection with the command line, you can enter the graphic interface to make the connection.
Click the Bluetooth icon and add new device.
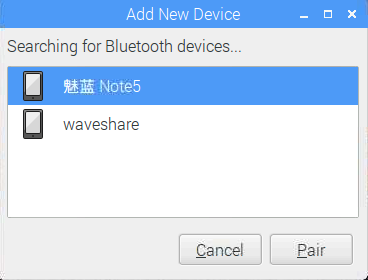
Select the corresponding Bluetooth device. Please make sure the Bluetooth on the mobile phone should be enable and set to discoverable.
On the RPi, select the option OK for pairing. And at the same time, on the mobile phone, click the option Pair.
Then, you may see the prompt saying that “Paired successfully, but this device has no services which can be used with Raspberry Pi.”
Click OK.
Now, the connection has been built up.
Run the following commands to start the program:
cd ~/AlphaBot2/Bluetooth-Control
sudo rfcomm watch hci0 1 python bluetooth.py
Then, scan the QR code below with your mobile phone, and download the relative APP. (This is the software for controlling the Dual-mode Bluetooth module. If you has installed this software in your Arduino mobile phone, you can skip this step)
Start the APP, and click the option Scan. (Note: please make sure the Bluetooth on your mobile phone is turned on) Normally, you can see the relative Bluetooth devices in the list. Then, select the option “raspberrypi”. Go to the next page, and select the option Remote control.
If the Bluetooth of the Raspberry PI can not be searched, you can run the following lines to enable the Bluetooth and set it to discoverable.
Resources
Documentation
| AlphaBot2-Base: | Schematic | ||
| AlphaBot2-Ar: | Schematic | Assembly diagram | |
| AlphaBot2-Pi: | Schematic | Assembly diagram | |
| AlphaBot2-PiZero: | Schematic | Assembly diagram | |
Demo
Software
- PuTTY for serial debugging
- SecureCRT for serial debugging
- Bluetooth Apps: iOS, Android
- Windows Qt client
- WiFi video console for Android
Related Product
Support
Technical Support
If you need technical support or have any feedback/review, please click the Submit Now button to submit a ticket, Our support team will check and reply to you within 1 to 2 working days. Please be patient as we make every effort to help you to resolve the issue.
Working Time: 9 AM - 6 AM GMT+8 (Monday to Friday)


