
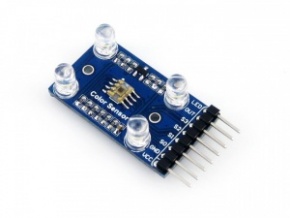
Color Sensor
| ||

Overview
- Sensor Chip: TCS3200 (RGB color detector)
- Detects static color, the output is a square wave with frequency directly proportional to incident light intensity.
- Supports fill-light by onboard LEDs.
Specifications
- Sensor Chip: TCS3200 (RGB)
- Power: 3.3V-5.5V
- Identification Type: Static
- Ideal detection distance: 10mm
- Dimension: 36.0mm * 20.6mm
- Mounting holes size: 2.0mm
Working principle
TCS3200D contains four types of filters: red filter, green filter, blue filter, and clear with no filter. When the sensor is illuminated by a ray of light, the types of filters (blue, green, red, or clear) used by the device can be selected by two logic inputs, S2 and S3. Table 2 illustrates the relationship among S2, S3, and filter types.
| S2 | S3 | Filter type |
|---|---|---|
| L | L | Red |
| L | H | Blue |
| H | L | Clear (no filter) |
| H | H | Green |
TCS3200D outputs a square wave (50% duty cycle) with a frequency corresponding to light intensity and color, and the frequency is directly proportional to light intensity. The typical output frequency of TCS3200D is in a range of 2Hz to 500KHz. Users can control frequency values of 100%, 20%, and 2% by two programmable outputs, S0 and S1, as Table 3 shown.
| S0 | S1 | Output Frequency Scaling |
|---|---|---|
| L | L | Power down |
| L | H | 2% |
| H | L | 20% |
| H | H | 100% |
TCS3200D has different sensitivities to red, green, and blue. As a result, the RGB output of pure white is not always 255. Therefore, a white balance adjustment is required after power-up within 2 seconds. Here are the processes.
- Place a white paper at the top of the sensor at a distance of 1cm, and input a High-level voltage to the LED port to light up 4 bright white LED indicators.
- The program selects R, G, and B filters respectively, and measures the corresponding RGB values of red, green, and blue.
- Calculate 3 adjustment parameters corresponding to red, green, and blue respectively, and perform automatic white balance adjustment.
Applications
This module can be applied to color sorting, environmental light induction and calibration, test strip reading, color matching tests, etc.
Pinouts
In the case of working with an MCU:
- VCC ↔ 2.7V ~ 5.5V
- GND ↔ power supply ground
- LED ↔ MCU.IO (controlling the 4 white LEDs)
- OUT ↔ MCU.IO (RGB color output frequency)
- S0/S1 ↔ MCU.IO (Output frequency scaling selection inputs)
- S2/S3 ↔ MCU.IO (Photodiode type selection inputs)
S0/S1 selects the output frequency scaling factor, S2/S3 selects the color filter of red, green, and blue, then OUT outputs a square wave with a frequency proportional to the selected color intensity. The detected color can be determined by the ratio of the intensity of red, green, and blue.
Note:
- Avoids environmental light noise.
- White balance is required when the first time using the module, resetting the module, or changing the light source.
Pico Guide
If you are the first time o use the Pico, you need to first learn how to get started at the Pico before you run other examples.
The Pico supports C and the Micropython which requires different firmware.
In most of the examples archives (Demo codes), we provide a Micropython firmware (uf2 file), we recommend you to use the provided firmware to test the board. Because the codes may run abnormally with different firmware.
If the board is tested to be workable, you can also download the newest firmware from Raspberry Pi and do further programming.
- If you want to use C codes, please refer to the C/C++ Guides
- If you want to use Micropython codes, please refer to the Micropython Guides.
- The link of the newest Micropython firmware of Pico
- Official Guides of Raspberry Pi Pico
Hardware Connection
| Sensor | Pico | Description |
|---|---|---|
| VCC | 3.3V | Power input |
| GMD | GND | Power ground |
| S0 | GP18 | Combined with S1, select output frequency scaling |
| S1 | GP19 | Combined with S2, select output frequency scaling |
| S2 | GP20 | Combined with S3, select output frequency scaling |
| S3 | GP21 | Combined with S2, select output frequency scaling |
| OUT | GP17 | Read the output frequency of RGB |
| LED | GP16 | Control the states of 4 LED indicators |

Download examples
Use the Raspberry Pi as the host device. Open a terminal and run the following commands to download the example.
sudo apt-get install p7zip-full
cd ~
sudo wget  https://files.waveshare.com/upload/3/33/Color-Sensor-code.7z
7z x Color-Sensor-code.7z -o./Color-Sensor-code
cd ~/Color-Sensor-code
cd Pico/c/build/
Examples
C codes
- Go into the c directory:
cd ~/Color-Sensor-code/Pico/c/build
- Add the path of the SDK:
export PICO_SDK_PATH=../../pico-sdk
- Note that if the path of your SDK is different, you need to modify the command and use the correct path to export.
- Generate Makefile and build.
cmake ..
make -j9
- After building, a uf2 file is generated.
- Press and hold the button of Pico, connect it to Raspberry Pi then release the button.
- Copy/Drag the uf2 file to the portable disk (RPI-RP2) recognized.
cp main.uf2 /media/pi/RPI-RP2/
Python
Use in Windows
- 1. Press and hold the BOOTSET button on the Pico board, connect the Pico to the USB port of the computer through the Micro USB cable, and release the button after the computer recognizes a removable hard disk (RPI-RP2).
- 2. Copy the rp2-pico-20210418-v1.15.uf2 file in the Python directory to the recognized removable disk (RPI-RP2).
- 3. Open Thonny IDE (note: use the latest version of Thonny, otherwise there is no Pico support package, the latest version under Windows is v3.3.3).
- 4. Click Tools -> Settings -> Interpreter, and select Pico and the corresponding port as shown in the figure.

- File -> Open -> Color Sensor.py, click to run, as shown below:

Micropython codes
- Flash the Micropython firmware first.
- Open the Thonny IDE (Menu -> Programming -> Thonny Python IDE).
- 【Optional】If the Thonny IDE in the Raspberry Pi is not the new version that supports Pico, please upgrade it first.
sudo apt upgrade thonny
- Configure Interpreter, choose Tools -> Options... -> Interpreter, choose MicroPython (Raspberry Pi Pico) and the ttyACM0 port.

- Click File -> Open.. and browser the micropython codes (Color Sensor.py) to run the codes.
Expected result
- Place the white paper 1cm above the four bright white LEDs of the sensor.
- Power up the development board. At this time, the LED port is set to a high level, and the four bright white LEDs light up.
- Wait for more than 2 seconds after power-on (the white balance is being adjusted at this time).
- After the adjustment, the sensor is facing the object to be measured, and the serial port outputs the corresponding RGB data.
Notices
- Light interference from outside should be avoided, which may affect the result of color identification. It is recommended to place the light source and Color Sensor in a close, light reflection-free box for testing.
- White balance adjustment is required whenever the Color Sensor module is reset or the light source is changed.
The STM32 examples are based on the STM32F103RBT6 and the STM32H743. The connection provided below is based on the STM32F103RB. If you need to use other STM32 boards, you may need to change the hardware connection and port the code yourself.
How to Use in STM32
Hardware connection
| Sensor | STM32 | Description |
|---|---|---|
| VCC | 3.3V | Power input |
| GMD | GND | Power ground |
| S0 | NC | Combined with S1, select output frequency scaling |
| S1 | NC | Combined with S2, select output frequency scaling |
| S2 | GPIOA.5 | Combined with S3, select output frequency scaling |
| S3 | GPIOA.4 | Combined with S2, select output frequency scaling |
| OUT | GPIOA.0 | Read the output frequency of RGB |
| LED | 3.3V | Control the states of 4 LED indicators |
Note: The STM32H743 requires S2 to be connected to GPIOA.3.

Examples
The examples are developed based on the HAL libraries. Download the Demo codes archive to your PC. Unzip and find the STM32 project from Color-Sensor-code\STM32\STM32F103RB\MDK-ARM.
- Open the Color Sensor.uvprojx file by Keil.
- Build and the project.
- Program the project to your STM32 board.
- Connect the UART1 of your STM32 board to the PC and check the serial data with SSCOM software.

Operation and Result
1. Place the white paper 1CM above the four bright white LED side of the sensor (hereinafter referred to as the front).
2. Power on the development board. At this time, the LED port is connected to a high level, and the four high-bright white LEDs are on.
3. Wait for more than 2 seconds after power on (white balance is being adjusted at this time).
4. After the adjustment, please put the sensor facing the object to be measured, and the serial port outputs the corresponding RGB data.
Refer to the color comparison table to know the detected color.
Precautions
1. Avoid the interference of external light during color recognition, otherwise it will affect the result of color recognition.
Place the Color Sensor and light source etc. in a closed, non-reflective box for testing.
2. White balance adjustment is required every time the Color Sensor module is restarted or the light source is replaced.
Code Analysis
The processing function is in the main.c file, below the main function.
void HAL_TIM_PeriodElapsedCallback(TIM_HandleTypeDef *htim) //Interrupt callback
The Arduino example is written for the Arduino UNO. If you want to connect it to other Arduino boards, you may need to change the connection.
Working with Arduino
Hardware connection
| Sensor | Arduino | Description |
|---|---|---|
| VCC | 5V | Power input |
| GMD | GND | Power ground |
| S0 | D6 | Combined with S1, select output frequency scaling |
| S1 | D5 | Combined with S2, select output frequency scaling |
| S2 | D4 | Combined with S3, select output frequency scaling |
| S3 | D3 | Combined with S2, select output frequency scaling |
| OUT | D2 | Read the output frequency of RGB |
| LED | GP16 | Control the states of 4 LED indicators |

Examples
- Download the demo codes to your PC and unzip.
- Install the Arduino IDE on your PC.
- Go into Color-Sensor-code/Arduino/Color_Sensor.
- Run the Color_Senosr.ino file.
- Select the correct Board and the Port.

- Build the project and upload it to the board.
- Open the serial monitor of the Arduino IDE or the SSCOM software and check the serial data.

Operation and Result
1. Place the white paper 1CM above the four bright white LED side of the sensor (hereinafter referred to as the front).
2. Power on the development board. At this time, the LED port is connected to a high level, and the four high-bright white LEDs are on.
3. Wait for more than 2 seconds after power on (white balance is being adjusted at this time).
4. After the adjustment, please put the sensor facing the object to be measured, and the serial port outputs the corresponding RGB data.
Refer to the color comparison table to know the detected color.
Precautions
1. Avoid the interference of external light during color recognition, otherwise it will affect the result of color recognition.
Place the Color Sensor and light source etc. in a closed, non-reflective box for testing.
2. White balance adjustment is required every time the Color Sensor module is restarted or the light source is replaced.
Resources
FAQ
{{{5}}}
|


{{{5}}}
Support
Technical Support
If you need technical support or have any feedback/review, please click the Submit Now button to submit a ticket, Our support team will check and reply to you within 1 to 2 working days. Please be patient as we make every effort to help you to resolve the issue.
Working Time: 9 AM - 6 AM GMT+8 (Monday to Friday)